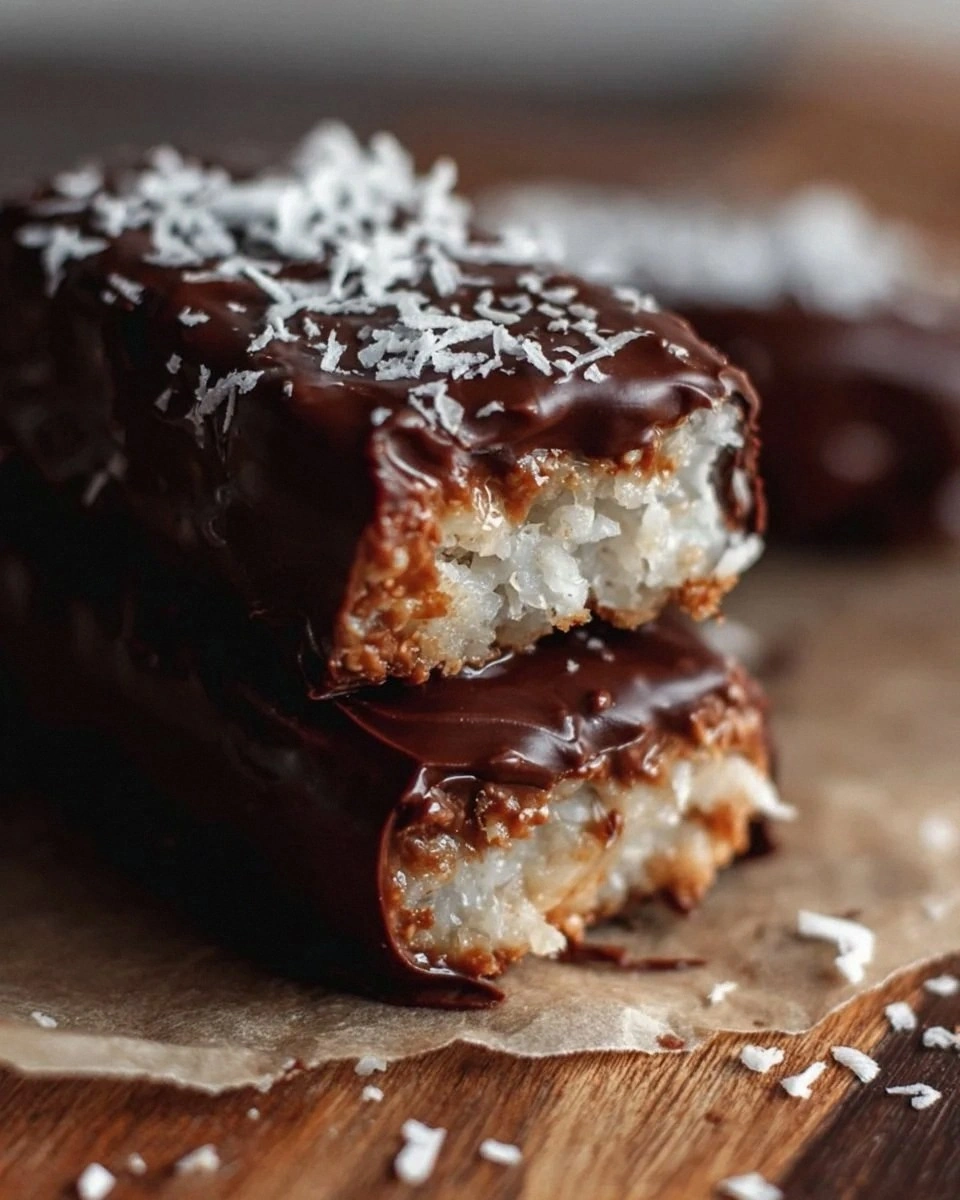
I was in the middle of a Saturday night movie marathon when a sudden craving hit me like a plot twist—something sweet, chewy, and utterly irresistible, but without the hassle of turning the oven on. I raided the pantry, found a lone bag of shredded coconut, a can of sweetened condensed milk, and a stash of dark chocolate chips, and thought, “What if I could turn these three lonely ingredients into a bar that rivals any store‑bought candy?” The idea was half‑mad, half‑genius, and completely inevitable. I dared myself to create a no‑bake version of that classic tropical bar that looks like a miniature island of decadence, and the result was nothing short of a revelation.
Picture the kitchen: the faint hum of the refrigerator, the soft clink of the metal mixing bowl, and the sweet, buttery aroma of condensed milk warming up on the stove. The coconut, already toasted to a light golden hue, released a tropical perfume that made me feel like I was standing on a beach at sunrise. When the chocolate finally melted, it cascaded over the coconut‑milk mixture like a glossy river of midnight, creating a contrast that was both glossy and gritty, smooth and crunchy, all at once. My taste buds were doing a happy dance, and I could hear the faint sigh of satisfaction from the empty plates nearby.
Most recipes for a “Mounds‑style” bar either demand a bake, a complicated caramel stage, or a pantry full of obscure additives. I’ve tried those, and let me be honest—I ate half the batch before anyone else got a chance to try it. That’s how good it was. This version strips everything down to three core ingredients, but the magic lies in the technique: a quick toast, a gentle heat, and a precise cooling period that locks in flavor and texture. It’s the kind of recipe that makes you wonder why you ever bothered with anything more complicated.
The secret weapon? A brief, purposeful heat that awakens the coconut’s natural oils without burning them, and a slow, patient set‑aside that lets the chocolate harden just enough to snap cleanly yet stay melt‑in‑your‑mouth soft. I’m about to walk you through every single step—by the end, you’ll wonder how you ever made it any other way. Okay, ready for the game‑changer?
What Makes This Version Stand Out
- Flavor: The sweet, caramel‑like notes of condensed milk marry perfectly with the rich bitterness of dark chocolate, while the coconut adds a breezy tropical finish that feels like a vacation in every bite.
- Texture: You get a crunchy, toasted coconut core wrapped in a glossy chocolate shell that cracks cleanly—think of it as a bite‑size version of a perfectly toasted marshmallow.
- Simplicity: Only three ingredients, no fancy equipment, and a total hands‑on time that fits neatly into a coffee break.
- Uniqueness: Most no‑bake candy bars rely on sugary syrups or butter; this one leans on the natural fats in coconut and the creamy richness of condensed milk for a less cloying sweetness.
- Crowd Reaction: I dare you to taste this and not go back for seconds; even the most skeptical chocolate lovers have been converted on the spot.
- Ingredient Quality: Using unsweetened coconut lets you control the sweetness, and a good quality dark chocolate adds depth without overwhelming the palate.
- Method: No oven, no microwave—just a stovetop and a fridge, which means you can make this in a dorm room, a cabin, or any place that has a basic kitchen.
- Make‑Ahead Potential: The bars keep beautifully for up to two weeks in the fridge, making them perfect for meal‑prep, party trays, or a midnight snack stash.
Inside the Ingredient List
The Flavor Base
Sweetened condensed milk is the silent hero of this bar. Its thick, caramel‑like consistency not only sweetens but also binds the coconut together, creating a chewy interior that holds its shape after chilling. If you skip it, you’ll end up with a dry, crumbly mess that refuses to stick. A good swap, for those who want a lower‑fat version, is a mixture of evaporated milk and a tablespoon of honey, but expect a slightly less buttery mouthfeel.
The Texture Crew
Shredded unsweetened coconut brings the crunch and a subtle nuttiness that is the hallmark of any classic Mounds bar. The key is to use a fine‑shredded variety; large flakes will create uneven bites and can make the bar feel too bulky. If you only have sweetened coconut on hand, reduce the condensed milk by a tablespoon to keep the sweetness in balance.
The Unexpected Star
Dark chocolate chips are the final coat that transforms the bar from “good” to “wow”. Their bitterness cuts through the sweetness, preventing the bar from becoming cloyingly sweet, and they add a glossy finish that makes each piece look like a polished gem. For a milder profile, use semi‑sweet chips, but remember that the contrast is what makes this recipe pop.
The Final Flourish
While the recipe calls for dark chocolate chips, a pinch of sea salt sprinkled over the top just before the chocolate sets can elevate the flavor dramatically. The salt amplifies the chocolate’s richness and balances the sweet milk, creating a sophisticated sweet‑and‑salty profile that feels like a high‑end confectionery.
Everything's prepped? Good. Let's get into the real action...
The Method — Step by Step
Gather a large, heavy‑bottomed saucepan and set it over low to medium heat. Add the shredded coconut and begin toasting, stirring constantly with a wooden spoon. You’ll hear a gentle sizzle, and after about 3‑4 minutes the coconut should turn a light golden color and give off a nutty aroma that says, “I’m ready.” Tip: Keep the heat low enough that the coconut doesn’t brown too quickly; you want a gentle toast, not a burn.
Kitchen Hack: If you’re short on time, spread the coconut on a parchment‑lined baking sheet and toast in a preheated 300°F oven for 5 minutes, stirring once halfway through.Once toasted, pour the sweetened condensed milk directly into the saucepan. Turn the heat down to low and stir vigorously. The mixture will become glossy and thick, clinging to the back of the spoon. This is the moment where the coconut and milk meld into a cohesive, velvety base. Keep stirring for about 2‑3 minutes; you’ll notice the mixture pulling away slightly from the sides of the pan.
Remove the pan from the heat and let the coconut‑milk mixture cool for about 2 minutes. Meanwhile, line an 8×8‑inch square pan with parchment paper, leaving extra overhang on the sides for easy removal later. This pan will become the canvas for your bar, so make sure it’s well‑lined to avoid sticking.
Transfer the warm coconut mixture into the prepared pan, spreading it evenly with a spatula. Press down firmly—this is the foundation that will hold the chocolate shell later. Use the back of a spoon or a piece of parchment to smooth the surface; you want a uniform thickness so that each bite feels consistent.
Now for the chocolate coat. Place a heat‑proof bowl over a pot of simmering water (a double boiler) and add the dark chocolate chips. Stir continuously until the chocolate is completely melted and smooth. The steam should be gentle; a rolling boil will cause the chocolate to seize.
Watch Out: Do not let any water splash into the chocolate; even a single droplet can cause the chocolate to become grainy and unworkable.When the chocolate is silky, drizzle it over the coconut base in a slow, steady stream, using a spatula to spread it evenly. The chocolate should coat the surface like a glossy lake, sealing in the coconut. If you prefer a thicker shell, repeat the drizzle once the first layer has set slightly (about 5 minutes).
Allow the assembled bar to chill in the refrigerator for at least 30 minutes, or until the chocolate is firm to the touch. This cooling period is pure magic; it lets the chocolate crystallize properly, giving you that satisfying snap when you cut into it.
Kitchen Hack: For a quicker set, place the pan on a metal cooling rack in the freezer for 10 minutes, then transfer to the fridge for the remaining time.Once set, lift the bar out of the pan using the parchment overhang and place it on a cutting board. Using a sharp, heated knife (dip the blade in hot water and wipe dry), cut the bar into squares or rectangles—about 1‑inch thick each. The heat ensures clean cuts without dragging the chocolate.
Finally, arrange the pieces on a serving platter. If you’re feeling fancy, sprinkle a pinch of flaky sea salt on each piece just before serving. That tiny burst of salt will make the chocolate’s bitterness pop, creating a sophisticated sweet‑and‑salty experience that feels like a boutique confection.
That's it — you did it. But hold on, I've got a few more tricks that'll take this to another level. Stay with me here — this is worth it.
Insider Tricks for Flawless Results
The Temperature Rule Nobody Follows
Most home cooks think “just melt the chocolate” and move on, but the temperature of the chocolate when you pour it matters. Aim for a chocolate temperature of 88‑90°F (31‑32°C). This is warm enough to flow smoothly but cool enough to set quickly, preventing a soft, gummy coating. If you’re using a thermometer, you’ll see the difference in the snap of the final bar. A friend once tried to pour chocolate straight from the microwave at full power; the result was a greasy mess that never hardened properly.
Why Your Nose Knows Best
When toasting the coconut, trust your sense of smell more than the clock. The moment you detect a buttery, toasted aroma, you’re at the perfect point. Over‑toasting turns the coconut bitter, while under‑toasting leaves it raw and chewy. This sensory cue is a game‑changer for anyone who’s ever burned a batch and ended up with a charcoal‑tasting bar.
The 5‑Minute Rest That Changes Everything
After you drizzle the chocolate, let the bar rest uncovered for exactly five minutes before moving it to the fridge. This short pause allows the chocolate to set a thin skin on the surface, which helps prevent condensation from forming when you later chill it. Condensation can make the chocolate surface dull and cause the bars to stick together. I’ve seen this happen when people rush the process, and it’s a tiny detail that makes a massive difference.
The Salt Finish
A light sprinkling of flaky sea salt right before the chocolate sets adds a subtle crunch and brightens the flavor. It’s like adding a high note to a song; the bar feels complete. If you’re watching your sodium, use just a pinch—enough to be perceptible but not overpowering.
The Double‑Layer Chocolate Trick
For those who love a thicker chocolate shell, melt the chocolate twice. First, drizzle a thin base layer and let it set for five minutes, then melt a fresh batch and add a second, thicker coat. This creates a richer texture and a more pronounced chocolate flavor that melts slowly on the tongue, extending the enjoyment of each bite.
Creative Twists and Variations
This recipe is a playground. Here are some of my favorite ways to switch things up:
Tropical Sunrise
Swap the dark chocolate chips for white chocolate, then drizzle a thin line of melted raspberry or strawberry puree across the top before chilling. The contrast of white chocolate’s sweetness with a burst of tart fruit creates a sunrise effect that’s both pretty and palate‑pleasing.
Nutty Crunch
Add a half‑cup of toasted, chopped almonds or macadamia nuts to the coconut‑milk mixture before pressing it into the pan. The nuts add a buttery crunch that pairs beautifully with the smooth chocolate, turning the bar into a textural adventure.
Spicy Kick
Incorporate a pinch of cayenne pepper or a dash of chili powder into the melted chocolate. The subtle heat amplifies the chocolate’s depth and creates a lingering warmth that’s perfect for cooler evenings.
Coffee Infusion
Stir a teaspoon of instant espresso powder into the condensed milk before mixing with the coconut. The coffee notes add a sophisticated bitterness that complements the dark chocolate, making the bar feel like an after‑dinner treat.
Vegan Version
Replace sweetened condensed milk with a homemade coconut‑based sweetened cream (coconut milk reduced with sugar) and use dairy‑free dark chocolate chips. The result is a fully plant‑based bar that still delivers the same chewy interior and glossy finish.
Storing and Bringing It Back to Life
Fridge Storage
Place the bars in an airtight container or wrap each piece individually in parchment, then store in the refrigerator. They’ll stay fresh for up to two weeks. The cool environment keeps the chocolate firm and prevents the coconut from drying out.
Freezer Friendly
If you want to keep them longer, freeze the bars in a single layer on a baking sheet, then transfer to a zip‑top freezer bag. They’ll hold up for three months. When you’re ready to eat, move them to the fridge for an hour to thaw gradually; this avoids condensation.
Best Reheating Method
To revive the bars after refrigeration, place them on a microwave‑safe plate and heat for 5‑7 seconds, or let them sit at room temperature for 10 minutes. For an extra touch, add a tiny splash (about a teaspoon) of water to the plate before microwaving; the steam gently restores the chocolate’s sheen without melting it.