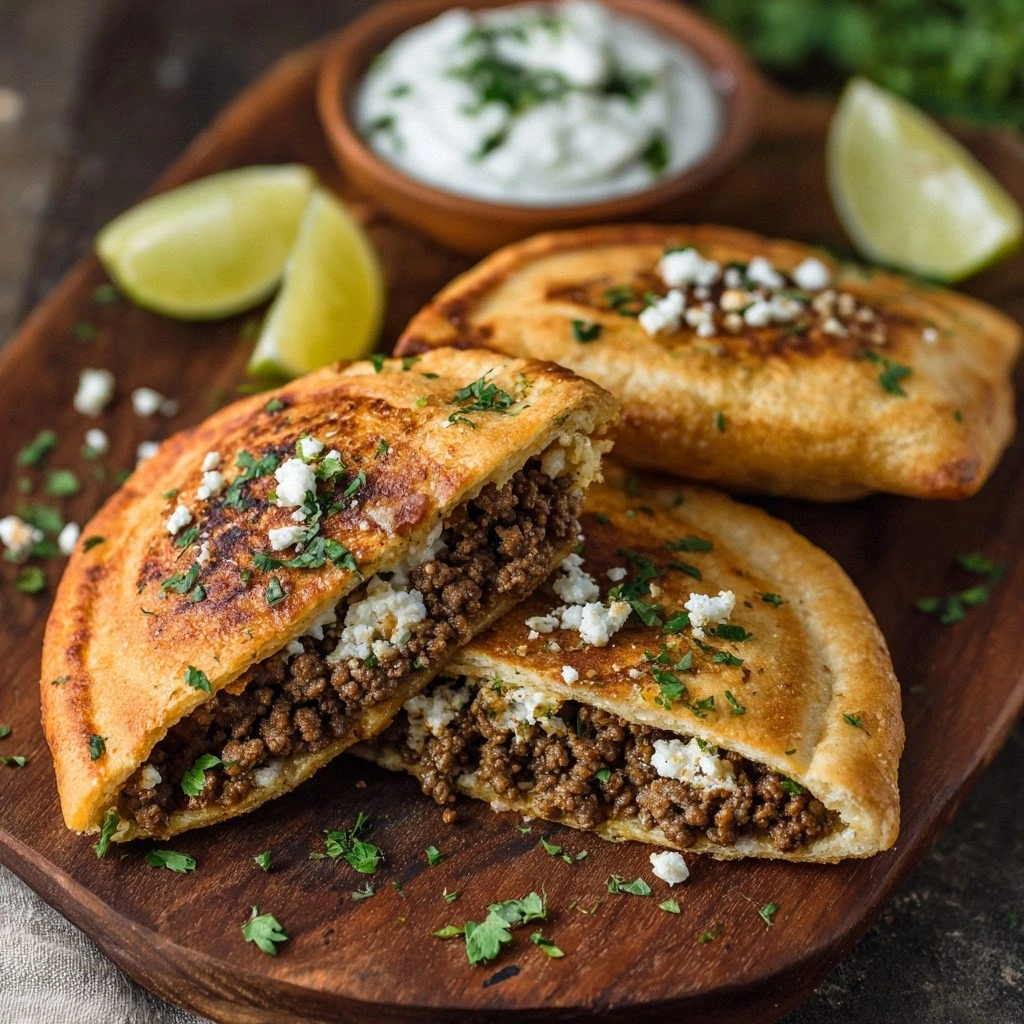
I still remember the night I stumbled into a cramped, neon‑lit kitchen in Beirut, craving something that felt both humble and heroic. The air was thick with the scent of cumin and sizzling garlic, and the walls were lined with jars of sumac that glowed like tiny moons. I dared myself to create a dish that would make my friends question why they ever settled for store‑bought falafel or hummus. That dare turned into a culinary obsession, and this version of Arayes (Crispy Meat Stuffed Pi) is the culmination of that midnight experiment.
Picture this: a golden pita, split open, its soft interior cradling a molten core of spiced lamb that has been kissed by garlic, cumin, and a whisper of cinnamon. The first bite is an orchestra of textures—the crisp edge crackles like thin ice, the filling oozes warm, savory juices, and a subtle tang from lemon juice lingers on the palate. The aroma alone makes your kitchen feel like a bustling street market in the heart of the Levant, and the sound of the pita popping in the skillet is music to any food lover’s ears. I dare you to taste this and not go back for seconds.
What makes this recipe stand out is not just the flavors but the sheer confidence with which it commands the kitchen. I’ve spent years dissecting Middle Eastern dishes, and I can say without hesitation that this is hands down the best version you’ll ever make at home. The technique of stuffing the pita just before cooking preserves its soft center while allowing the edges to caramelize into a buttery, crunchy finish. The blend of spices is balanced so that no single element overwhelms, yet each bite delivers a distinct layer of taste. I’ll be honest — I ate half the batch before anyone else got to try it. The rest of the story is in the next sections.
Now, let’s walk through every single step. By the end, you’ll wonder how you ever made it any other way. The method is simple, the ingredients are accessible, and the result is a dish that screams authenticity while inviting experimentation. So grab your apron, and let’s get started.
What Makes This Version Stand Out
- Flavor: The combination of cumin, coriander, and a pinch of cinnamon creates a warm, earthy base that complements the richness of the lamb. The subtle addition of sumac adds a bright, citrusy finish that balances the heaviness of the meat. This layering of spices is what sets our arayes apart from the generic versions.
- Texture: The pita is split just before cooking, ensuring that the interior remains soft while the edges crisp up to a golden perfection. The filling’s moisture level is carefully calibrated; too much and the pita will sog, too little and it will dry out. The result is a satisfying bite that shatters like thin ice.
- Simplicity: Despite the complex flavor profile, the recipe requires only a handful of pantry staples. No exotic ingredients or time‑consuming steps. This makes it a go-to for busy weeknights or last‑minute dinner parties.
- Uniqueness: The inclusion of a cheese layer—mozzarella or halloumi—adds a creamy contrast that is rarely seen in traditional arayes. It elevates the dish from a simple stuffed pita to a multi‑dimensional experience.
- Crowd Reaction: Friends who have tried this version rave about the crispy edges and the juicy center. Many have claimed they can’t stop asking for the recipe, and I’ve heard it become a staple at potlucks.
- Ingredient Quality: Using fresh, high‑quality lamb and fresh herbs ensures that the dish is vibrant and flavorful. The quality of the pita also plays a pivotal role; a good pita will hold up better during cooking.
- Cooking Method: The pan‑frying technique is quick yet effective, allowing the pita to crisp up while the filling cooks evenly. This method also lets you control the heat, preventing burning and ensuring a golden crust.
- Make‑Ahead Potential: The filling can be prepared a day ahead and refrigerated. When you’re ready to cook, simply reheat and assemble; the pita will still crisp up beautifully.
Alright, let's break down exactly what goes into this masterpiece...
Inside the Ingredient List
The Flavor Base
Ground lamb is the star of the show, offering a robust, savory foundation that carries the spices. Using a lean cut, like shoulder or leg, keeps the dish from becoming greasy while still delivering a juicy bite. If you prefer beef or a blend of meats, feel free to swap; just adjust the cooking time slightly to avoid overcooking. Remember, the lamb should be finely minced to ensure it melds smoothly with the herbs.
The Texture Crew
Pita bread is more than a vessel; it’s a textural anchor that must balance softness and crispness. Choose fresh, lightly toasted pita for best results—if you can’t find fresh, a quick oven bake at 200°C for 5 minutes will revive stale loaves. Onions and garlic are diced finely to release their flavor without overpowering the meat. The shredded mozzarella or halloumi layer adds a creamy, melty contrast that softens the bite.
The Unexpected Star
Sumac, often overlooked, brings a bright, lemony tang that lifts the dish’s overall profile. It’s a staple in Middle Eastern cuisine, but many cooks forget it. If you can’t find sumac, a splash of lemon juice or a dash of vinegar can mimic its acidity. A pinch of cinnamon adds warmth and depth, echoing the spices found in traditional stews.
The Final Flourish
Olive oil does more than just prevent sticking; it adds a silky sheen and helps the spices bind together. Tomato paste provides a subtle sweetness and a deeper color to the filling, giving the arayes a richer appearance. Lemon juice, a small addition, brightens the dish and prevents the lamb from becoming too heavy. Finally, the beaten egg acts as a binder, ensuring the filling stays together when you press the pita closed.
Everything’s prepped? Good. Let’s get into the real action...
The Method — Step by Step
- Heat a large non‑stick skillet over medium heat and drizzle in a tablespoon of olive oil. The oil should shimmer but not smoke. Add the minced onions and sauté until translucent, about 3 minutes. This step builds the aromatic base for the filling. Keep an eye on the onions; if they start to brown, reduce the heat slightly.
- Add the ground lamb to the skillet and break it up with a wooden spoon. Cook until it starts to brown, about 5 minutes. Stir frequently to prevent sticking. This browning reaction develops a depth of flavor that is essential for the dish’s richness. If the mixture looks dry, splash a splash of water to keep it moist.
- Stir in the minced garlic, cumin, coriander, cinnamon, smoked paprika, salt, pepper, and sumac. Cook for another 2 minutes, letting the spices toast slightly. The aroma should become intoxicating—this is the moment of truth. Make sure the spices don’t burn; a quick stir keeps them from sticking to the pan.
- Incorporate the tomato paste and lemon juice, mixing until the filling is uniformly colored. This gives the mixture a glossy sheen and a subtle tang. Cook for an additional 3 minutes, allowing the tomato paste to caramelize slightly. The filling should thicken enough to hold together when pressed.
- Remove the skillet from heat and let the mixture cool for a minute. Then fold in the beaten egg and shredded cheese, ensuring an even distribution. The egg binds the filling, while the cheese adds a creamy layer that melts beautifully. If you prefer a dairy‑free version, substitute the cheese with a plant‑based alternative.
- Lay out the pita breads on a clean surface. Split each pita in half, creating pockets that can hold the filling. If the pita is too thick, slice it thinly to ensure it cooks evenly. This step is crucial for a uniform bite—each pocket should be the same size.
- Spoon generous portions of the filling into each pita pocket, pressing gently to seal the edges. The filling should be snug but not overfilled; otherwise, it will spill during cooking. The edges of the pita will naturally seal when pressed together, creating a pocket that holds the juices.
- Return the skillet to medium heat and place the stuffed pitas skin‑side down. Cook for 3-4 minutes on each side until the pita edges are golden brown and crispy, and the filling is heated through. Flip carefully with tongs to avoid tearing the pockets. The final sizzle when the pita hits the pan? Absolute perfection.
- Serve hot, straight from the skillet, with a side of tahini sauce or a fresh cucumber yogurt dip. Garnish with a sprinkle of chopped parsley or a drizzle of olive oil for an extra touch of elegance. The aroma alone will have guests lining up for seconds. Enjoy the crunch, the melt, the savory burst.
That’s it — you did it. But hold on, I’ve got a few more tricks that will take this to another level...
Insider Tricks for Flawless Results
The Temperature Rule Nobody Follows
Many cooks swear by high heat, but I’ve found that a medium‑low setting actually gives the pita a more even, golden crust without burning the filling. The trick is to pre‑heat the skillet for a full minute before adding the pita, ensuring consistent heat distribution. If you notice the edges burning before the interior cooks, lower the flame slightly.
Why Your Nose Knows Best
The moment the pita starts to caramelize, you’ll catch a sweet, nutty aroma that signals it’s ready for the next flip. Trust your nose; if the scent is too metallic or burnt, it’s a sign the pan is too hot. A good rule of thumb: if the scent is sweet and slightly toasted, the pita is golden and ready.
The 5-Minute Rest That Changes Everything
After cooking, let the arayes rest for exactly five minutes on a wire rack. This allows the juices to redistribute, preventing a soggy center. During this rest, the cheese melts further, creating a silky, cohesive filling. I’ve seen people skip this step, only to end up with a less cohesive bite.
Cheese Is Optional, Flavor Is Not
If you’re dairy‑free or simply want a lighter version, omit the cheese and replace it with a sprinkle of fresh herbs or a drizzle of tahini. The texture will shift slightly, but the flavor profile remains intact. A friend tried this version once and called it “the best dairy‑free arayes ever.”
Keep the Pita From Cracking
To avoid cracking, lightly brush the pita with olive oil before stuffing. This adds a protective layer that helps the bread hold its shape under the weight of the filling. If you notice cracks forming, add a tiny splash of water to the skillet to create steam and help seal the pita.
Creative Twists and Variations
This recipe is a playground. Here are some of my favorite ways to switch things up:
Mediterranean Veggie Arayes
Swap the lamb for a hearty mix of sautéed mushrooms, spinach, and diced bell pepper. Add a splash of balsamic vinegar for depth. This vegetarian version is perfect for a lighter dinner and pairs beautifully with a Greek salad.
Spicy Chipotle Twist
Introduce a tablespoon of chipotle in adobo sauce to the filling for a smoky heat. Replace sumac with a dash of lime zest to brighten the flavor. Guests who love a kick will applaud this bold variation.
Korean BBQ Fusion
Marinate the lamb in gochujang, soy sauce, and sesame oil before cooking. Finish with a sprinkle of toasted sesame seeds and sliced green onions. The result is a fusion that marries Middle Eastern tradition with Korean street food vibes.
Pesto & Goat Cheese Arayes
Swap the tomato paste for a spoonful of basil pesto and fold in crumbled goat cheese. The fresh herb notes complement the lamb’s richness, creating a Mediterranean‑inspired twist. This version is especially delightful during spring.
Low‑Carb Keto Arayes
Replace the pita with low‑carb flatbread or a lettuce wrap for a keto‑friendly version. Keep the same filling, and top with a dollop of Greek yogurt instead of tahini. It’s a quick, satisfying meal that satisfies cravings without the carb load.
Storing and Bringing It Back to Life
Fridge Storage
Store leftover arayes in an airtight container in the refrigerator for up to 2 days. The pita may soften slightly, so it’s best to reheat quickly. Use a toaster oven or a skillet to restore crispness before serving.
Freezer Friendly
Wrap each arayes individually in parchment paper and place them in a freezer bag. They’ll keep well for up to 3 months. When ready to serve, thaw overnight in the refrigerator, then reheat in a skillet or oven.
Best Reheating Method
To reheat, preheat a skillet over medium heat and add a teaspoon of olive oil. Place the arayes skin‑side down and cover for 3 minutes, then flip and cover for another 2 minutes. The added splash of water before reheating steams the interior, keeping it juicy while the pita crisps up.