Picture this: it’s a Friday night, the air is heavy with the scent of take‑out, and your kitchen is a battlefield of burnt toast and half‑frozen pizza. I had just pulled a chicken breast from the fridge, half‑cooked it in a pan, and the whole room smelled like a failed experiment. I was ready to give up on dinner until a friend dared me to turn that lone chicken into a Hawaiian‑style masterpiece. The challenge was simple: take a humble piece of poultry, coat it in a sweet‑savory glaze, and bake it until the edges caramelize like a sunrise over Waikiki.
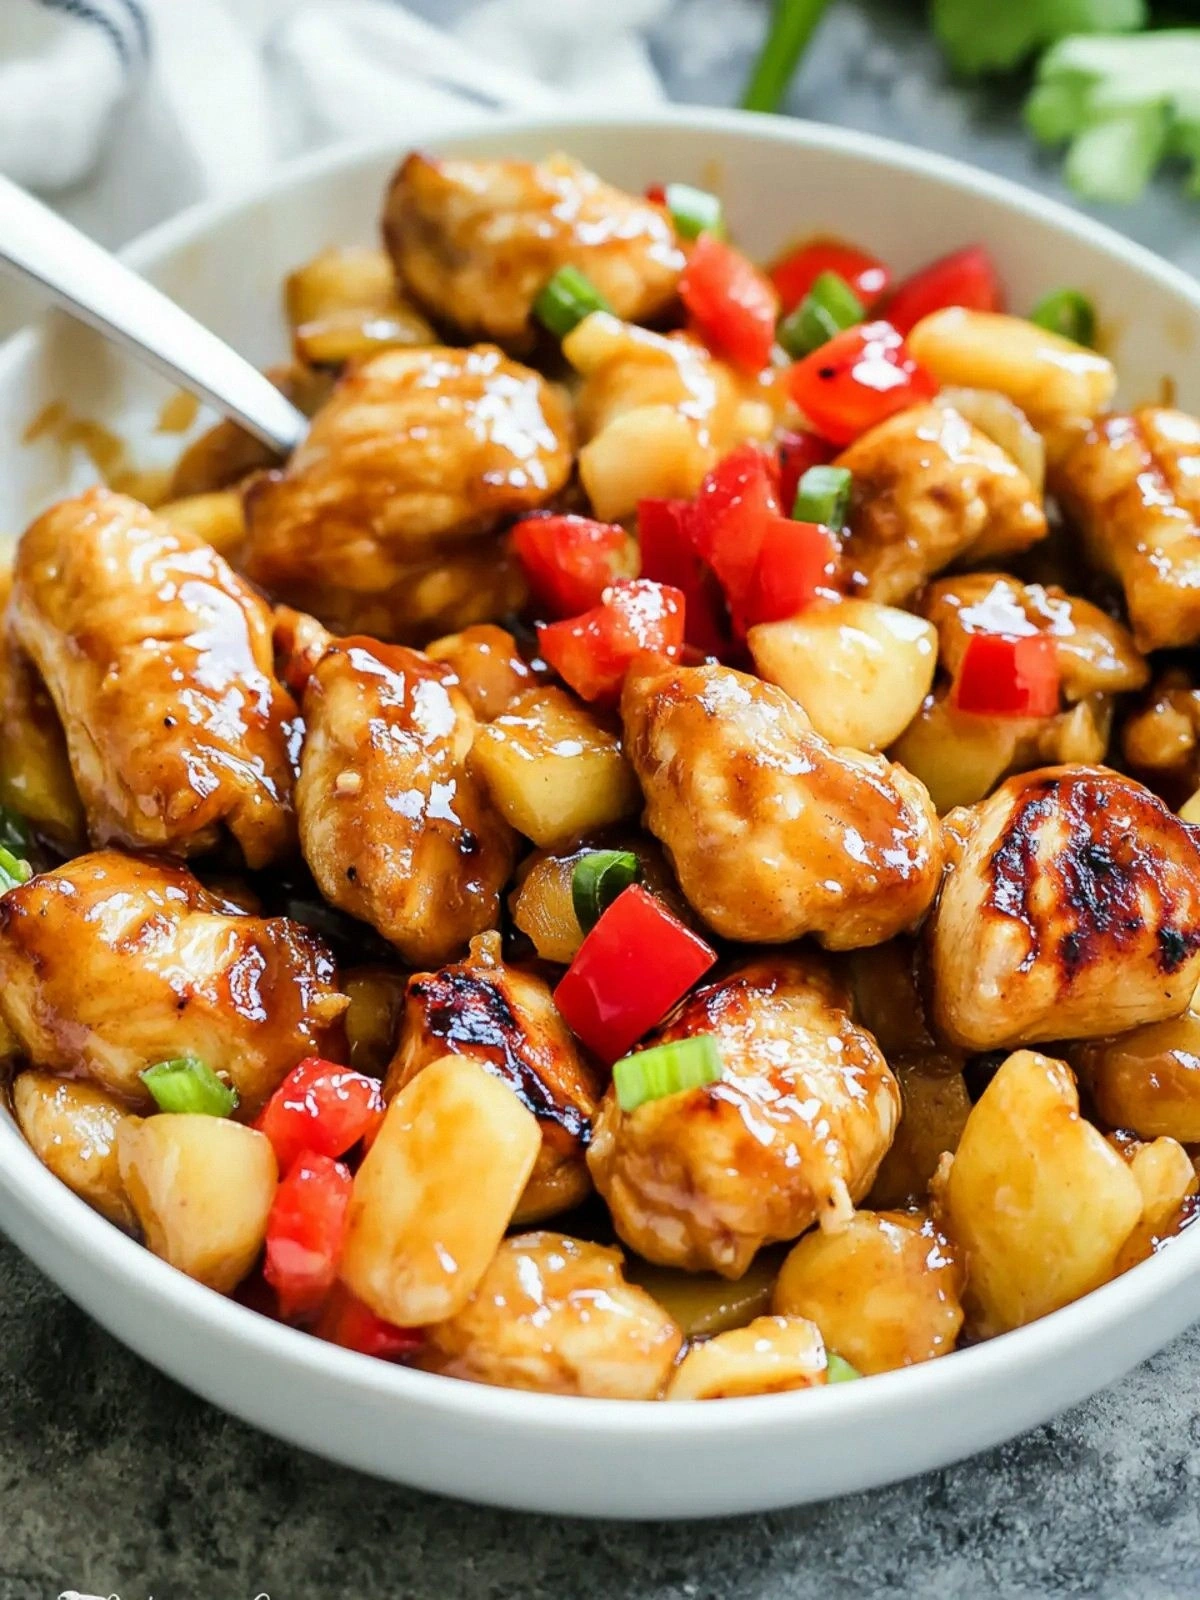
When the first spoonful hit my tongue, the flavors exploded. The pineapple juice sweetened the soy sauce, creating a glossy glaze that clung to the chicken like a second skin. The crunch of fresh red pepper added a pop of color and a subtle heat that cut through the sweetness. The aroma that filled the kitchen was a tropical breeze, with hints of garlic and brown sugar dancing together. My senses were in full swing—taste, sight, smell, sound, and even the feel of that silky sauce sliding off the spoon.
This isn’t just another chicken recipe. It’s the kind of dish that turns a simple dinner into a memorable event. The secret lies in the balance: the cornstarch creates a crisp coating, the eggs lock in moisture, and the pineapple tidbits give that unmistakable island flare. Most versions of this dish either over‑sweeten or under‑season, but my version leans into the natural tang of pineapple while keeping the savory base strong. I’ve perfected the timing so the chicken stays juicy, the sauce thickens just enough, and the edges crackle without burning.
There’s a twist you won’t expect—adding a splash of low‑sodium soy sauce before the final bake to deepen the umami profile. That small tweak transforms the glaze from sweet to complex, making every bite feel like a vacation. Let me walk you through every single step—by the end, you’ll wonder how you ever made it any other way.
What Makes This Version Stand Out
- Flavor Depth: The combination of pineapple juice, brown sugar, and soy sauce creates a glaze that is sweet, tangy, and savory all at once, unlike the one‑note sauces in many other recipes.
- Crispy Texture: Coating the chicken in cornstarch before baking produces a golden crust that cracks with a satisfying snap, giving you that coveted crunch.
- Simple Prep: No complicated marinades or secret ingredients—just pantry staples and a few minutes of prep.
- Visual Appeal: The bright red bell pepper and pineapple tidbits add a splash of color that makes the dish Instagram‑worthy.
- Crowd‑Pleaser: Whether you’re feeding a family or hosting a potluck, this dish’s sweet‑savory profile wins over even the pickiest eaters.
- Make‑Ahead Friendly: You can assemble the chicken a few hours ahead, refrigerate it, and bake right before serving.
- Ingredient Quality: Using low‑sodium soy sauce keeps sodium in check while still delivering a robust umami punch.
Inside the Ingredient List
The Flavor Base
At the heart of this dish lies the pineapple juice and soy sauce duo. Pineapple juice brings natural sweetness and acidity, brightening the entire glaze. Soy sauce provides umami and saltiness; using the low‑sodium version keeps the dish balanced without overwhelming the other flavors. If you’re a fan of extra depth, a splash of rice vinegar can replace a portion of the pineapple juice for a tangier kick. Choosing fresh pineapple juice over canned preserves the bright, tropical notes that canned juice often lacks.
The Texture Crew
Cornstarch is the unsung hero that turns a simple coating into a crispy shell. It creates a light, airy crunch that snaps when you bite into the chicken. The eggs act as a binder, ensuring the cornstarch adheres and forming a seal that locks in juiciness. Skipping the eggs will leave the coating loose, resulting in a soggy exterior. If you’re vegan, substitute the eggs with a tablespoon of water mixed with a teaspoon of cornstarch to achieve a similar binding effect.
The Unexpected Star
The can of pineapple tidbits adds bursts of sweet, caramelized flavor that contrast beautifully with the savory glaze. Their chewy texture keeps the dish interesting, preventing it from becoming one-dimensional. If you prefer a fresher taste, fresh pineapple chunks work just as well and add a bright, juicy bite. For an extra layer of sweetness, a drizzle of honey can replace a portion of the brown sugar.
The Final Flourish
Red bell pepper provides a crisp, sweet crunch that complements the caramelized edges. It also adds a pop of color that makes the dish visually striking. Slicing the pepper thinly allows it to cook just enough to soften without becoming mushy. Garlic, minced finely, infuses the glaze with a warm, aromatic note that balances the pineapple’s sweetness. A pinch of black pepper at the end of cooking adds a subtle heat that ties everything together.
Everything’s prepped? Good. Let’s get into the real action…
The Method — Step by Step
- Preheat the oven. Set it to 375°F (190°C) and let it come to temperature while you prepare the chicken. The steady heat ensures even baking and a golden crust. I dare you to taste this and not go back for seconds.
- Season the chicken. Sprinkle salt and pepper liberally on both sides of the 2‑pound boneless breasts. This simple step brings out the natural flavor and creates a savory base. If you’re watching sodium, use a low‑sodium soy sauce in the glaze instead.
- Coat with cornstarch. Lightly dust each breast in 1/2 cup of cornstarch, shaking off any excess. The starch will form a crisp shell as it bakes. A pinch of salt mixed into the cornstarch helps the coating stick.
- Whisk the glaze. In a bowl, combine 1/2 cup pineapple juice, 1/4 cup brown sugar, 1/4 cup low‑sodium soy sauce, and 2 minced garlic cloves. Stir until the sugar dissolves. This glaze will caramelize and coat the chicken, giving it that sweet‑savory sheen.
- Egg wash. Beat 2 large eggs in a shallow dish. Dip each coated breast into the eggs, allowing excess to drip back into the bowl. The eggs bind the cornstarch and glaze, creating a unified coating.
- Arrange the chicken. Place the breasts on a parchment‑lined baking sheet. Add 1/4 cup vegetable oil around the edges to help with browning. The oil also prevents sticking and adds a subtle richness.
- Bake. Cook for 20 minutes, then flip the breasts and pour the remaining glaze over them. Continue baking for another 10–12 minutes, or until the internal temperature reaches 165°F (74°C). The sauce should thicken and caramelize into a glossy finish.
- Finish with pineapple tidbits and bell pepper. Sprinkle 1 can of pineapple tidbits and thinly sliced red bell pepper over the chicken during the last 3 minutes of baking. The heat will melt the pepper slightly while keeping the pineapple juicy.
- Rest before serving. Let the chicken rest for 5 minutes on a cutting board. This step allows the juices to redistribute, keeping the meat tender.
- Plate and serve. Slice the chicken against the grain, drizzle any leftover glaze, and serve with steamed rice or a fresh salad. Picture yourself pulling this out of the oven, the whole kitchen smelling incredible, and watching your guests’ eyes light up.
That’s it — you did it. But hold on, I’ve got a few more tricks that’ll take this to another level.
Insider Tricks for Flawless Results
The Temperature Rule Nobody Follows
Many cooks bake at a higher heat to get a crisp crust, but this can dry out the chicken. Baking at a steady 375°F allows the glaze to thicken slowly, sealing in moisture. If you prefer an extra crispy edge, finish the chicken under the broiler for 1–2 minutes, watching carefully to avoid burning.
Why Your Nose Knows Best
Smell the glaze as it simmers; a sweet aroma indicates the sugars are caramelizing. If the scent is faint, the heat is too low, and the glaze will stay runny. A strong, caramelized scent means the glaze is ready to coat the chicken perfectly.
The 5‑Minute Rest That Changes Everything
Resting the chicken after baking allows the juices to redistribute, preventing them from spilling onto the plate. This simple step keeps every bite moist and flavorful. Skip it, and you’ll end up with a dry, disappointing center.
Use a Silicone Baking Mat
A silicone mat ensures even heat distribution and prevents sticking. It also makes cleanup a breeze, as the glaze doesn’t cling to the pan. If you’re in a rush, the mat speeds up the baking process because you don’t need to pre‑line the sheet.
Serve with a Fresh Green Salad
The sweet glaze pairs beautifully with a crisp green salad tossed in a light vinaigrette. The acidity cuts through the richness, balancing the dish. A handful of fresh cilantro or mint adds a herbal note that elevates the tropical theme.
Creative Twists and Variations
Teriyaki Twist
Swap the low‑sodium soy sauce with a splash of teriyaki sauce for a richer, slightly sweeter profile. The teriyaki adds depth without overpowering the pineapple notes. This variation is perfect for those who love a deeper umami kick.
Spicy Pineapple Kick
Add a teaspoon of sriracha or a pinch of crushed red pepper flakes to the glaze. The heat balances the sweetness, giving the dish a lively contrast. Serve with a cooling cucumber salad to keep the palate refreshed.
Herb‑Infused Variation
Stir in chopped fresh basil or mint into the glaze before baking. The herbs impart a bright, aromatic layer that complements the tropical flavor. This version works well with a side of jasmine rice.
Gluten‑Free Option
Replace the cornstarch with rice flour or a gluten‑free all‑purpose blend. The coating will still crisp beautifully while keeping the dish gluten‑free. Ensure the soy sauce is gluten‑free as well to maintain the integrity of the flavor.
Cheesy Finale
Sprinkle shredded mozzarella or cheddar over the chicken during the last 2 minutes of baking. The cheese melts into the glaze, adding a creamy texture and savory depth. This version is a crowd‑pleaser for families who love a cheesy twist.
Storing and Bringing It Back to Life
Fridge Storage
Cool the chicken completely before placing it in an airtight container. Store in the refrigerator for up to 3 days. When reheating, gently warm in a skillet with a splash of water to keep the glaze from drying out.
Freezer Friendly
Wrap each breast individually in parchment paper, then place in a freezer bag. Freeze for up to 3 months. Thaw overnight in the refrigerator before reheating in a skillet or oven at 350°F.
Best Reheating Method
Reheat in a skillet over medium heat, adding a tablespoon of water to create steam. This method preserves the glaze’s moisture and keeps the chicken juicy. Serve immediately for the best texture.