I was standing in my kitchen, mid‑midnight, with a half‑finished batch of brownies that had somehow turned into a charcoal‑colored nightmare. The smoke alarm was doing its best impression of a drum solo, and my roommate was yelling, “Did you just set the oven on fire again?” In that chaotic moment I grabbed a jar of maraschino cherries, a slab of dark chocolate, and whispered a dare to myself: “If I can turn this disaster into something edible, I’m never buying a store‑bought dessert again.” The result? A truffle that feels like a love‑letter from your grandma, a sweet‑tart flashback to the 80s candy‑shop counter, and a texture that makes you question everything you thought you knew about no‑bake desserts.
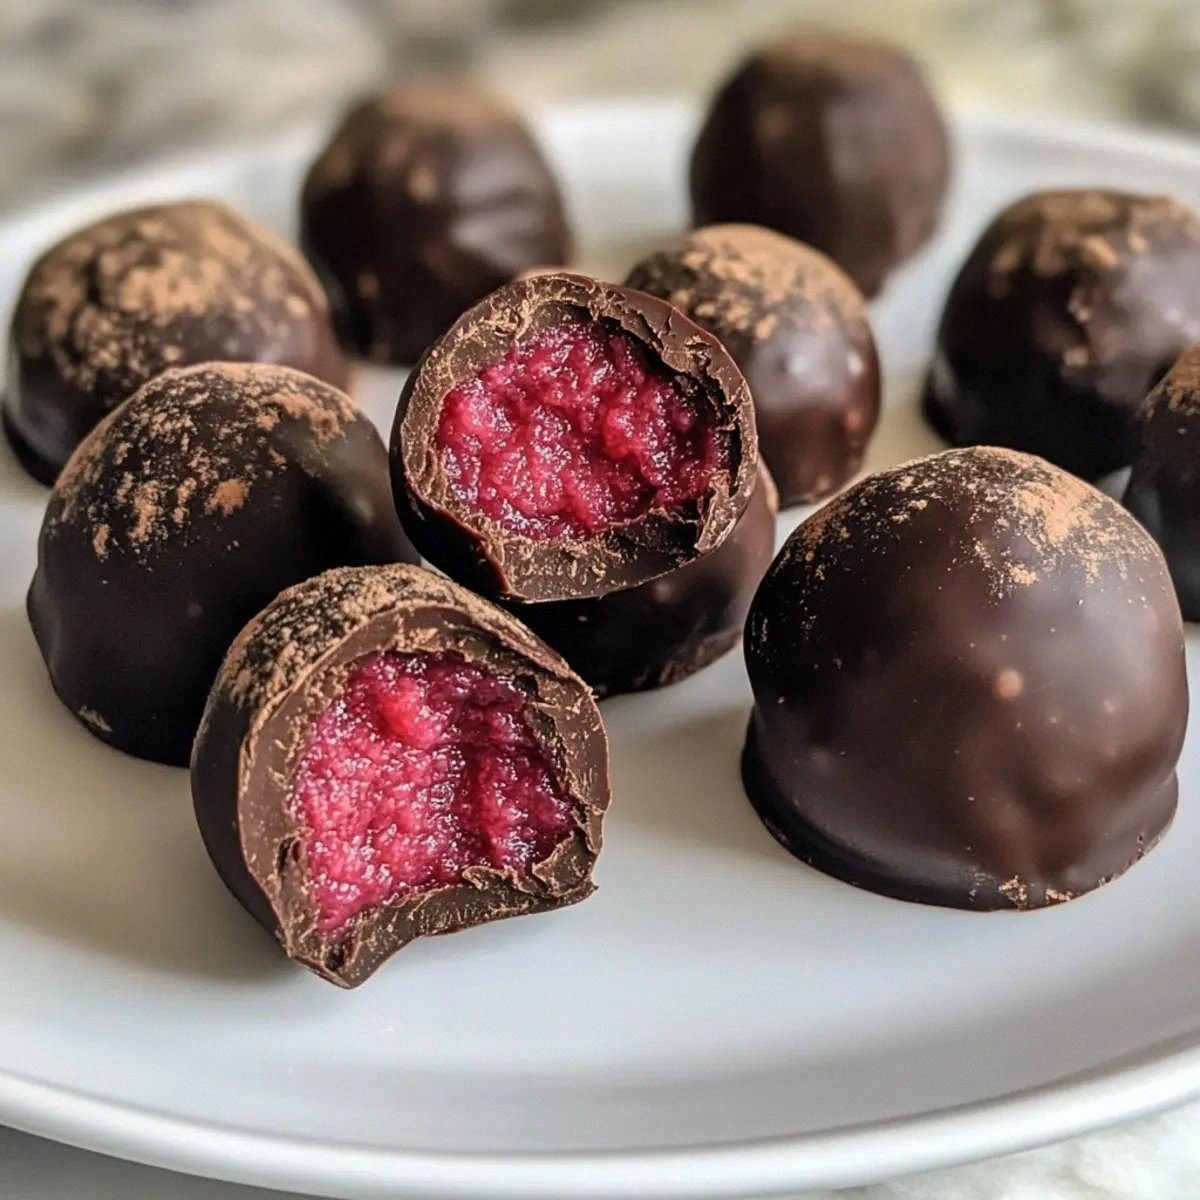
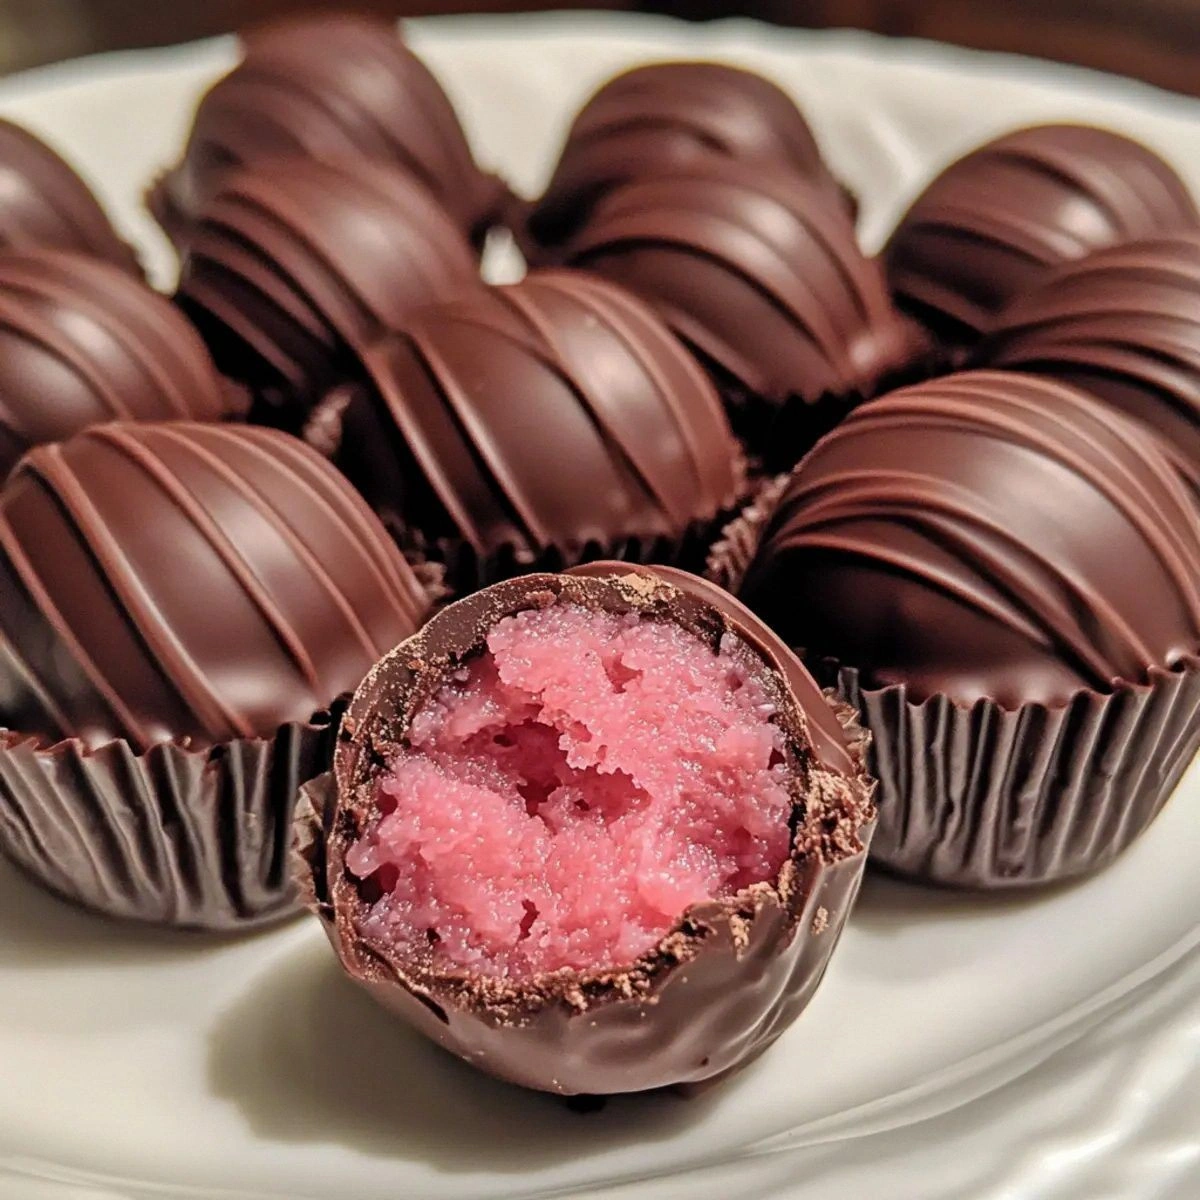
Picture this: a glossy, ruby‑red center that bursts open like a tiny fireworks show, releasing a buttery, melt‑in‑your‑mouth richness that coats your tongue in a velvety hug. The scent? A heady mix of melted chocolate and the faint, almost nostalgic perfume of cherry syrup that makes you think of summer picnics and movie‑theater concessions all at once. When you bite, you hear a faint snap as the chocolate shell gives way, followed by the soft, almost creamy crumble of powdered‑sugar‑infused butter that practically sighs against your palate. The whole experience is a symphony of textures—crisp, smooth, and melt‑away—all without ever touching a hot oven.
Most cherry‑chocolate truffle recipes either drown the fruit in chocolate or make the whole thing taste like a cheap candy bar. This version stands out because it respects the integrity of each component. I’m talking about a method that gently folds the cherries into a butter‑sugar base, then enrobes the whole thing in dark chocolate that’s tempered just enough to give you that glossy finish without the snap‑crackle‑pop of over‑tempered candy. The secret ingredient? A pinch of sea‑salt that lifts the sweetness and makes the flavor pop like fireworks on the Fourth of July.
But here’s the kicker: I’m going to reveal a technique that most home cooks skip entirely—a quick, no‑blowtorch caramelization of the cherry juice that adds depth without adding any extra sugar. Okay, ready for the game‑changer? Let me walk you through every single step — by the end, you’ll wonder how you ever made it any other way.
What Makes This Version Stand Out
- Flavor Harmony: The sweet‑tart cherry meets the deep, slightly bitter dark chocolate, creating a balanced bite that feels like a perfectly tuned chord.
- Texture Contrast: A buttery, powder‑sugar interior gives way to a firm chocolate shell, delivering a surprise crunch that’s more satisfying than a cookie‑crunch.
- Simplicity: No oven, no fancy equipment—just a saucepan, a bowl, and a handful of patience, making it ideal for late‑night cravings.
- Unique Ingredient Twist: Caramelized cherry juice adds a depth that store‑bought mixes simply can’t replicate.
- Crowd Reaction: Guests often claim they’ve never tasted anything like it, and the “I dare you to taste this and not go back for seconds” challenge becomes a party staple.
- Ingredient Quality: Using premium dark chocolate (70% cacao or higher) ensures a rich mouthfeel without being overly sweet.
- Make‑Ahead Potential: These truffles keep beautifully in the fridge for up to a week, meaning you can prep them ahead for holidays or impromptu gatherings.
- Zero‑Bake Magic: The entire process is a no‑bake wonder, perfect for summer heat or when you simply don’t want to fire up the oven.
Inside the Ingredient List
The Flavor Base
First up, the maraschino cherries. These aren’t your ordinary fresh cherries; they’re already soaked in a sugary brine that infuses them with a bright, almost floral sweetness. If you skip them and use fresh cherries, you’ll lose that signature tang and the recipe will become overly buttery. I recommend draining them well, then giving them a quick pat‑dry so the butter doesn’t turn soggy. Swap tip: If you’re avoiding the extra sugar, opt for unsweetened dried cherries and add a tablespoon of cherry jam to keep the moisture.
Next, the butter. Half a cup of unsalted butter is the glue that holds everything together, creating a silky, melt‑in‑your‑mouth interior. The butter should be softened to room temperature; if it’s too cold, you’ll end up with gritty truffles. For a dairy‑free twist, try coconut oil—just be aware it will add a subtle coconut aroma that can compete with the chocolate.
The Texture Crew
Powdered sugar isn’t just for frosting; it’s the secret to that cloud‑like interior that dissolves on the tongue. It sweetens without adding grainy texture, and it helps the butter bind into a smooth paste. If you’re watching carbs, you can substitute a sugar‑free powdered sweetener, but the texture will be slightly less airy.
Dark chocolate, the final armor, brings depth and a slight bitterness that balances the cherries’ sweetness. Choose a bar with at least 70% cacao for the best flavor profile. If you’re a fan of milk chocolate, feel free to mix half‑and‑half, but remember you’ll be dialing back on the bitter contrast that makes these truffles unforgettable.
The Unexpected Star
A pinch of flaky sea salt might seem like a tiny detail, but it’s the catalyst that turns a good truffle into a great one. Salt amplifies the chocolate’s bitterness and makes the cherry’s acidity pop, preventing the sweet overload that can make desserts feel cloying. If you’re on a low‑sodium diet, use a pinch of potassium chloride instead—it behaves similarly in flavor enhancement.
The Final Flourish
A splash of vanilla extract (about a quarter teaspoon) adds a warm, aromatic backdrop that ties the cherry and chocolate together. It’s subtle, but without it the flavor can feel a bit flat. If you want to get fancy, try a dash of almond extract; just remember it’s potent, so a little goes a long way.
Everything's prepped? Good. Let's get into the real action…
The Method — Step by Step
Start by draining the maraschino cherries, then give them a gentle pat‑dry with paper towels. Transfer them to a small saucepan, add the cherry juice (about ¼ cup), and bring to a simmer over medium heat. Let the mixture reduce by half, stirring occasionally; you’ll notice it thickening into a glossy syrup that smells like a candy‑store dream. Watch this: When the syrup starts to coat the back of a spoon, you’ve reached the perfect reduction.
Watch Out: Don’t let the syrup boil dry—once it reaches the right consistency, remove it from heat immediately.While the syrup cools, melt the dark chocolate using a double boiler. Set a heat‑proof bowl over a pot of simmering water, making sure the bowl doesn’t touch the water. Stir the chocolate gently until it’s smooth and glossy—this should take about 4–5 minutes. Once melted, remove the bowl from heat and let it sit for a minute; this brief cooling helps prevent the butter from seizing when combined later.
In a separate large mixing bowl, cream the softened butter with an electric mixer on medium speed until it’s light and fluffy, about 2 minutes. Gradually add the powdered sugar, a quarter at a time, allowing each addition to incorporate fully before adding the next. The mixture will look grainy at first, then transform into a smooth, pale paste that holds its shape when lifted.
Now comes the “magic” moment: drizzle the reduced cherry syrup into the butter‑sugar mixture while the mixer is on low. The syrup will swirl and create ribbons of deep red throughout the pale base, giving you visual confirmation that the flavors are marrying. Add a pinch of sea salt and the vanilla extract, then increase the mixer speed to medium‑high and beat for another minute until the mixture is glossy and slightly thickened.
Fold the drained cherries into the butter‑sugar‑cherry blend. Use a rubber spatula and a gentle folding motion to distribute the fruit evenly without crushing them. The cherries should remain whole, creating little pockets of burst‑of‑flavor in each truffle. If you prefer a smoother interior, you can pulse the cherries in a food processor for a few seconds before folding.
Cover the bowl with plastic wrap and chill the mixture in the refrigerator for at least 30 minutes. This firming step is crucial; it makes the mixture easy to roll into balls without sticking to your hands. While you wait, pre‑line a baking sheet with parchment paper—this is where the finished truffles will rest.
After chilling, scoop out the mixture with a small ice‑cream scoop (about 1‑1½ tablespoon per ball). Roll each scoop between your palms to form smooth, even spheres. If the mixture feels too soft, give it another quick 10‑minute chill before rolling.
Now, the coating: dip each chilled ball into the melted dark chocolate, letting excess drip back into the bowl. Place the coated truffle onto the prepared parchment sheet and repeat until all balls are enrobed. The chocolate should set within 5–10 minutes at room temperature; if your kitchen is warm, pop the sheet into the fridge for a quick set.
For a finishing touch, sprinkle a tiny pinch of flaky sea salt on top of each truffle while the chocolate is still glossy. This tiny burst of salt is the secret that makes the sweet‑tart flavor explode in your mouth. Let the truffles rest for another 5 minutes before serving, allowing the chocolate to fully harden.
That’s it — you did it. But hold on, I’ve got a few more tricks that’ll take this to another level. Stay with me here — this is worth it. I dare you to taste this and not go back for seconds; the combination of buttery interior, cherry pop, and dark chocolate snap is practically addictive.
Insider Tricks for Flawless Results
The Temperature Rule Nobody Follows
Never let your butter get too warm before mixing with powdered sugar. If the butter is even a few degrees above room temperature, the sugar can dissolve unevenly, leaving a gritty texture. Keep the butter in the fridge for 10 minutes before you start creaming, then let it soften on the counter for exactly 5 minutes. I once left it out for 30 minutes and ended up with a grainy mess that took forever to smooth out.
Why Your Nose Knows Best
When the chocolate is melting, trust your sense of smell more than the timer. A faint, nutty aroma signals that the chocolate has reached the perfect tempering point, while a burnt smell means you’ve overheated it. This sensory checkpoint saves you from a ruined coating and ensures that glossy finish we all crave.
The 5‑Minute Rest That Changes Everything
After you roll the butter‑cherry mixture into balls, give them a quick 5‑minute rest on the parchment before dunking them in chocolate. This short pause lets the interior firm up just enough to hold its shape, preventing the truffles from cracking the chocolate shell during the dip. I tried skipping this step once; the result was a tragic “crack‑and‑run” where the chocolate split right after the first bite.
The Salt‑Pop Trick
A pinch of flaky sea salt on each truffle isn’t just garnish—it’s a flavor amplifier. The salt cuts through the sweetness, making the chocolate’s bitterness and the cherry’s acidity more pronounced. If you’re serving these at a party, keep a tiny salt shaker nearby so guests can add an extra dash if they wish.
The “No‑Mess” Chocolate Transfer
Instead of dunking each truffle by hand, pour the melted chocolate into a shallow, wide bowl and use a fork to lift each ball, letting the chocolate coat evenly as you tap the fork against the bowl’s edge. This method minimizes drips and gives you a uniform coating every time.
Creative Twists and Variations
This recipe is a playground. Here are some of my favorite ways to switch things up:
Espresso‑Infused Truffles
Replace half of the dark chocolate with a high‑quality espresso‑flavored chocolate bar. The coffee notes deepen the chocolate’s bitterness and complement the cherry’s fruitiness, creating a sophisticated flavor that’s perfect for after‑dinner sipping.
White Chocolate & Coconut
Swap the dark chocolate for white chocolate and add a teaspoon of toasted coconut flakes to the butter‑sugar base. The result is a tropical, sweet‑and‑creamy bite that feels like a beach vacation in your mouth.
Spicy Chili Kick
Add a pinch of cayenne pepper to the melted chocolate before coating. The subtle heat awakens the palate and makes the sweet‑tart cherry flavor pop even more dramatically.
Nutty Crunch
Fold in finely chopped toasted almonds or pistachios into the butter‑cherry mixture before chilling. The nuts add a pleasant crunch that contrasts with the smooth interior and adds a layer of nutty aroma.
Berry‑Blend Fusion
Mix in a handful of dried cranberries or raspberries with the cherries for a mixed‑berry interior. The tartness of the additional berries creates a complex fruit profile that’s perfect for summer gatherings.
Storing and Bringing It Back to Life
Fridge Storage
Place the truffles in an airtight container lined with parchment paper. They’ll stay fresh for up to 7 days, and the chocolate will retain its shine. If you notice a slight dullness, a quick dip in freshly melted chocolate will revive the gloss.
Freezer Friendly
These truffles freeze beautifully. Arrange them on a tray, flash‑freeze for 30 minutes, then transfer to a zip‑top freezer bag. They’ll keep for up to 3 months. When you’re ready to serve, let them thaw in the fridge for an hour, then bring to room temperature for optimal texture.
Best Reheating Method
If the chocolate coating feels a bit firm after refrigeration, place the truffles on a plate and microwave for 5–7 seconds. Add a tiny splash (about ½ teaspoon) of water to the plate before microwaving; the steam gently softens the chocolate without melting the interior, bringing the truffle back to its perfect bite‑size glory.