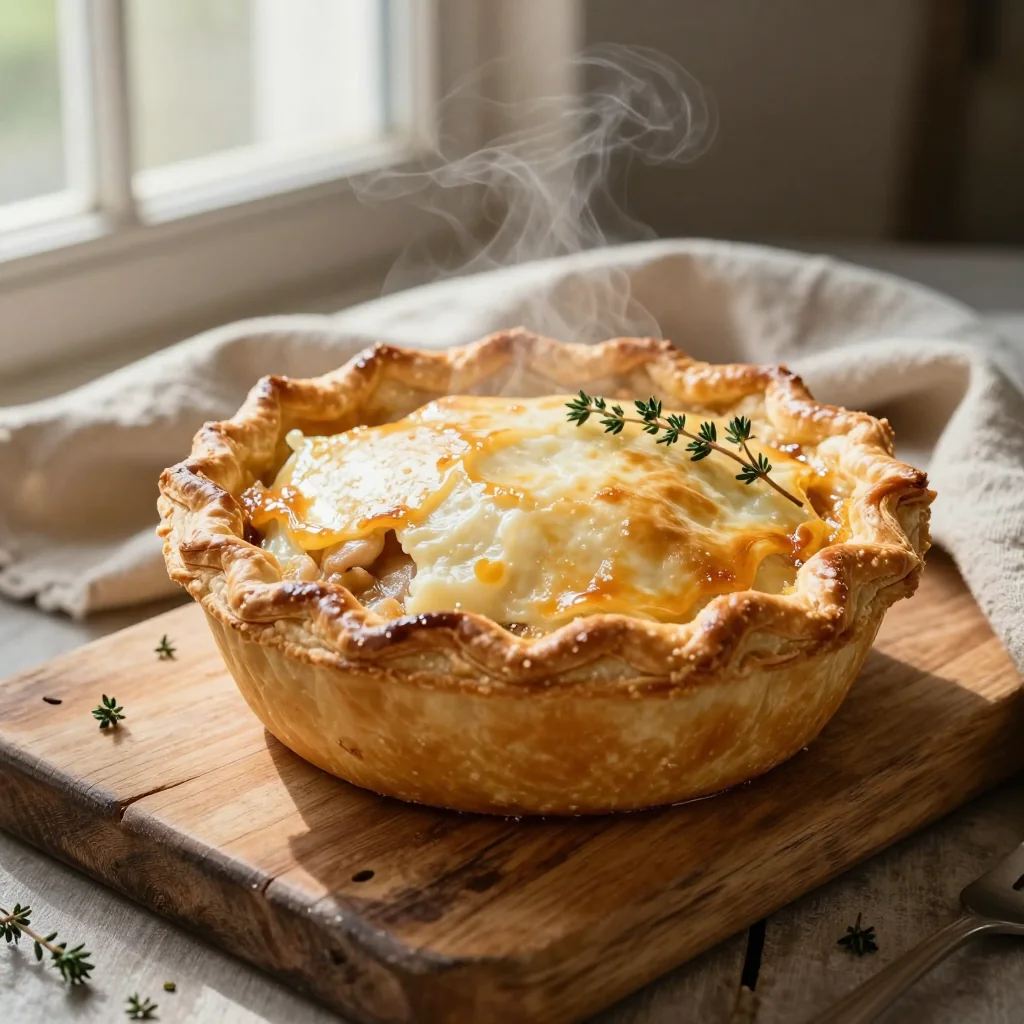
A comforting, buttery masterpiece that brings together tender chicken, creamy sauce, and a golden puff pastry crown.
When I was a child, the scent of a bubbling pot pie drifting from my grandmother’s kitchen was the very definition of home. She would roll out a simple pastry, tuck in a hearty mixture of chicken and vegetables, and bake it until the crust turned a deep, inviting gold. The first bite was always a revelation: buttery layers giving way to a velvety filling that warmed both body and soul. Those afternoons taught me that comfort food is more than sustenance—it’s memory, love, and tradition wrapped in a single dish.
Chicken pot pie has its roots in British cuisine, where humble pies were a way to stretch meat and make use of seasonal vegetables. Over time, the dish migrated across the Atlantic, evolving into the creamy, indulgent version we cherish today. Adding a puff pastry crust elevates the classic, giving it a light, flaky texture that contrasts beautifully with the rich interior.
In this article, I’ll walk you through every step, from selecting the freshest chicken to mastering the perfect puff pastry seal. You’ll discover why a few simple tricks—like chilling the butter and using a splash of heavy cream—make all the difference between an ordinary pie and a show‑stopping centerpiece.
So roll up your sleeves, preheat that oven, and let’s create a pot pie that will become a family favorite for years to come.
🌟 Why This Recipe Will Captivate You
From the first golden crust to the last spoonful of creamy filling, this pot pie delivers comfort, elegance, and unforgettable flavor.
- ✨ Perfect Balance of Textures: The puff pastry offers a light, airy crunch while the interior remains luxuriously smooth, creating a harmonious mouthfeel.
- ✨ One‑Pan Simplicity: All components are assembled in a single baking dish, reducing cleanup and allowing flavors to meld beautifully.
- ✨ Versatile Ingredient List: You can swap chicken for turkey or add mushrooms for an earthy twist without compromising the core taste.
- ✨ Time‑Efficient Preparation: With a 30‑minute prep, you’ll have a dinner that feels gourmet but fits a busy weeknight schedule.
- ✨ Nutrient‑Rich Comfort: Packed with protein, vegetables, and a modest amount of dairy, this dish satisfies both heart and palate.
- ✨ Crowd‑Pleaser Aesthetic: The glossy, golden puff pastry top looks stunning on any table, making it perfect for both casual meals and special occasions.
🥗 The Ingredients
📝 Complete Ingredient List
For the Puff Pastry Crust:
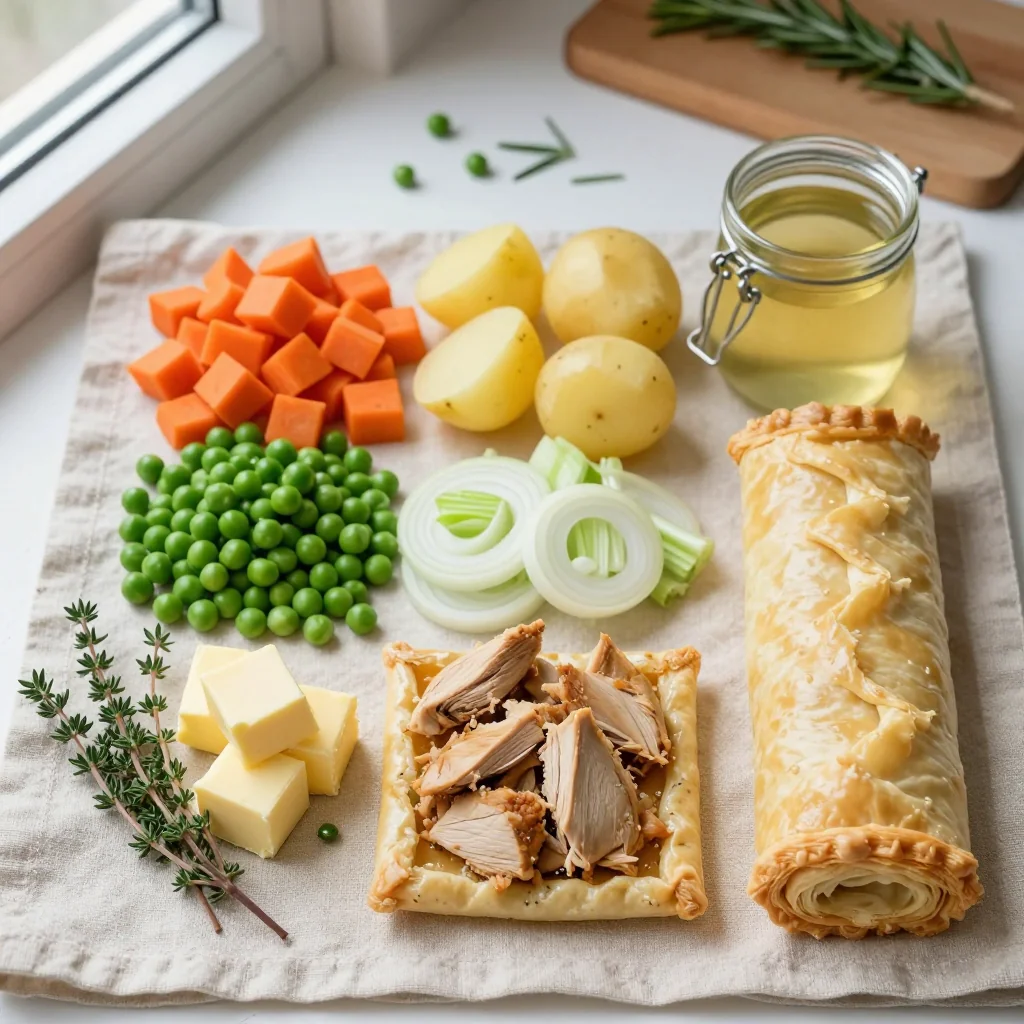
- 500 g store‑bought puff pastry sheets
- 1 large egg (beaten, for egg wash)
For the Filling:
- 500 g boneless skinless chicken breast, diced
- 200 g carrots, diced
- 150 g frozen peas
- 150 g corn kernels (optional)
- 1 medium onion, finely chopped
- 2 cloves garlic, minced
- 30 g unsalted butter
- 30 g all‑purpose flour
- 300 ml chicken broth
- 150 ml heavy cream
- 1 tsp dried thyme
- 1 tsp dried rosemary
- to taste salt
- to taste freshly ground black pepper
🔍 Focus on Key Ingredients
Chicken Breast
Choosing high‑quality, free‑range chicken adds a subtle depth of flavor that you simply can’t get from factory‑farmed meat. Trim any excess fat, then dice into uniform 1‑inch cubes so they cook evenly and stay juicy within the creamy sauce.
Puff Pastry
The secret to a flaky, buttery crust lies in keeping the pastry cold until it hits the oven. The layers of butter in the dough expand as steam, creating that signature lift. If you prefer a gluten‑free option, look for a gluten‑free puff pastry alternative that still contains butter.
Heavy Cream
Heavy cream enriches the sauce, giving it that silky mouthfeel. It also balances the acidity of the broth, ensuring the filling isn’t too sharp. For a lighter version, you can substitute half‑and‑half, but expect a slightly thinner consistency.
🔄 Quick Substitutions
| If you don’t have... | Use instead... |
|---|---|
| Chicken broth | Vegetable broth |
| Heavy cream | Half‑and‑half or whole milk + a knob of butter |
| Puff pastry | Homemade shortcrust pastry or phyllo sheets |
👨🍳 Step‑by‑Step Instructions
Follow these detailed steps to create a perfectly balanced pot pie. Each phase is designed to build layers of flavor while keeping the process manageable.
📋 Phase 1: Preparation & Mise en Place
Getting everything ready before you start cooking ensures a smooth assembly.
Preheat the oven and prepare the pastry
Set your oven to 200 °C (390 °F). While it heats, lay the puff pastry sheets on a lightly floured surface. Using a rolling pin, gently roll them to a 3‑mm thickness, then cut a circle slightly larger than your baking dish (about 28 cm/11 in). Keep the pastry covered with a clean kitchen towel to prevent it from drying out.
Dice chicken and vegetables
Trim the chicken breast, cut into bite‑size cubes, and season lightly with salt and pepper. Peel and dice carrots into ½‑inch pieces; this size ensures they soften without turning mushy. Measure out peas and corn, keeping them frozen until you add them to the sauce.
🔥 Phase 2: Cooking & Assembly
This phase builds the creamy filling and seals the pie.
Sauté aromatics and chicken
In a large, heavy‑bottomed skillet, melt the butter over medium heat. Add the onion and garlic, sautéing until translucent (about 3 minutes). Increase the heat to medium‑high, add the chicken cubes, and sear until lightly golden on all sides, about 5 minutes. The chicken should be partially cooked but not fully done.
Create the roux and add liquid
Sprinkle the flour over the sautéed mixture, stirring constantly for 2 minutes to form a roux. Gradually whisk in the chicken broth, ensuring no lumps remain. Once the broth is incorporated, stir in the heavy cream, thyme, rosemary, and a pinch of nutmeg for warmth. Bring the sauce to a gentle simmer; it should thicken enough to coat the back of a spoon.
Add vegetables and finish the filling
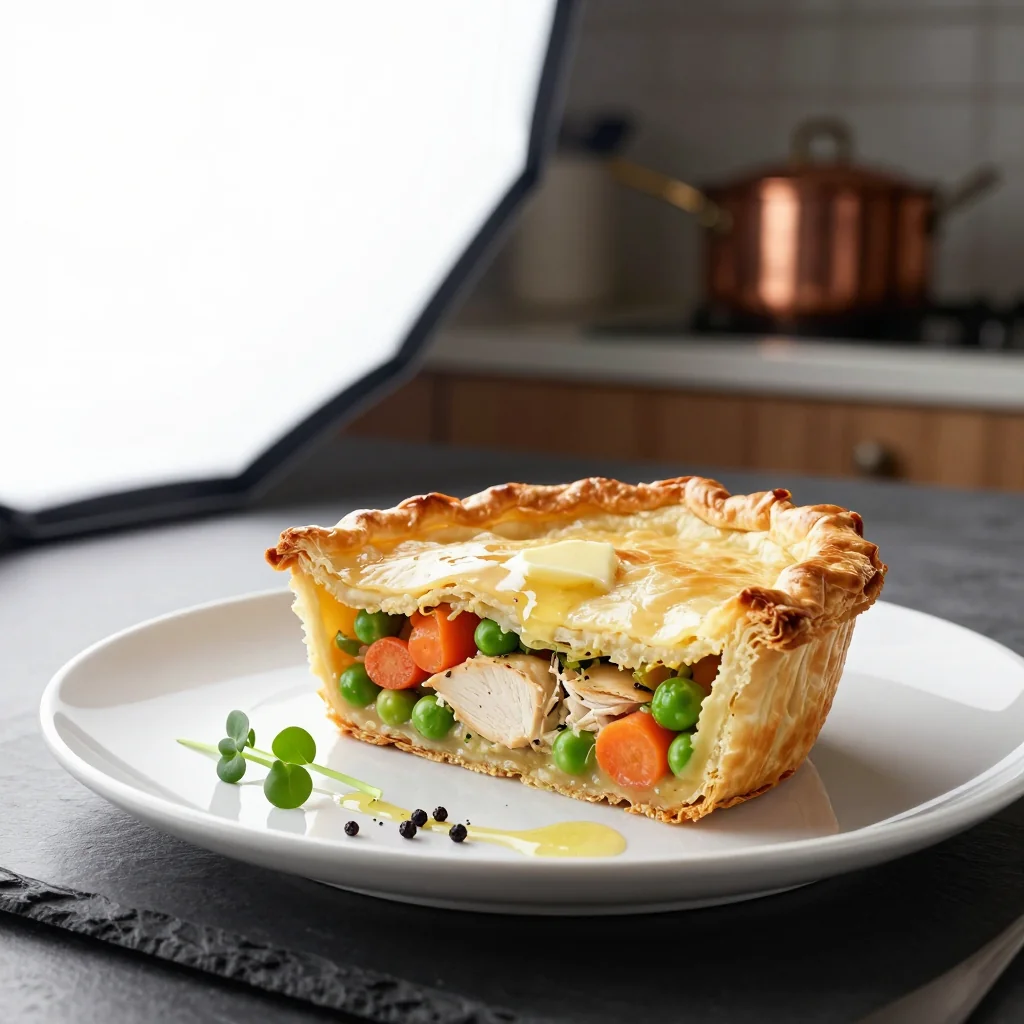
Stir in carrots, peas, and corn. Reduce heat to low and let the mixture simmer for another 5 minutes, allowing the vegetables to soften while the sauce reaches a velvety consistency. Taste and adjust seasoning with salt and pepper. Remove from heat.
✨ Phase 3: Finishing & Serving
Final touches that turn a good pie into a spectacular one.
Transfer filling to baking dish
Pour the hot filling into a 28‑cm (11‑in) deep baking dish, spreading it evenly. Smooth the surface with a spatula to create a level base for the pastry.
Cover with puff pastry and egg wash
Gently place the rolled puff pastry over the filling, pressing the edges down to seal. Trim any excess pastry, then fold the overhang inward for a rustic look. Brush the entire surface with beaten egg; this will give the crust a glossy, golden finish.
Bake until golden
Place the assembled pie in the preheated oven. Bake for 30‑35 minutes, or until the pastry is puffed, deeply golden, and the filling is bubbling around the edges. If the crust browns too quickly, cover loosely with aluminum foil.
Rest before serving
Allow the pot pie to rest for 10 minutes after removing it from the oven. This rest period lets the sauce thicken further and makes slicing cleaner.
Serve and enjoy
Cut generous wedges, serve on warm plates, and garnish with a sprinkle of fresh parsley or thyme. Pair with a crisp green salad for a complete meal.
💡 Expert Tips & Tricks
🛒 Choosing the Right Ingredients
Always opt for free‑range or heritage chicken; the meat is more flavorful and less watery. When selecting vegetables, choose carrots that are firm and bright orange—these will retain their sweetness after baking. For peas and corn, frozen varieties work perfectly because they’re flash‑frozen at peak freshness, preserving both color and texture.
🔪 Preparation Techniques
Dice all components to a uniform size—this ensures even cooking and prevents some pieces from becoming overcooked while others remain underdone. Keep a bowl of ice water nearby for the puff pastry; if it warms up while you work, a quick dip will reset its temperature without making it soggy.
🌡️ Mastering the Cooking Process
When making the roux, stir constantly to avoid a raw flour taste. The sauce should reach a gentle simmer before adding the cream; this prevents curdling. Use a kitchen thermometer if you’re unsure—aim for an internal temperature of 75 °C (167 °F) for the chicken, which guarantees safety without drying it out.
🍽️ Presentation & Service
For a restaurant‑style finish, dust the top of the baked crust with a light sprinkling of smoked paprika or finely chopped chives just before serving. This adds a pop of color and a subtle aromatic note that elevates the dish.
🏆 Pro Tips
Professional chefs rely on precision, timing, and subtle enhancements to transform a classic into a masterpiece.
- 🎯 Chill the butter for the pastry: Cold butter creates steam pockets during baking, which lift the layers and give the pastry its signature flakiness. Even a brief chill in the freezer (10 minutes) can make a noticeable difference.
- 🎯 Use a silicone brush for egg wash: It spreads the egg evenly without tearing the delicate pastry, ensuring a uniform golden sheen.
- 🎯 Deglaze the skillet with a splash of white wine: After sautéing the aromatics, add 30 ml of dry white wine to lift caramelized bits, deepening the flavor foundation of the sauce.
- 🎯 Finish the sauce with a knob of cold butter: Whisking in a tablespoon of cold butter at the end adds a glossy finish and rounds out the mouthfeel.
- 🎯 Score the pastry before baking: Lightly scoring the top allows steam to escape, preventing the crust from bubbling unevenly.
- 🎯 Rest the pie on a wire rack: This prevents the bottom from becoming soggy by allowing excess moisture to evaporate.
"A great pot pie is a symphony of textures—each bite should sing." — Chef Thomas Keller
🔄 Variations & Adaptations
The beauty of this recipe lies in its flexibility. Below are several creative twists to suit different dietary preferences and flavor cravings.
🥬 Vegetarian / Vegan Version
Swap the chicken for hearty plant‑based protein such as diced tempeh or chickpeas. Replace butter with a vegan margarine and use coconut cream instead of heavy cream. The puff pastry can be sourced from vegan brands, ensuring the entire dish remains plant‑based while retaining its comforting richness.
- Tempeh: Press, cube, and marinate in soy sauce before sautéing.
- Coconut cream: Use the thick part from a chilled can for a dairy‑free creaminess.
🌶️ Flavor Variations
Feel free to explore global inspirations by adjusting herbs and spices. Here are three popular directions:
Spicy Mexican Twist:
Incorporate chipotle peppers in adobo, a dash of cumin, and replace thyme with fresh cilantro. Serve with a side of lime‑y rice for a bold, smoky experience.
Mediterranean Flair:
Add sun‑dried tomatoes, Kalamata olives, and a pinch of oregano. Finish with a sprinkle of feta cheese after baking for a salty, tangy contrast.
Asian Fusion:
Swap rosemary for ginger, add a splash of soy sauce, and include sliced shiitake mushrooms. Garnish with toasted sesame seeds and scallions for an umami‑rich profile.
⚠️ Dietary Adaptations
Gluten‑Free:
Use a gluten‑free puff pastry or make a crust from almond flour and butter. Ensure the flour for the roux is a gluten‑free blend.
Lactose‑Free:
Replace heavy cream with lactose‑free cream or a blend of oat milk and coconut cream. Choose a dairy‑free butter alternative for sautéing.
Low‑Calorie:
Reduce butter by half, substitute half the cream with low‑fat milk, and increase the proportion of vegetables. This cuts calories while preserving the comforting texture.
👶 Kid‑Friendly Version
For younger palates, omit the thyme and rosemary, and add a touch of mild cheddar cheese into the filling. Serve with a side of apple slices to balance the savory richness with a sweet crunch.
📦 Storage & Reheating
🧊 Conservation
Refrigerator:
- Duration: 3 days
- Container: Airtight glass or plastic container
- Tip: Store the crust and filling separately to keep the pastry crisp.
Freezer:
- Duration: 2 months
- Method: Wrap tightly in plastic wrap, then foil.
- Defrosting: Thaw overnight in the refrigerator before reheating.
💡 For best texture, reheat from frozen using the oven method below.
♨️ Reheating
🔥 Oven (Recommended):
- Preheat to 180 °C (350 °F).
- Cover the pie loosely with aluminum foil.
- Heat for 20 minutes.
- Remove foil and bake an additional 10 minutes until the crust regains its golden crisp.
⚡ Microwave (Quick):
- Place a slice on a microwave‑safe plate.
- Cover with a microwave‑safe lid.
- Heat on medium power for 2‑3 minutes, checking halfway.
- Let stand 1 minute before serving.
🍳 Skillet:
Heat a non‑stick skillet over medium heat, add a splash of broth, and cover. Warm for 5‑7 minutes, allowing steam to re‑moisten the filling while the bottom crisps.
🍷 Perfect Pairings
🥗 Side Dishes
- Simple Arugula Salad: Peppery arugula with a lemon‑olive oil dressing balances the richness of the pie.
- Roasted Brussels Sprouts: Their caramelized edges add a subtle bitterness that cuts through the creamy filling.
- Garlic‑Infused Mashed Potatoes: For those who crave extra comfort, the smooth potatoes complement the flaky crust.
🍷 Wine & Beverage Pairings
- Chardonnay (oaked): Its buttery notes echo the puff pastry while the acidity lifts the sauce.
- Pinot Noir: Light red fruit flavors enhance the herbaceous undertones without overwhelming the dish.
- Non‑Alcoholic: Sparkling apple cider provides a crisp, refreshing counterpoint.
🍰 To Complete the Meal
Begin with a light citrus starter such as a grapefruit and honey salad, followed by the pot pie. Finish with a classic apple crumble—its warm spices echo the thyme and rosemary, creating a cohesive dining experience.
❓ Frequently Asked Questions
Q: Can I make this pot pie ahead of time?
Absolutely. Assemble the pie up to the point of adding the egg wash, then cover tightly and refrigerate for up to 24 hours. When ready to bake, add the egg wash and proceed with the recommended baking time. This method even improves flavor as the ingredients meld overnight.
Q: What if I don’t have a deep baking dish?
You can use a standard 9‑inch (23 cm) pie dish or a cast‑iron skillet. The key is to ensure the filling isn’t too shallow; otherwise, the crust may over‑bake before the interior is fully heated.
Q: How do I prevent the puff pastry from shrinking?
Keep the pastry cold until it hits the oven, and avoid over‑working it. If the pastry does shrink, gently press it back into place before applying the egg wash.
Q: My sauce turned out too thin—what went wrong?
This usually happens when the flour isn’t cooked long enough or the liquid is added too quickly. Ensure you whisk the flour into the butter for at least 2 minutes, and add the broth gradually while stirring constantly to create a smooth roux before introducing cream.
Q: Can I substitute the vegetables?
Yes! Feel free to use parsnips, turnips, or even diced sweet potatoes. Just keep the size consistent so they cook evenly. If you add denser vegetables, increase the simmer time by a couple of minutes.
Q: Is it possible to freeze the pie before baking?
Definitely. Assemble the pie, brush with egg wash, then wrap tightly and freeze. When you’re ready to bake, add an extra 10‑15 minutes to the cooking time to account for the frozen state.
🎉 To Your Oven!
There’s something undeniably magical about a pot pie that combines a buttery, golden crown with a velvety, savory filling. This Chicken Pot Pie with Puff Pastry Crust captures that magic while offering practical tips, adaptable variations, and a clear, step‑by‑step roadmap. Whether you’re cooking for a family dinner, a holiday gathering, or a cozy night in, this recipe promises a memorable experience that will have everyone asking for seconds.
Give it a try, share your photos, and let us know how you customized it. Your feedback fuels our culinary community and inspires new creations. Happy cooking!
Have you tried this recipe?
Leave a comment and rating below! Share your masterpiece on Instagram with #PotPieFiesta for a chance to be featured.
Chicken Pot Pie with Puff Pastry Crust
A golden, flaky pot pie packed with tender chicken, vegetables, and a creamy sauce.
📝 Ingredients
Puff Pastry Crust
Filling
👨🍳 Instructions
- 1
Preheat oven to 200 °C (390 °F) and prepare the puff pastry as described in Phase 1.
- 2
Sauté onion, garlic, and chicken in butter until lightly golden.
- 3
Stir in flour to form a roux, then gradually whisk in broth and cream.
- 4
Add carrots, peas, corn, thyme, and rosemary; simmer 5 minutes.
- 5
Transfer filling to baking dish, cover with pastry, brush with egg wash.
- 6
Bake 30‑35 minutes until crust is golden and filling bubbles.
- 7
Rest 10 minutes before slicing.
- 8
Serve hot, garnished with fresh parsley.
- 9
Store leftovers according to the storage guide.
- 10
Enjoy with your favorite side dishes and beverages!
🥗 Nutritional Information (per serving)
*Nutritional values are estimates based on standard ingredients.
📚 You Might Also Like
Classic Beef Stew
Lemon Herb Roasted Chicken
Vegetarian Shepherd's Pie


💬 Comments & Reviews
Leave a Comment
[Reader comments will appear here]