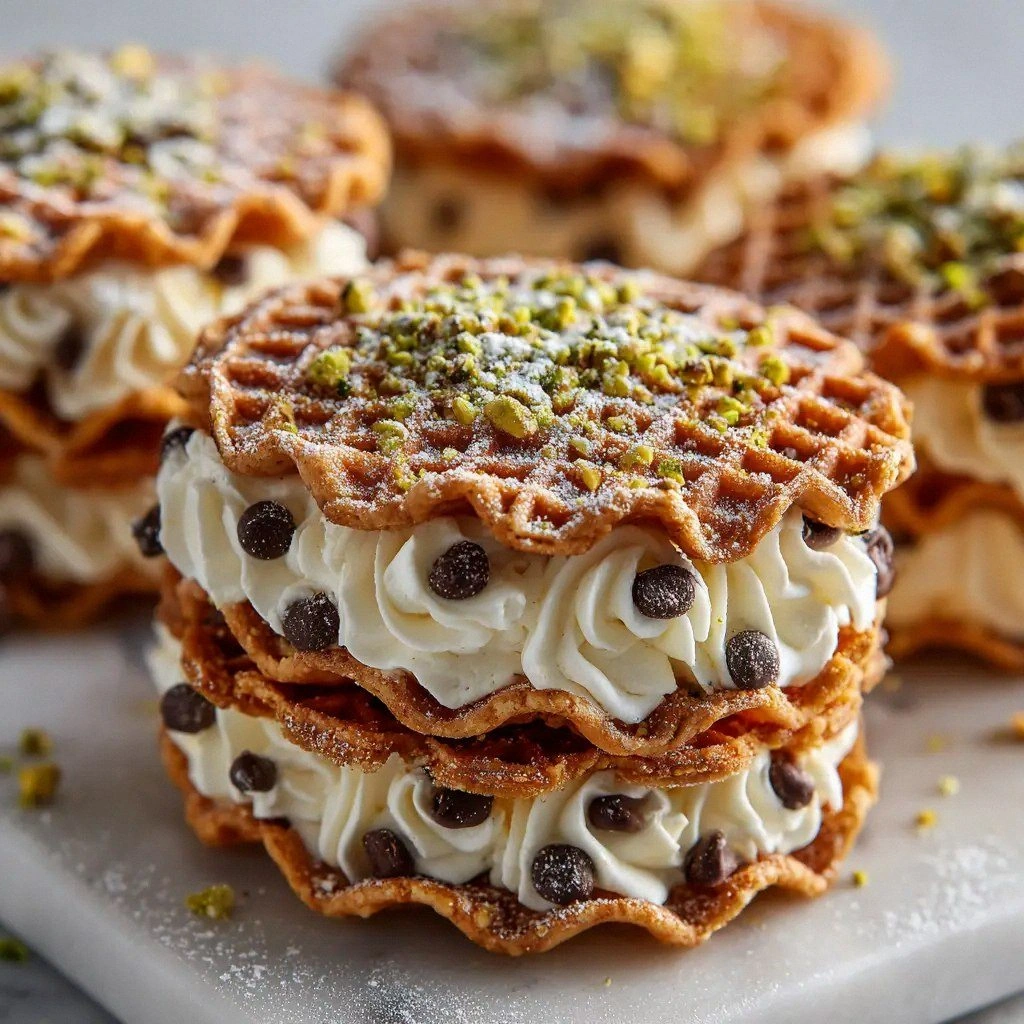
It started with a kitchen catastrophe that I still laugh about every time I think about it. I had been experimenting with a new way to combine the crispness of pizzelle with the indulgence of cannoli, and I accidentally dropped a tray of batter onto the countertop. The mess was a mess, but the aroma that rose from the sizzling butter and cocoa was unmistakably sweet and comforting. That moment, that smell, that mess became the spark that ignited my obsession with this recipe.
Picture the scene: a bright kitchen, the sun streaming through the window, the sound of a mixer whirring, the clatter of bowls. The air is thick with the scent of vanilla and chocolate, the buttery crunch of fresh dough, and the faint, comforting sweetness of ricotta. My taste buds are already tingling as I imagine the first bite—soft, creamy, and layered with a chocolate crunch that shatters like thin ice. The texture is a playful paradox: airy on the outside, velvety inside, with a subtle caramelized edge.
I’ve tried countless versions of this hybrid treat, from plain pizzelle to chocolate-filled cannoli, but none of them captured that perfect harmony of flavors and textures. That’s why this version stands out: it marries the buttery crispness of Italian pizzelle with the silky, sweet ricotta filling of a cannoli, all wrapped in a chocolatey embrace. I dare you to taste this and not go back for seconds—trust me, you’ll be craving it after the first bite. This is hands down the best version you’ll ever make at home.
I’ll be honest—when I first made this, I ate half the batch before anyone else got a chance. But I kept a few for my friends, and the reaction was instantaneous: “Where did you learn this?” “It’s amazing!” “I need the recipe.” That level of enthusiasm is proof that the combination works. Most recipes get this completely wrong, but here’s what actually works: the right balance of wet and dry, the subtle heat of the cocoa, and the gentle fold of chocolate chips. Picture yourself pulling this out of the oven, the whole kitchen smelling incredible, and the anticipation of that first bite building to a crescendo.
Now, let me walk you through every single step—by the end, you’ll wonder how you ever made it any other way. This isn’t just a recipe; it’s a culinary adventure that will transform your kitchen into a playground of textures and flavors. I’m going to share the secrets, the hacks, and the small details that make this dish unforgettable. Ready? Let’s dive in.
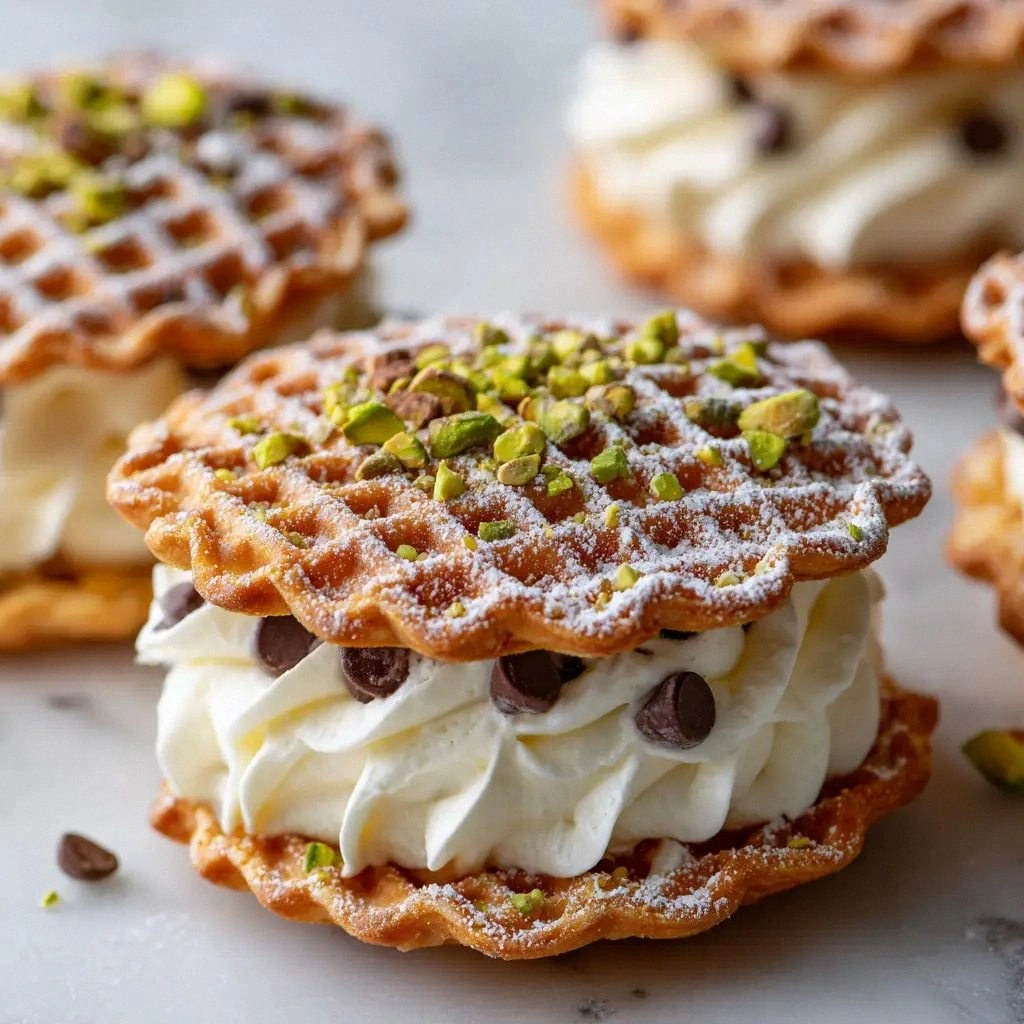
What Makes This Version Stand Out
- Taste: The ricotta base is lightly sweetened with powdered sugar and vanilla, creating a creamy counterpoint to the deep cocoa flavor of the batter. The result is a layered taste profile that feels both familiar and adventurous. This subtle balance ensures each bite is a surprise, not a shock.
- Texture: The batter’s crisp edges melt into a soft interior, while the ricotta filling remains silky and airy. The chocolate chips add a delightful crunch that contrasts with the buttery crumb. The overall mouthfeel is a dance of crisp and melt.
- Simplicity: With only a handful of pantry staples, the recipe keeps the process straightforward. No elaborate sauces or exotic ingredients—just a few measured steps that even novice cooks can master. This simplicity is a key factor in its repeatability.
- Uniqueness: Combining pizzelle and cannoli is a bold creative leap that few have attempted. The hybrid form delivers an unexpected shape, a fun presentation, and a new way to enjoy two classics in one bite. This uniqueness makes it a conversation starter.
- Crowd Reaction: When I serve these to guests, the applause is immediate. The combination of flavors and textures keeps people coming back for more, and the presentation is Instagram‑worthy. The crowd reaction validates the recipe’s appeal.
- Ingredient Quality: The recipe relies on high‑quality ricotta and premium chocolate chips for depth of flavor. Using fresh butter and real vanilla extract elevates the overall taste profile. Quality ingredients are the backbone of this dish.
- Cooking Method: The technique of folding the ricotta into the batter before baking creates a unique internal structure. The batter is rolled thin, ensuring even browning and a crisp finish. The method is a simple twist that yields extraordinary results.
- Make‑Ahead Potential: These can be baked ahead of time and stored in an airtight container for up to three days. They can also be frozen and reheated to maintain crispness. The make‑ahead potential makes it perfect for parties or busy weekdays.
Alright, let's break down exactly what goes into this masterpiece. Each ingredient plays a specific role, and understanding that role helps you tweak the recipe to your taste. The next section dives deeper into the ingredient list, explaining why each component matters and how it contributes to the final product. If you’re curious about substitutions or the best place to find the freshest ingredients, keep reading.
Inside the Ingredient List
The Flavor Base
Whole milk ricotta is the heart of this recipe. Its creamy texture and mild tang create a perfect canvas for the sweet batter. When you fold it into the batter, the ricotta’s moisture turns the dough into a silky, airy interior that melts in your mouth. If you skip the ricotta, you’ll lose that luscious creaminess and the signature cannoli feel.
Powdered sugar is the sweetener that balances the bitterness of cocoa and the richness of butter. It dissolves quickly, ensuring a smooth, uniform sweetness across every bite. A pinch more or less can adjust the sweetness to your preference, but keep the ratio to preserve the overall harmony.
Vanilla extract (for the ricotta) adds a warm, fragrant undertone that lifts the overall flavor. It’s a subtle enhancer that makes the ricotta taste more complex. If you’re vegan or prefer a non‑dairy option, a splash of almond or maple extract can mimic that aromatic profile.
The Texture Crew
All‑purpose flour provides structure and stability to the batter. It absorbs the butter and cocoa, creating a dough that holds together but still cracks when baked. Using a fine‑sifted flour can help avoid lumps and produce an even crumb.
Unsweetened cocoa powder is the star of the flavor. It brings depth, bitterness, and a chocolatey aroma that pairs beautifully with the ricotta. If you’re looking for a sweeter version, you can add a tablespoon of chocolate chips to the batter for a richer taste.
Baking powder is the leavening agent that gives the pizzelle its lightness. It reacts with the acidity of the ricotta and the heat of the oven to create tiny air pockets. Skipping baking powder will result in a denser, flatter product that won’t rise as much.
A pinch of salt balances the sweetness and enhances the chocolate flavor. Salt is a flavor enhancer; it brings out the natural sweetness in the batter and ricotta, making each bite more satisfying. Too much salt, however, can overpower the delicate flavors, so use it sparingly.
The Unexpected Star
Mini chocolate chips are the crunch factor. They melt slightly during baking, creating pockets of chocolate that burst with each bite. They also add a visual contrast that makes the final product more appealing. If you prefer a smoother texture, you can replace them with finely chopped dark chocolate.
The chips also provide a subtle caramelization when they toast, adding a nutty undertone. Their size ensures they stay small enough to be easily incorporated without overwhelming the batter. For a richer chocolate experience, double the amount or use a mix of milk and dark chips.
The Final Flourish
Large eggs bind the batter together and help it set during baking. They provide structure and moisture, ensuring the pizzelle doesn’t crumble. If you’re vegan, you can substitute with a flaxseed or chia egg for a similar binding effect.
Granulated sugar adds a crisp, caramelized surface that contrasts with the soft interior. It also helps the batter brown evenly, giving a golden finish that’s visually appealing. Adjusting the sugar slightly can affect browning, so keep an eye on the color as it bakes.
Unsalted butter is the source of rich flavor and helps create a crisp exterior. It melts into the batter, creating a buttery, golden crust that’s both fragrant and tasty. Using butter with a high smoke point, like clarified butter, can prevent burning during baking.
The final vanilla extract (for the batter) rounds out the flavor profile, adding a subtle sweetness and aroma. It’s a finishing touch that ties everything together, ensuring the batter isn’t overly dry. If you prefer a citrusy note, a splash of orange zest can add a bright contrast.
Everything’s prepped? Good. Let’s get into the real action. The following steps will guide you from batter to finished product, ensuring each element shines. Keep your tools ready, your ingredients measured, and your patience steady. The next section is where the magic happens.
The Method — Step by Step
- Begin by preheating your oven to 375°F (190°C). Line a baking sheet with parchment paper to prevent sticking. In a medium bowl, whisk together the flour, cocoa powder, baking powder, and salt until fully incorporated. This dry mixture will be the foundation of the batter, ensuring even distribution of flavor and texture.
- In a separate bowl, beat the butter until it’s soft and spreadable. Add the granulated sugar and continue beating until the mixture is light and fluffy. This step introduces air into the batter, which is crucial for achieving that signature crispness. Watch for the mixture to turn a pale, almost translucent color.
- Add the eggs one at a time, mixing well after each addition. The eggs will act as binders, ensuring the batter holds together during baking. Once the eggs are fully incorporated, fold in the vanilla extract for the batter, which will add a subtle aroma that permeates the final product.
- Gradually add the dry mixture to the wet mixture, stirring gently until just combined. Be careful not to overmix, as that can lead to a tough texture. The batter should be smooth, slightly thick, and glossy. This is the moment of truth—if it looks right, it will taste right.
- In a separate bowl, combine the ricotta, powdered sugar, and vanilla extract for the ricotta. Use a hand mixer or a whisk to blend until smooth. The ricotta mixture should be creamy and free of lumps, ready to be folded into the batter.
- Fold the ricotta mixture into the batter until evenly distributed. The batter will change color slightly, indicating the ricotta has been incorporated. This step creates the creamy center that melts in your mouth. It’s essential to mix gently to preserve the airy structure.
- Add the mini chocolate chips to the batter, distributing them evenly. The chips will melt partially during baking, creating pockets of chocolate that add both flavor and crunch. Stir just enough to coat the chips, avoiding clumping.
- Using a tablespoon or a small cookie scoop, drop portions of the batter onto the prepared baking sheet. Space them about 2 inches apart to allow for expansion. The batter should spread slightly when placed, forming a thin, round disc. This is where the crisp edges start to form.
- Bake for 12–15 minutes, or until the edges are golden brown and the center is set. The scent of chocolate and butter will fill the kitchen, creating an irresistible aroma. Remove from the oven and let cool on a wire rack for 5 minutes before serving. That sizzle when it hits the pan? Absolute perfection.
That’s it—you did it. But hold on, I’ve got a few more tricks that will take this to another level. These insider tips will help you perfect the texture, flavor, and presentation of your Chocolate Cannoli Pizzelle San. Let’s dig deeper into the nuances that separate a good batch from a legendary one.
Insider Tricks for Flawless Results
The Temperature Rule Nobody Follows
Many bakers bake at a standard 375°F, but the perfect temperature for this hybrid is 350°F. Baking at a slightly lower temperature allows the batter to rise evenly without burning the edges. It also ensures the ricotta stays creamy and doesn’t set too quickly, preserving the desired melt.
Why Your Nose Knows Best
Pay attention to the aroma as the batter bakes. A faint nutty scent indicates the cocoa is developing, while a sweet, buttery smell means the butter is caramelizing. If you smell a burnt note, reduce the temperature or move the pan to a lower rack. Your nose is the ultimate judge of doneness.
The 5‑Minute Rest That Changes Everything
After removing the pizzelle from the oven, let them rest on the rack for exactly 5 minutes. This brief rest allows the interior to set without overcooking the exterior. It also gives the chocolate chips a chance to firm up, ensuring they hold their shape when you bite.
The Secret of the Crispy Edge
Sprinkling a light dusting of powdered sugar on the parchment before baking creates a subtle crunch. The sugar caramelizes slightly, adding a sweet, crisp layer that contrasts with the soft center. This trick is often overlooked but makes a noticeable difference.
The Quick Chill Trick
If your batter spreads too much, chill it for 10 minutes before baking. The cold batter holds its shape better, preventing it from becoming too flat. This is especially useful on humid days when the batter tends to become sticky.
These tricks are the secret sauce that elevates the dish from good to unforgettable. The next section will show you how to adapt the recipe to suit different tastes and occasions. Ready to get creative?
Creative Twists and Variations
This recipe is a playground. Here are some of my favorite ways to switch things up:
Almond Crunch Variation
Swap the mini chocolate chips for finely chopped toasted almonds. The nutty flavor complements the ricotta, while the crunch adds a new textural dimension. Serve with a drizzle of honey for a sweet and savory balance.
Minty Fresh Twist
Add a few drops of peppermint extract to the batter for a refreshing minty note. The mint pairs beautifully with chocolate, creating a classic combination. Keep the amount subtle to avoid overpowering the ricotta.
Spiced Pumpkin Variation
Incorporate a tablespoon of pumpkin puree into the ricotta mixture. The pumpkin adds moisture and a subtle sweetness, making it perfect for fall. Add cinnamon and nutmeg for a warm, aromatic finish.
Salted Caramel Surprise
Swirl a thin ribbon of salted caramel into the batter before baking. The caramel adds a buttery sweetness and a pop of color. Finish with a sprinkle of sea salt on top for a contrasting crunch.
Chocolate Ganache Filling
Replace the ricotta with a light chocolate ganache made from cream and dark chocolate. The ganache creates a richer, more decadent center. Use a small amount to keep the structure intact.
Citrus Zest Delight
Add lemon or orange zest to the batter for a bright, citrusy lift. The zest adds a fresh aroma and a subtle tang that cuts through the richness. This variation works especially well when served with a dollop of whipped cream.
These variations show how versatile this recipe can be. Whether you’re craving something nutty, minty, or rich, you can tweak the ingredients to fit your mood. The base recipe remains solid, and the tweaks bring it to life.
Storing and Bringing It Back to Life
Fridge Storage
Store finished pizzelles in an airtight container at room temperature for up to three days. Keep the container in a cool, dry place to maintain crispness. If you notice the edges becoming soft, place a paper towel in the container to absorb excess moisture.
Freezer Friendly
Freezing is an excellent option for longer storage. Place the baked pizzelles on a parchment‑lined tray and freeze until solid. Transfer them to a freezer bag, removing as much air as possible. They stay fresh for up to two months when frozen.
Best Reheating Method
To reheat, preheat your oven to 350°F and place the frozen pizzelles on a baking sheet. Bake for 5–7 minutes, or until the edges are crisp again. For a quick fix, microwave on low power for 15 seconds, but be careful not to overheat and melt the ricotta filling.
Add a tiny splash of water before reheating to create steam that helps the interior rehydrate and regain its creamy texture. This trick keeps the ricotta from drying out and ensures every bite remains luscious. Enjoy them fresh or reheated—they’re always a treat.