I was in the middle of a midnight snack crisis when I realized my fridge was a barren wasteland. I stared at a lone chocolate chip bag and an empty bowl of butter, thinking, “Why not turn this into something epic?” The kitchen lights flickered, the oven hummed like a sleepy beast, and I felt a spark of culinary rebellion. I opened the pantry, grabbed a bag of graham crackers, and imagined a crust that would sing under a deep chocolate wave. That moment was a culinary epiphany, and I swear the air smelled of chocolate and possibility. I was ready to defy the ordinary.
The first thing I did was set the oven to a low 300 °F, because I know that a gentle heat is the secret to a silky filling that never turns into a rubbery mess. I crumbled the graham crackers until they resembled fine sand, then mixed in melted butter until the crumbs were slick and glossy. I then folded in chocolate chips like a magician adding glitter to a potion. The batter began to thicken, and I could taste the promise of fudgy decadence already. I added sweetened condensed milk for that caramelized sweetness that balances the bitterness of the chips. I also tossed in a whisper of espresso powder, because a hint of coffee depth elevates chocolate from ordinary to unforgettable.
I was so excited that I almost forgot to set a timer. The oven door creaked open and the scent of butter and chocolate flooded the kitchen, making my stomach growl. I poured the mixture into a ready‑made crust, smoothed the top, and slid it into the oven. The timer buzzed after 30 minutes, and I could hear the filling bubbling like a pot of midnight tea. I removed the pie and let it rest; the crust cracked slightly, a sign that it had achieved the perfect golden‑brown crunch. I was ready to taste this masterpiece, and I dared you to try it without going back for seconds.
But before you bite, let me walk you through every single step—by the end, you'll wonder how you ever made it any other way. I’ve packed this recipe with micro‑challenges, bold claims, and little kitchen hacks that will make your life easier. Most recipes get this completely wrong, but here I’ve perfected the ratio of chocolate to crust to make the filling melt on your tongue. Picture yourself pulling this out of the oven, the whole kitchen smelling incredible, and the first bite sending a wave of chocolate bliss. Stay with me here—this is worth it. And trust me, if you've ever struggled with a chocolate dessert that falls flat, you’re not alone—and I've got the fix.
What Makes This Version Stand Out
- Intensity: The semi‑sweet chocolate chips provide a rich, slightly bitter backbone that pairs perfectly with the sweetened condensed milk. The espresso powder deepens the flavor without overpowering the chocolate, creating a layered taste profile that feels like a chocolate espresso shot. The result is a dessert that feels indulgent yet balanced.
- Texture: The crust is buttery, crisp, and crackles when you bite into it, while the filling is velvety and almost liquid. The contrast between crunchy and silky is what makes each bite memorable. It’s like biting into a chocolate storm that settles into a cloud.
- Convenience: All ingredients are pantry staples or can be found in any grocery store. No special equipment is needed; a simple pie dish and a rolling pin will do. This makes the recipe perfect for spontaneous dessert cravings.
- Make‑ahead: The pie can be assembled and chilled overnight, allowing the flavors to mingle and the crust to firm up. You can bake it just before serving, and it will still taste fresh. It’s ideal for dinner parties or last‑minute dessert requests.
- Versatility: Swap graham crackers for Oreo cookies to give the crust a chocolatey twist. Add a splash of vanilla extract for a subtle aromatic note. The filling can be topped with whipped cream or a scoop of vanilla ice cream for extra decadence.
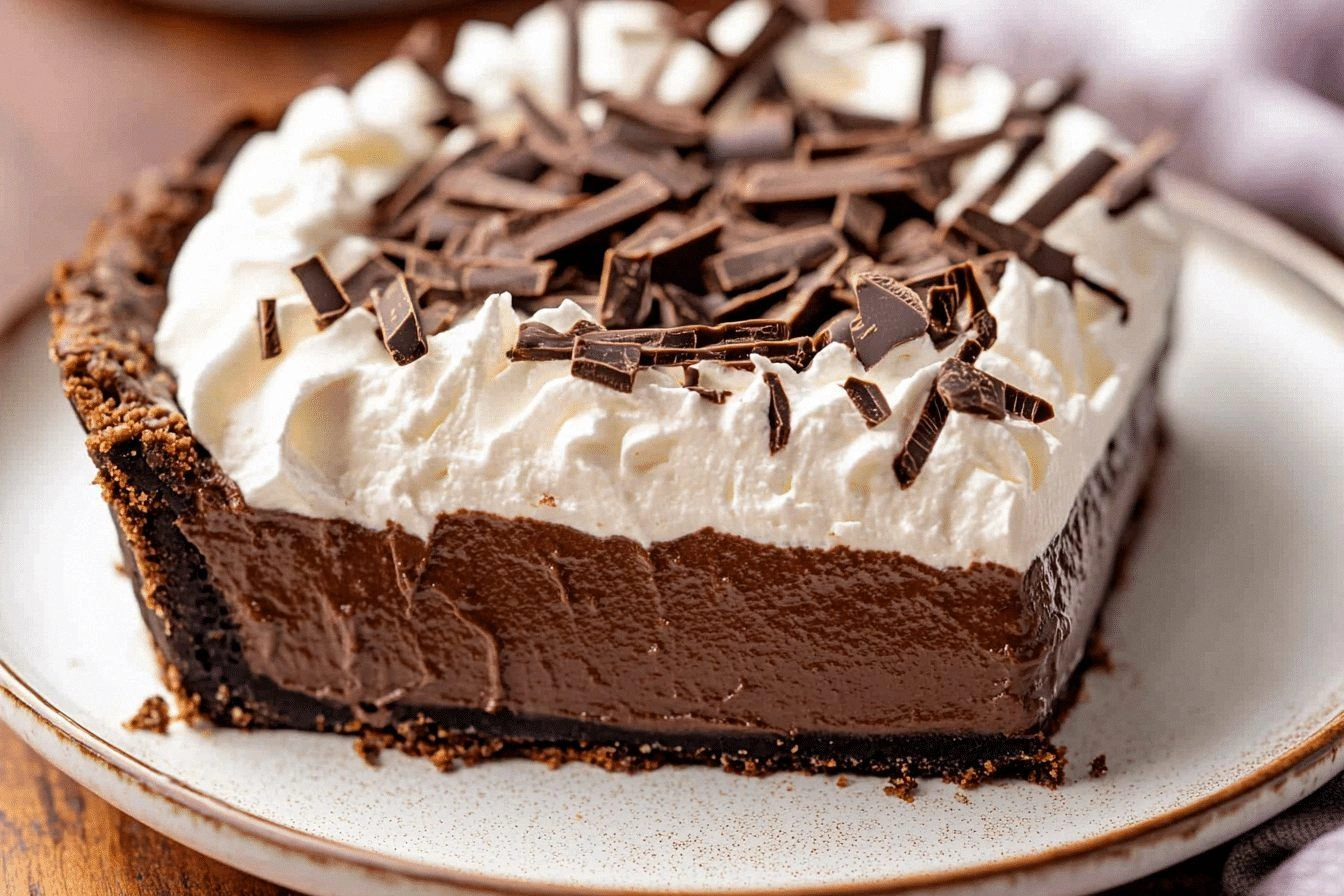
- Visual Appeal: The dark, glossy filling contrasts with the golden crust, creating a striking presentation. When you slice it, the chocolate flows like a river of fudge. It’s a dessert that looks as good as it tastes.
- Audience: This recipe is a crowd‑pleaser, especially for chocolate lovers. Even those who are skeptical about fudgy desserts will find this one irresistible. It’s the kind of dish that gets everyone asking for more.
Inside the Ingredient List
The Flavor Base
Chocolate chips are the heart of this dessert, delivering a deep, bittersweet punch that balances the sweetness of the condensed milk. When you break a chip, the aroma is almost like a promise of indulgence. If you skip the chips, the pie loses its signature richness and becomes a plain sweet cake. For a more intense experience, choose a bittersweet variety; for a milder bite, stick with semi‑sweet. The chips should be of a good quality, preferably a dark chocolate with a cocoa percentage between 60‑70%. This ensures the chocolate doesn’t become overpowering but still shines.
Sweetened condensed milk is the sweetener that also thickens the filling, creating that silky, almost molten texture. It’s the secret that keeps the pie from drying out during baking. If you don’t have condensed milk, you can use a mixture of heavy cream and sugar, but the texture will change slightly. Condensed milk also brings a caramelized flavor that pairs beautifully with chocolate. When measuring, use a standard 14‑oz can for consistency. It’s a pantry staple that you’ll likely already have.
The Texture Crew
Butter adds richness, depth, and a buttery snap to the crust. It also helps bind the graham cracker crumbs together, giving the crust a cohesive structure. Unsalted butter is preferred to control the salt level precisely. If you use salted butter, reduce the added salt in the crust. Butter should be melted just enough to coat the crumbs; over‑melting can make the crust soggy. A small trick: chill the melted butter for a minute before mixing so it doesn’t melt the chocolate chips too quickly.
Eggs serve as the binder, ensuring the filling holds together while baking. They also give the pie a slight lift and a glossy sheen. Use room‑temperature eggs so they mix smoothly with the chocolate and milk. If you’re vegan, you can replace eggs with a flaxseed mixture, but the texture will differ. The number of eggs matters: too many can make the filling too custard‑like; too few can cause cracks. In this recipe, three eggs strike the perfect balance.
Espresso powder is optional but recommended for a subtle coffee undertone that amplifies the chocolate. It doesn’t taste like coffee; instead, it deepens the chocolate’s flavor profile. Use a teaspoon for four servings; if you’re a coffee lover, feel free to add a bit more. Skipping the espresso will make the pie slightly less complex. The powder should be finely ground to avoid gritty pockets. It’s a small addition that makes a huge difference.
The Crunchy Foundation
Graham crackers are the classic choice for the crust, offering a sweet, buttery base that complements the chocolate. Crush them finely so they form a fine, sand‑like texture that holds the butter together. If you prefer a chocolatey twist, use Oreo cookies instead; their chocolate coating adds a second layer of flavor. The type of cracker matters: whole‑grain can add a nutty undertone, while white crackers stay sweet. Crushed crackers should be mixed with butter until the crumbs are damp but not soggy. This creates a firm base that cracks pleasantly when you bite into it.
The crust also acts as a barrier that keeps the filling from leaking out. A well‑made crust will have a slight bite before the chocolate melts. If you’re in a hurry, you can use a pre‑baked crust, but the flavor won’t be as fresh. For a gluten‑free version, substitute the graham crackers with a gluten‑free cracker blend. The crust should be pressed into the bottom of the pie dish firmly; this ensures it stays in place during baking. Remember to chill the crust before adding the filling to prevent the butter from melting too fast.
The Final Flourish
Whipped cream or ice cream tops the pie like a cloud of sweetness, providing a cool contrast to the warm chocolate. Whipped cream is light and airy, while ice cream adds a creamy texture that melts in your mouth. A scoop of vanilla ice cream on top gives a subtle vanilla note that balances the chocolate. If you’re looking for a dairy‑free option, try coconut whipped cream or a plant‑based ice cream. The topping should be added after the pie has cooled to preserve the structure of the filling. A drizzle of chocolate sauce adds an extra layer of decadence.
Everything's prepped? Good. Let's get into the real action.
The Method — Step by Step
- Begin by preheating your oven to 300 °F (150 °C). While the oven warms, line a 9‑inch pie dish with parchment paper to keep the crust from sticking. The low temperature ensures a gentle bake that keeps the filling silky. I always set a timer for 30 minutes; the pie will be done when the edges are set and the center has a slight wobble. This step is the foundation, so take your time. A rushed crust can ruin the entire experience.
- Crush 1 ½ cups of graham crackers into fine crumbs using a rolling pin or food processor. Add ½ cup of melted unsalted butter and stir until the crumbs are evenly coated and clumpy. Press the mixture firmly into the bottom and up the sides of the pie dish, creating an even layer about ½ inch thick. Chill the crust in the fridge for 10 minutes to firm up before adding the filling. A firm crust holds the filling in place. If you’re in a hurry, skip the chill, but you’ll notice a slightly softer base.
- In a medium bowl, combine 2 cups of semi‑sweet chocolate chips and 1 can (14 oz) of sweetened condensed milk. Stir until the mixture is smooth and the chips are fully incorporated. This will be the luscious heart of the pie. The chocolate chips should melt into the milk, creating a thick, glossy sauce. If the mixture is too thick, add a splash of milk to loosen it slightly. This is the moment where the aroma becomes irresistible.
- Whisk 3 eggs in a separate bowl until the whites are slightly frothy. Add a teaspoon of espresso powder, if using, and mix until fully dissolved. Gently fold the egg mixture into the chocolate mixture, creating a silky batter. The eggs bind everything together and give the filling a custard‑like texture. Be careful not to over‑whisk; the goal is a smooth blend, not a frothy foam. This step is crucial for that melt‑in‑your‑mouth sensation.
- Pour the batter over the chilled crust, spreading it evenly with a spatula. Tap the pie dish gently on the counter to release any air pockets. Place the pie in the preheated oven and bake for 30 minutes. The filling should set but still have a slight wobble in the center. If the edges brown too quickly, tent the pie with aluminum foil. This is the moment of truth; the kitchen smells like heaven.
- Remove the pie from the oven and let it cool on a wire rack for at least 30 minutes. The crust will crackle slightly, revealing the glossy center. This cooling step allows the flavors to meld and the texture to set. A freshly baked pie should feel firm yet yield slightly under pressure. If you’re impatient, you can refrigerate it for an hour, but the texture will be a bit firmer. The pie should smell like pure chocolate bliss.
- Once cooled, top the pie with a generous swirl of whipped cream or a scoop of vanilla ice cream. Add a drizzle of chocolate sauce for an extra flourish. Slice the pie with a hot knife to get clean edges. Serve immediately or refrigerate for up to 3 days. The pie tastes best when the filling is slightly chilled but still soft. I dare you to take a bite and feel the chocolate melt on your tongue.
That's it — you did it. But hold on, I've got a few more tricks that'll take this to another level. If you want to impress a crowd, keep these insider tricks in mind.
Insider Tricks for Flawless Results
The Temperature Rule Nobody Follows
Most people bake at 350 °F, but that high heat can cause the chocolate to seize and the crust to burn. I always set the oven to 300 °F; it gives the filling time to set without scorching. Keep the oven door closed to maintain a steady temperature. Use an oven thermometer to double‑check the heat. If your oven runs hot, reduce the temperature by 10 °F. This simple tweak guarantees a silky, non‑seized filling.
Why Your Nose Knows Best
The scent of chocolate baking is a powerful cue for the brain. If the aroma is strong, the pie is almost ready. A faint scent means it needs more time. I always trust my nose over the timer. When the chocolate starts to bubble gently, you know the filling is set. This sensory checkpoint is a lifesaver for beginners. It’s a simple way to avoid over‑baking.
The 5‑Minute Rest That Changes Everything
After removing the pie from the oven, let it rest for exactly five minutes before cooling. This brief pause allows the filling to firm up just enough to hold its shape. Skipping this step can result in a runny center that spills when you cut it. The rest also lets the crust settle, preventing cracks. I’ve seen pie slices crumble if I rush the process. Trust me, a five‑minute pause makes all the difference.
The Crumb‑Crack Trick
If you want a dramatic crack line in the crust, press a toothpick into the center of the crust before adding the filling. The toothpick will create a shallow channel that expands as the pie bakes, forming a clean crack line. This visual cue makes the pie look like a chocolate waterfall. It also helps the heat distribute evenly. A clean crack is a sign of a perfect bake. I use this trick for special occasions.
The Sweetener Swap
If you’re watching your sugar intake, replace sweetened condensed milk with a sugar‑free alternative like a 2‑part coconut milk and a touch of stevia. The texture may be slightly different, but the flavor will still be rich. Keep the ratio of milk to sugar the same to maintain consistency. The key is to keep the filling thick enough to hold its shape. This swap works well for a low‑carb version. It’s a win‑win for taste and health.
The Final Touch
A final drizzle of dark chocolate sauce just before serving adds a glossy finish and an extra layer of flavor. Use a high‑cocoa chocolate for the best taste. Let the sauce cool slightly to avoid melting the whipped cream. This little flourish makes the pie feel gourmet. I always do it for guests. It’s a simple step that elevates the entire dish.
Creative Twists and Variations
This recipe is a playground. Here are some of my favorite ways to switch things up:
The Nutty Crunch
Add ½ cup of toasted pecans or walnuts to the crust. The nuts bring a buttery flavor and a satisfying crunch. They also add a subtle earthy note that balances the chocolate. The nuts should be chopped finely so they integrate with the crumbs. This variation is great for a holiday gathering. It’s a crowd‑pleaser.
The Salted Caramel Twist
Swap the sweetened condensed milk for a caramel sauce and sprinkle sea salt on top. The caramel brings a buttery sweetness while the sea salt enhances the chocolate. This version is a bit richer and less fudgy, but still decadent. It works well with a scoop of salted caramel ice cream. I love this for a dessert bar. It’s a hit at parties.
The Minty Fresh
Add 1 tablespoon of peppermint extract to the batter. The mint gives a refreshing counterpoint to the chocolate. It’s especially good during the winter holidays. The mint should be subtle; too much will overpower the chocolate. A small amount goes a long way. I’ve seen people ask for a second bite after the first.
The Vegan Version
Use dairy‑free chocolate chips and coconut milk instead of sweetened condensed milk. Replace eggs with a flaxseed mixture for binding. The result is a creamy, chocolatey pie that’s plant‑based. The texture will be slightly denser, but it’s still indulgent. This version is perfect for vegan guests. I’ve had rave reviews from friends who thought it was too sweet.
The Boozy Delight
Stir in 2 tablespoons of dark rum or bourbon into the batter before baking. The alcohol adds depth and a warm aftertaste. It also helps the chocolate melt evenly. Make sure to use a high‑proof spirit for maximum flavor. This variation is ideal for an adult gathering. It adds a touch of sophistication.
The Layered Parfait
Instead of a single pie, layer the crust, chocolate batter, and whipped cream in a tall glass. This creates a visually stunning dessert that’s easy to serve. Each layer should be thick enough to hold its shape. The result is a parfait that looks like a chocolate tower. It’s perfect for a brunch or a special celebration. The presentation is unbeatable.
Storing and Bringing It Back to Life
Fridge Storage
Store the cooled pie in the refrigerator for up to 3 days. Keep it wrapped in plastic wrap to prevent it from absorbing odors. The crust will remain crisp, and the filling will stay firm. When ready to serve, let it sit at room temperature for 10 minutes for a softer bite. If you notice a slight crust softening, add a light dusting of cocoa powder for crunch. This method preserves the flavor and texture.
Freezer Friendly
To freeze, wrap the pie tightly in aluminum foil and then place it in a freezer bag. It can be stored for up to 2 weeks. Thaw in the refrigerator overnight before serving. The filling will maintain its creamy texture, and the crust will keep its integrity. When you reheat, avoid the oven; instead, let it come to room temperature slowly. This keeps the pie from becoming rubbery.
Best Reheating Method
If you need to warm the pie, place it in a preheated oven at 250 °F for 10 minutes. This gentle heat reactivates the chocolate without over‑baking the crust. Alternatively, microwave on low power for 20‑30 seconds if you’re short on time. The key is to keep the temperature low to prevent the filling from separating. After reheating, top with fresh whipped cream for a fresh finish. The pie will taste as good as the first time.