I’ll be honest — the first time I tried to combine jalapeño poppers with onion rings, the kitchen looked like a war zone and my taste buds were left in a state of confused euphoria. I had a bag of frozen onion rings, a jar of jalapeños, and an inexplicable urge to stuff something cheesy inside a crunchy circle. The result? A disaster of soggy rings and a bland bite that made me swear off “fusion” forever. That night, after a marathon of failed experiments, a daring friend dared me: “Make it the best version you can, or admit you’re a culinary coward.” I took the challenge, locked the pantry, and set out to create a snack that would make even the most skeptical palate scream for an encore.
Picture yourself in a kitchen where the air is thick with the scent of sizzling onions, the sharp bite of fresh jalapeños, and the buttery richness of melted cheese. You hear the sizzle of oil like a drumroll, feel the heat of the pan against your fingertips, and see the golden rings puff up like tiny, edible fireworks. The first bite is an orchestra: the onion’s sweet crunch, the popper’s creamy, spicy core, and a whisper of smoky bacon that lingers on the tongue. It’s the kind of snack that makes you forget about the world outside and focus solely on the glorious texture dance happening in your mouth.
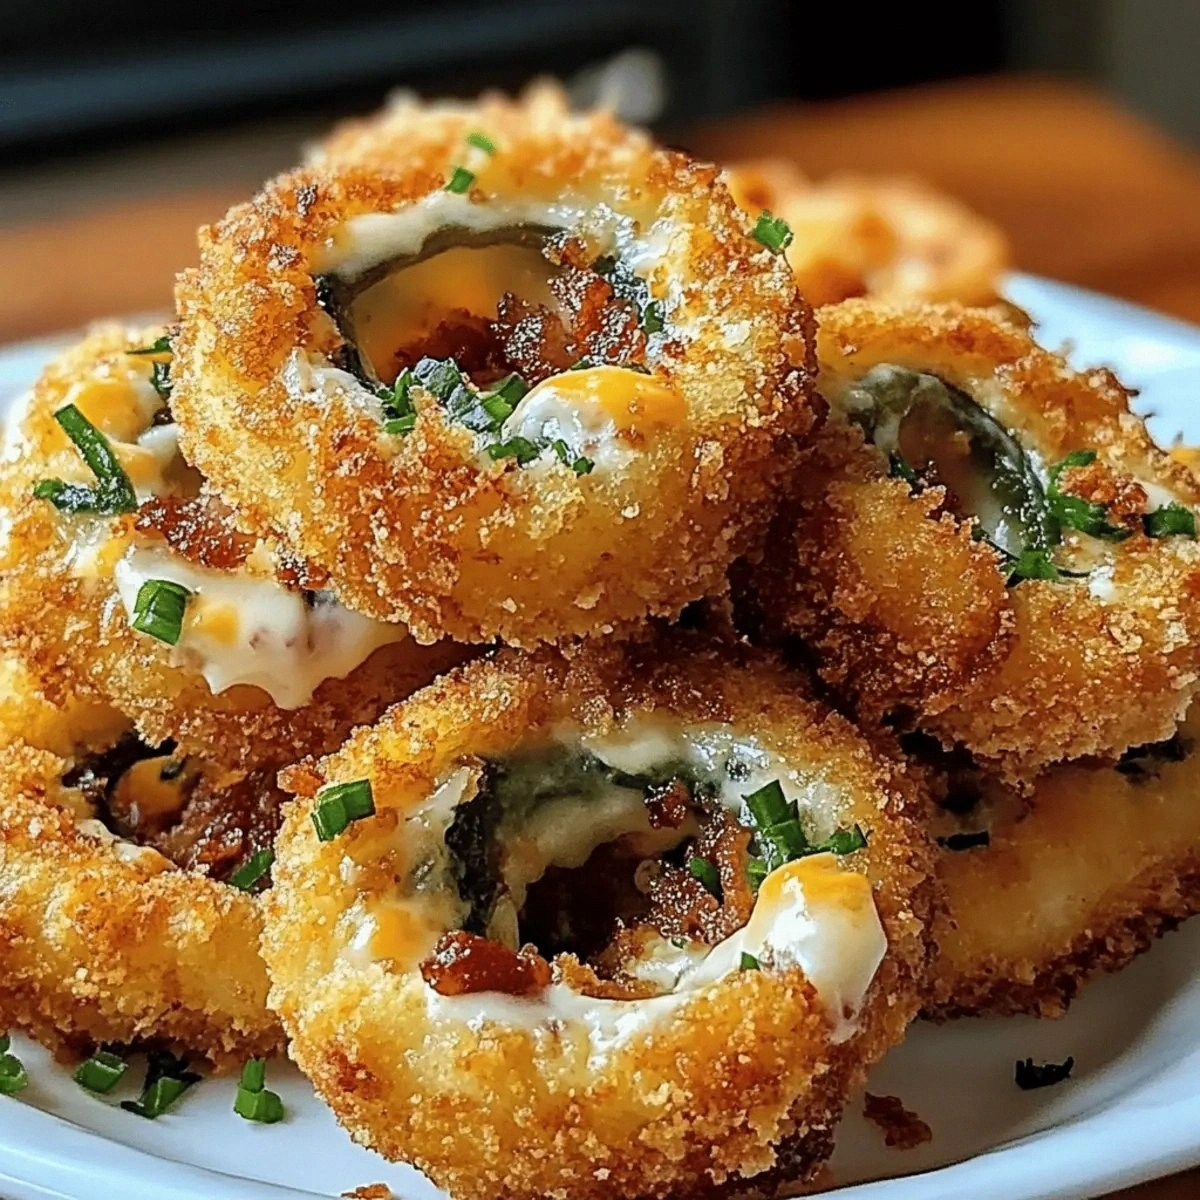
What makes this version stand out is a simple but game‑changing technique: we hollow out the onion rings just enough to cradle a jalapeño‑popper filling, then give them a double coating of seasoned breadcrumbs for that ultra‑crisp finish. Most recipes either drown the onion in batter or forget the crucial step of sealing the filling, resulting in a soggy mess. Here, we lock in the flavor with a quick flash‑fry, then finish with a second fry that creates a shell so crisp it shatters like thin ice under a spoon. I dare you to taste this and not go back for seconds.
Let me walk you through every single step — by the end, you’ll wonder how you ever made it any other way. We’ll dive deep into why each ingredient matters, reveal a couple of kitchen hacks that will save you minutes, and even explore creative twists that can turn this snack into a party centerpiece or a midnight craving quencher. Ready for the game‑changer? Buckle up, because this next part? Pure magic.
What Makes This Version Stand Out
- Flavor Explosion: The combination of jalapeño heat, creamy cheese, and smoky bacon creates a layered taste that evolves with every bite.
- Texture Contrast: You get a tender onion interior, a gooey cheese core, and a double‑crisp breadcrumb exterior that shatters delightfully.
- Simplicity: All ingredients are pantry‑friendly, and the steps use basic techniques anyone can master.
- Uniqueness: Few recipes actually stuff onion rings; most just coat them. This one takes the concept to a whole new level.
- Crowd Reaction: Guests often claim this is the best thing they’ve ever tasted at a gathering, and they’ll beg for the recipe.
- Ingredient Quality: Using fresh jalapeños and real bacon bits makes the flavor pop, unlike processed “popper” mixes.
- Cooking Method: The double‑fry technique guarantees a crunchy exterior without soaking the filling.
- Make‑Ahead Potential: You can prep the stuffing and even pre‑coat the rings ahead of time, then fry when guests arrive.
Inside the Ingredient List
The Flavor Base
The backbone of this snack is the jalapeño‑popper filling. Eight ounces of cream cheese provides a buttery canvas that holds the heat and melts beautifully when fried. If you skip the cream cheese, you’ll end up with a dry, crumbly interior that never reaches that luxurious melt‑in‑your‑mouth feel. Shredded cheddar adds a sharp, tangy note that balances the jalapeño’s heat, while the garlic powder injects a subtle aromatic depth. For a milder version, you can substitute half the jalapeños with a milder green pepper, but you’ll lose the signature kick.
The Texture Crew
Flour, eggs, and seasoned breadcrumbs form the triple‑layer coating that gives the rings their signature crunch. The flour creates a dry surface for the egg to cling to, while the egg acts as a glue for the breadcrumbs. Seasoned breadcrumbs (instead of plain) bring an extra burst of flavor that you’d otherwise have to season later. If you’re gluten‑free, swap the flour for rice flour and use gluten‑free panko; the texture will stay crisp, though the coating may be slightly lighter.
The Unexpected Star
Bacon bits are the surprise element that turns this dish from “good” to “legendary.” They add a smoky, salty crunch that pairs perfectly with the creamy interior. If you’re vegetarian, try using smoked tempeh crumbles or a sprinkle of smoked paprika for a similar depth. The oil, a generous two cups, should be a neutral high‑smoke‑point variety like canola or grapeseed; this ensures the rings fry evenly without imparting any off‑flavors.
The Final Flourish
Salt and pepper are the final seasoning that ties everything together. While the recipe lists them “to taste,” a pinch of sea salt on the finished rings can elevate the flavor dramatically, especially when paired with the cheese’s richness. Freshly cracked black pepper adds a subtle heat that complements the jalapeño without overwhelming it. Always taste your filling before stuffing; a little extra pepper can make the difference between “good” and “wow.”
Everything's prepped? Good. Let’s get into the real action…

The Method — Step by Step
Start by separating the onion rings from the bag and gently pulling each ring apart to create a small pocket. Use a sharp knife to make a shallow slit on one side—think of it as opening a tiny door for the filling. The onion should stay whole; if it cracks, you’ve either over‑handled it or the onion was too dry. Once you have a pocket, set the rings aside on a paper towel to dry slightly; this helps the coating stick later.
While the onions rest, prepare the jalapeño‑popper filling. Finely dice the two medium jalapeños (remove seeds for less heat, keep them for a fire‑breather’s version). In a mixing bowl, combine the cream cheese, shredded cheddar, garlic powder, and a generous handful of bacon bits. Fold in the jalapeños until the mixture is uniform. Taste and add a pinch of salt if needed—remember, the bacon already brings saltiness.
Now comes the stuffing part. Using a small spoon or a piping bag, spoon about a tablespoon of the cheese mixture into each onion pocket. Don’t overfill; the ring needs to close around the filling without bursting. Press the edges together gently, and if you notice any gaps, dab a little water on the seam and press again. This step is the heart of the recipe—if you get it right, the flavor center stays sealed during frying.
Set up a three‑station breading line: one shallow bowl with the cup of flour, a second bowl with the two beaten eggs, and a third bowl with the seasoned breadcrumbs. Lightly dust each stuffed ring in flour, shaking off excess. Dip it into the egg, allowing any stray egg to drip back into the bowl, then roll it in the breadcrumbs until fully coated. For extra crunch, double‑dip: repeat the egg and breadcrumb steps a second time.
Heat two cups of oil in a deep skillet or Dutch oven over medium‑high heat until it reaches 350°F (175°C). Use a thermometer—if you don’t have one, drop a breadcrumb in; it should sizzle and turn golden within 15 seconds. Carefully lower a batch of coated rings into the oil, making sure not to overcrowd the pan. The rings should float and begin to bubble immediately; that’s the sound of flavor forming.
Fry the rings for about 2‑3 minutes, or until the breadcrumbs turn a deep golden‑brown and the onions become tender. Using a slotted spoon, transfer them to a wire rack set over a baking sheet to drain excess oil. While they rest, increase the oil temperature to 375°F (190°C) for the second fry—this higher heat creates that final, ultra‑crisp shell.
Return the rings to the oil for a quick 30‑second blast. You’ll hear a sharper sizzle—this is the moment the exterior locks into that perfect crunch. Remove them again and place on the wire rack; sprinkle a pinch of sea salt while they’re still hot to enhance the flavor. Let them rest for a minute; this brief pause lets the interior settle so the cheese doesn’t ooze out when you bite.
Serve immediately with a side of cool ranch or a drizzle of chipotle mayo. The contrast between the hot, crispy ring and the cool dip is a sensory fireworks display that will have everyone reaching for more. And remember, the first bite is the most crucial—let the ring sit on your tongue for a second before chewing so the cheese can melt fully and coat the onion’s sweet layers.
That’s it — you did it. But hold on, I’ve got a few more tricks that’ll take this to another level. These insider tips will make sure every batch you make is consistently flawless, whether you’re feeding a crowd or just treating yourself after a long day.
Insider Tricks for Flawless Results
The Temperature Rule Nobody Follows
Most home cooks set the oil to a single temperature and hope for the best. The secret is a two‑stage fry: start at 350°F to cook the onion through, then crank it up to 375°F for that final crunch. This method prevents the breadcrumbs from soaking up oil while still ensuring the interior is tender. I once tried a single‑temperature fry and ended up with soggy rings that never achieved that satisfying snap.
Why Your Nose Knows Best
Your sense of smell is a more reliable indicator than a timer when it comes to frying. When the oil reaches a faint, nutty aroma, you’re nearing the perfect frying window. If you hear a high‑pitched scream, the oil is too hot and will scorch the coating. Trust your nose; it’s the same trick professional chefs use in bustling restaurant kitchens.
The 5‑Minute Rest That Changes Everything
After the first fry, let the rings rest on a rack for five minutes. This short pause allows the moisture inside the onion to redistribute, preventing steam from escaping during the second fry. The result? A ring that stays juicy inside while the exterior stays crisp. Skipping this step is the fastest way to end up with a dry, crumbly bite.
Bacon Bit Boost
If you love bacon, crumble an extra half‑cup of cooked bacon and fold it into the filling right before stuffing. The added fat renders during frying, enriching the cheese and creating tiny pockets of smoky crunch. A friend tried this once and declared it “the most addictive snack she’s ever made.”
Seasoned Breadcrumb Swap
For an extra flavor punch, mix a tablespoon of grated Parmesan into the seasoned breadcrumbs. The Parmesan melts into the coating, creating a subtle umami layer that pairs beautifully with the jalapeño heat. Just be careful not to over‑salt, as the cheese adds its own salinity.
Creative Twists and Variations
This recipe is a playground. Here are some of my favorite ways to switch things up:
Southwest Sunrise
Swap the cheddar for pepper jack, add a teaspoon of cumin to the filling, and finish the rings with a drizzle of lime crema. The citrus brightens the heat and gives the snack a fresh, daytime vibe.
Cheesy Bacon Explosion
Increase the bacon bits to 1½ cups, fold in a handful of shredded mozzarella, and sprinkle extra bacon on top after the second fry. This version is for the true cheese‑and‑bacon aficionado.
Veggie‑Friendly Popper
Replace the cream cheese with a plant‑based alternative, use smoked paprika‑seasoned breadcrumbs, and add diced roasted red peppers to the filling. The flavor profile stays bold while catering to a vegetarian palate.
Spicy Sweet Fusion
Add a tablespoon of honey to the breadcrumb mixture and swap half the jalapeños for finely diced pineapple. The sweet‑heat combo creates a tropical twist that’s perfect for summer gatherings.
Mini Bite‑Size Popper Rings
Cut the onions into smaller rings (about 2 inches in diameter) and use a teaspoon of filling. These bite‑size versions are perfect for cocktail parties and can be served on a platter with multiple dipping sauces.
Storing and Bringing It Back to Life
Fridge Storage
Place cooled rings in an airtight container lined with paper towels to absorb excess oil. They’ll stay fresh for up to three days. When ready to serve, reheat them in a preheated 375°F oven for 8‑10 minutes; the oven revives the crunch without re‑frying.
Freezer Friendly
After the first fry (but before the second), lay the rings on a baking sheet and freeze until solid. Transfer them to a zip‑top freezer bag; they’ll keep for up to two months. When you’re ready to eat, fry them straight from frozen for the second fry—no thawing needed.
Best Reheating Method
For the ultimate reheated crunch, use a hot skillet with a splash of oil and a quick 30‑second sear on each side. Add a tiny splash of water to the pan and cover for 30 seconds; the steam helps the interior stay moist while the exterior regains its snap.