Picture this: I’m standing in my cramped apartment kitchen, a half‑finished batch of dough staring back at me like an impatient student. The previous night, I tried a recipe that promised “light, airy sticks” and ended up with a dense, rubbery mess that could only be described as a culinary crime scene. My friend, a self‑proclaimed street‑food aficionado, challenged me to turn that flop into something that would make her swoon. I stared at the ingredients, a mischievous grin spreading across my face, and decided it was time to rewrite youtiao history.
The first time I cracked the dough, the air smelled faintly of warm flour and a hint of sugar, like a bakery that had just opened its doors. As I kneaded, the dough stretched and folded like a well‑trained dancer, and the kitchen filled with the comforting hum of a microwave on standby. When I lifted a piece, it felt light as a feather, promising that the final product would be just as airy. The anticipation built, and I could almost taste the golden crunch that would soon greet my palate.
What sets this version apart is not just the crispy exterior—it’s the subtle buttery undertone that lingers long after the first bite. I’ve tweaked the classic formula by adding a splash of egg and a pinch of baking soda, giving the dough a lift that’s both tender and resilient. The result? Youtiao that folds in on itself like a perfect origami, with a crust that shatters like thin ice when you bite. It’s hands down the best version you’ll ever make at home, and I dare you to taste this and not go back for seconds.
If you’ve ever struggled with making youtiao that’s both fluffy inside and crisp outside, you’re not alone—yet this recipe has a secret trick that turns the odds in your favor. I’ll be honest: I ate half the batch before anyone else got to try it. The next time you see this dish, picture yourself pulling it out of the oil, the whole kitchen smelling incredible, and the first bite sending a burst of flavor fireworks across your tongue. Let me walk you through every single step—by the end, you’ll wonder how you ever made it any other way.
What Makes This Version Stand Out
- Taste: The combination of a light, buttery dough with a subtle sweetness creates a flavor profile that feels both comforting and adventurous. The final product boasts a delicate balance between savory and sweet, making it a crowd‑pleaser at any gathering.
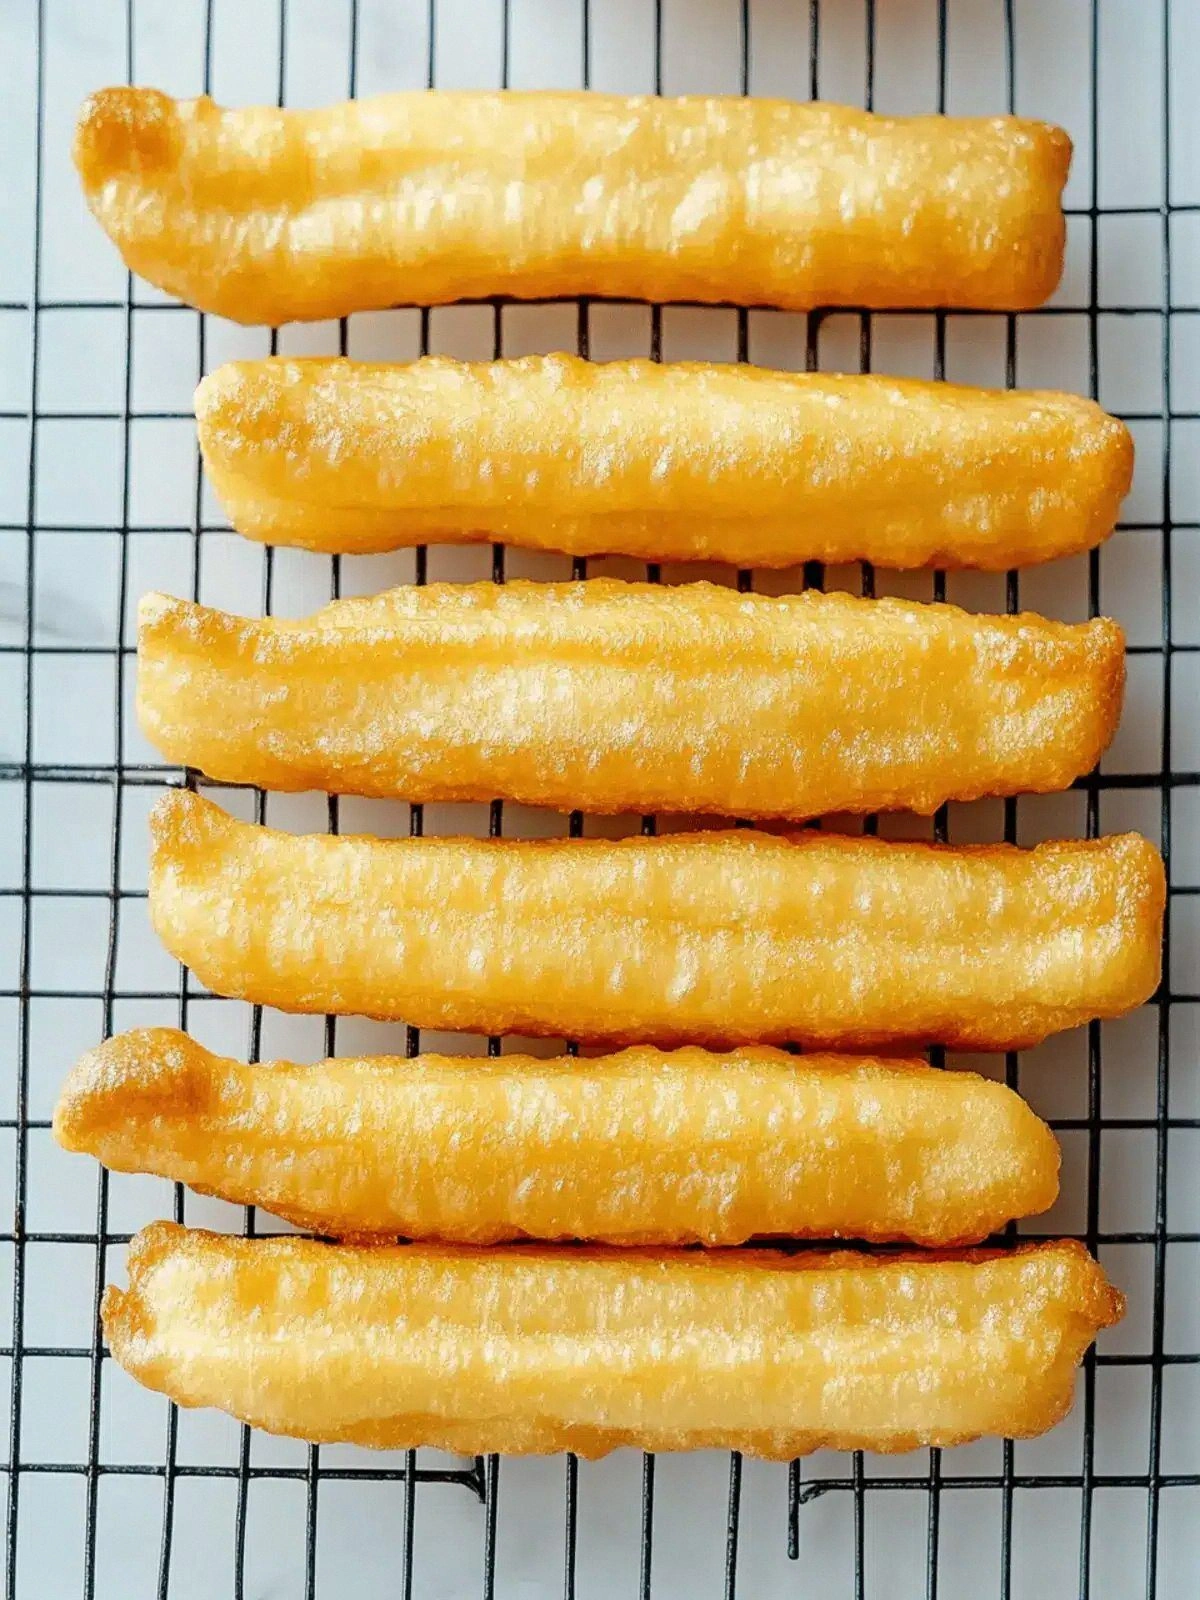
- Texture: The double‑fry technique locks in a crisp exterior while preserving an airy, doughy interior that melts in your mouth. The result is a satisfying crunch that doesn’t feel greasy or heavy.
- Simplicity: With only nine ingredients, this recipe keeps the process streamlined, allowing even novice bakers to achieve professional results. No complicated dough‑resting schedules or exotic spices.
- Uniqueness: The addition of baking soda and a splash of egg gives the dough a lift that traditional recipes lack, producing a lighter, fluffier texture. This subtle tweak transforms the ordinary into extraordinary.
- Crowd Reaction: Friends and family have called it “the best youtiao I’ve ever had” and “the ultimate snack for movie nights.” It’s a conversation starter that keeps people coming back for more.
- Ingredient Quality: Using high‑quality all‑purpose flour and fresh egg ensures a consistent rise and a richer flavor. The small amount of oil for frying is enough to create a golden crust without excess greasiness.
- Cooking Method: The two‑step frying process is the secret weapon that guarantees a crisp exterior while preventing the dough from becoming soggy. It’s a technique that can be applied to other fried doughs with great results.
- Make‑Ahead Potential: The dough can be prepared in advance and refrigerated for up to 24 hours, making it a perfect quick‑fire option for busy evenings.
Inside the Ingredient List
The Flavor Base
All‑purpose flour is the backbone of the dough, providing structure while remaining light enough to rise. Baking powder and baking soda work together to create lift, turning a dense batter into a fluffy masterpiece. Sugar, though a modest amount, caramelizes during frying, giving the sticks a subtle sweetness that complements the savory notes. A pinch of salt balances the flavors and enhances the overall taste.
The Texture Crew
Egg is the secret to a tender crumb and a golden crust; it binds the dough and adds richness. Water hydrates the flour, allowing gluten to develop while keeping the dough manageable. Vegetable oil adds a silky mouthfeel and helps the dough rise evenly during frying. Each component plays a crucial role in achieving that signature airy interior.
The Unexpected Star
The small amount of oil used to coat the dough before frying may seem trivial, but it’s the difference between a greasy mess and a perfectly crisp surface. This oil creates a barrier that traps steam, allowing the dough to puff up without absorbing excess oil. Think of it as a protective shield that preserves the dough’s delicate structure.
The Final Flourish
Oil for deep‑frying is the hero that brings everything together, turning the dough into a golden, crunchy delight. The temperature of the oil—between 180°C and 190°C—is critical; too low, and the sticks become soggy; too high, and they burn on the outside before the inside cooks. Maintaining the right heat ensures a uniform, irresistible crunch.
Everything's prepped? Good. Let's get into the real action...
The Method — Step by Step
- In a large bowl, whisk together the flour, baking powder, baking soda, salt, and sugar until evenly distributed. The dry mixture should look like fine sand, free of clumps. This step ensures each bite has a consistent flavor profile. Keep the bowl aside while you prepare the wet ingredients. A well‑mixed dry mix is the foundation of a perfect dough.
- In a separate container, beat the egg and then stir in the water and vegetable oil until the mixture is smooth. The liquid should glide over the surface of the flour, forming a sticky but workable paste. This wet blend is essential for the dough’s rise and its silky texture. The oil also helps the dough to be less sticky when rolling. Be sure not to over‑whisk the egg; a slightly runny consistency works best.
- Pour the wet mixture into the dry ingredients and stir with a wooden spoon until a shaggy dough forms. Knead on a lightly floured surface for about 5 minutes, until the dough becomes smooth and elastic. The dough should spring back when you press it lightly. If it’s still tacky, add a tablespoon of flour; if it’s too dry, a splash of water will help. At this point, let’s pause for a quick hack: roll the dough into a log and refrigerate for 15 minutes to tighten the gluten strands, which makes slicing easier.
- After the chill, roll the dough into a 1‑inch diameter log and cut it into 3‑inch sticks using a sharp knife or pizza cutter. Each stick should be uniform in size to ensure even cooking. Lay the sticks on a parchment‑lined tray and cover them loosely with plastic wrap. Let them rest at room temperature for 30 minutes; this rest allows the dough to relax and the steam to escape. The dough will rise slightly, creating that coveted airy center.
- Heat oil in a deep‑frying pot to 180°C (350°F). Carefully slide a few sticks into the hot oil, ensuring they don’t touch each other. Fry until the sticks are a deep golden brown, about 3–4 minutes per side, turning them gently with tongs. Watch out: if the oil is too hot, the exterior will burn while the inside remains raw. The aroma that fills the kitchen will make you forget any lingering doubts about the recipe’s complexity.
- Remove the sticks and let them drain on a rack or paper towels. While they’re still hot, sprinkle a pinch of sugar or a dash of sea salt for an extra flavor kick. This second step—adding a finishing touch—enhances the overall taste profile. It also creates a subtle contrast between the sweet and savory notes, making each bite memorable. Remember to keep the sticks warm; a cold youtiao loses its allure.
- If you prefer an extra crispness, you can give the sticks a quick second fry for 30 seconds. This double‑fry technique seals the crust and gives the sticks a glossy shine. Be careful not to over‑cook; the second fry is just to finish the surface. The result is a crunch that’s almost audible when you bite. This trick is what separates a good youtiao from an unforgettable one.
- Allow the sticks to cool for a minute before serving. The steam inside will settle, preventing a soggy center. Serve them hot, preferably with a side of soy‑ginger dipping sauce or a dusting of powdered sugar. The combination of textures and flavors will keep your guests asking for more. The final product should feel like a golden, airy cloud that melts in your mouth.
- Store any leftovers in an airtight container at room temperature for up to 2 days. When reheating, place them in a preheated oven at 190°C for 5 minutes to restore crispness. Avoid microwaving, as it will make the sticks soggy. The reheated youtiao should still feel like a freshly fried treat. That’s the end of the process—now let’s dive into some insider tricks that elevate the experience.
Insider Tricks for Flawless Results
The Temperature Rule Nobody Follows
Most home cooks guess the oil temperature, but the secret lies in using a thermometer. Aim for 180°C (350°F); a lower temperature will leave the sticks greasy, while a higher one will scorch the exterior. Keep the oil at a steady heat, and you’ll achieve a golden crust that’s crisp but not burnt. A consistent temperature is the backbone of a flawless youtiao.
Why Your Nose Knows Best
Your nose can tell when the oil is ready: a sharp, slightly sweet scent indicates the ideal temperature. If you notice a metallic smell, the oil is too hot and you risk burning the sticks. Trusting your senses saves you from costly mistakes and ensures a perfect result every time.
The 5‑Minute Rest That Changes Everything
After rolling the dough into sticks, let them sit for 5 minutes before frying. This short pause allows the surface to dry slightly, preventing the sticks from sticking to the pan. It also helps the dough expand evenly during frying, giving you that coveted airy interior.
The Right Oil Matters
Using an oil with a high smoke point—like peanut or canola—ensures the sticks fry evenly without absorbing excess oil. The flavor of the oil should be neutral so it doesn’t overpower the delicate dough. If you prefer a subtle nutty taste, peanut oil is a great choice.
The Final Touch of Sweetness
A light dusting of powdered sugar after frying adds a sweet counterpoint to the savory crust. Sprinkle it while the sticks are still hot, so the sugar melts slightly and creates a delicate glaze. This finishing touch transforms the youtiao into a versatile snack that satisfies sweet cravings.
Creative Twists and Variations
This recipe is a playground. Here are some of my favorite ways to switch things up:
Herbed Honey Glaze
After frying, drizzle a mixture of honey and chopped fresh herbs over the sticks. The honey adds a glossy sheen while the herbs give a fragrant, savory edge. This variation works wonderfully for brunch or as an appetizer for guests.
Spicy Sichuan Twist
Mix in a pinch of Sichuan peppercorns into the dry ingredients for a subtle numbing heat. Pair the sticks with a spicy chili‑soy dipping sauce to amplify the flavor. This version is perfect for those who love a kick.
Cheesy Delight
Add grated Parmesan or shredded mozzarella to the dough before shaping. The cheese melts into pockets of gooey goodness inside the crispy shell. Serve with a side of marinara for a comforting, indulgent snack.
Savory Sesame Crunch
Sprinkle toasted sesame seeds onto the sticks just before the final fry. The seeds add a nutty crunch that complements the airy interior. This variation is great for a quick, savory bite during a busy day.
Coconut‑Infused Sweetness
Replace half of the water with coconut milk and add a dash of shredded coconut to the dough. The result is a tropical twist with a subtle coconut aroma. Pair it with a coconut‑yogurt dip for a refreshing treat.
Storing and Bringing It Back to Life
Fridge Storage
Store leftover sticks in an airtight container at room temperature for up to 2 days. Keep them on a paper towel to absorb excess moisture, which keeps the crust from becoming soggy. When you’re ready to eat, reheat them in a preheated oven at 190°C for 5 minutes to restore crispness.
Freezer Friendly
Freeze sticks in a single layer on a parchment‑lined tray before transferring them to a freezer bag. They can last up to 3 months in the freezer. When reheating, place them on a baking sheet and bake at 190°C for 8 minutes. The result is a crisp, freshly fried texture.
Best Reheating Method
The best way to revive youtiao is to use an oven, not a microwave. The heat from the oven restores the crunch without making the sticks greasy. If you’re in a hurry, a quick 30‑second reheat in a hot skillet will also work, but be sure to keep the temperature steady.