Remember that night when the kitchen smelled like burnt sugar and the oven door was stuck? I was about to call it a disaster until a friend dared me to turn that sticky mess into something sweet. I grabbed a jar of golden syrup, a handful of caster sugar, and a dash of bicarbonate, and the room filled with a caramel scent that felt like a hug from the inside. This is not just another honeycomb recipe; it’s a crunchy, buttery, caramelized revelation that will make you question why you ever settled for plain ice cream. And if you think honeycomb is just a snack, think again—this version is the ultimate indulgence.
Picture yourself pulling this out of the oven, the whole kitchen smelling incredible, the golden shards clinking like tiny cymbals as they set on parchment. The moment the first piece cracks, a sweet, buttery aroma floods your senses, and you can’t help but taste the caramel before you even bite. That sizzle when it hits the pan? Absolute perfection. I dare you to taste this and not go back for seconds. It’s a moment where the kitchen becomes a stage and you, the chef, the star.
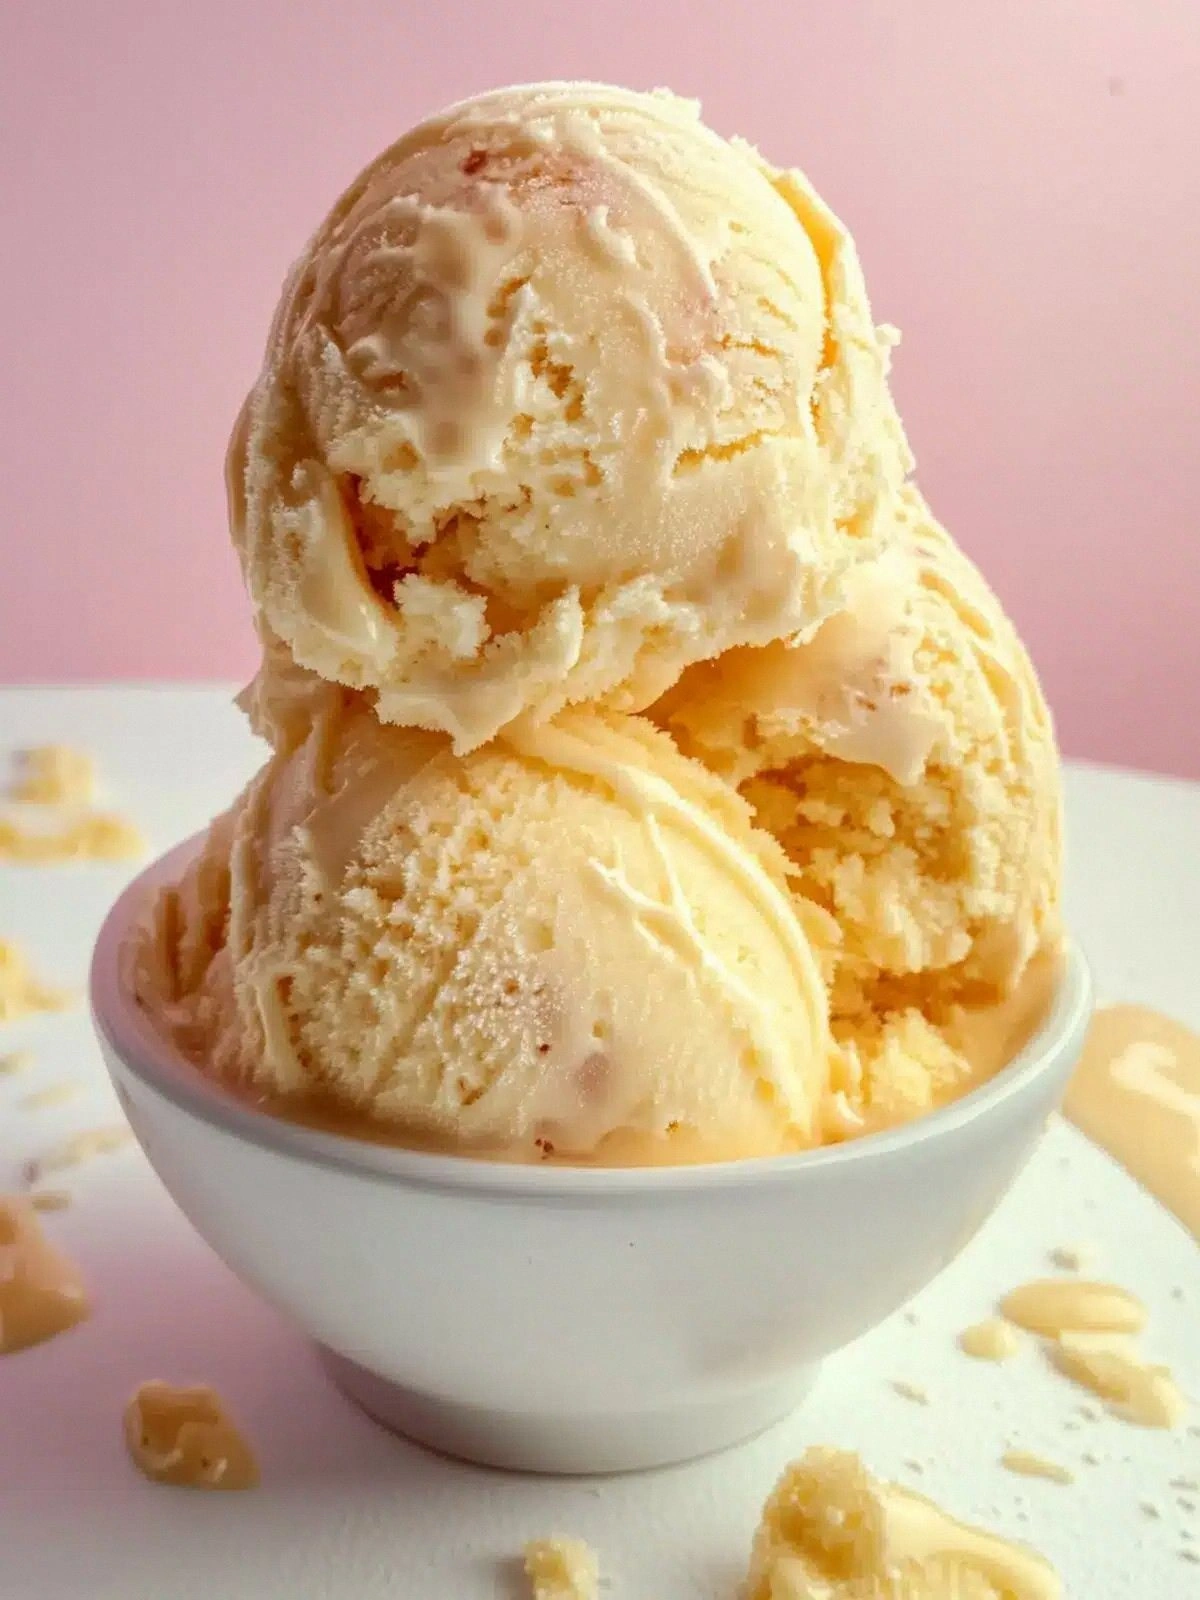
I’ve spent years hunting for that one recipe that feels both nostalgic and brand new, and this honeycomb ice cream does exactly that. It marries the crunch of caramelized sugar with the creamy depth of condensed milk and double cream, creating a texture that’s simultaneously airy and dense. The golden syrup gives it a silky sweetness that lingers on the tongue, while the bicarbonate of soda adds that signature pop and lightness that makes the shards crackle when you bite. This version stands out because it doesn’t just layer flavors—it fuses them into a single, unforgettable experience.
If you’ve ever struggled with making a crisp honeycomb that actually holds its shape, you’re not alone—and I’ve got the fix. Most recipes get this completely wrong, ending up with a sticky mess or a brittle, glassy candy that shatters like thin ice. The secret? A precise temperature control and an unexpected use of condensed milk to balance the sweetness. Stay with me here—this is worth it. Let me walk you through every single step, and by the end, you’ll wonder how you ever made it any other way.
What Makes This Version Stand Out
- Taste: The caramel notes are deep yet bright, thanks to the golden syrup that carries a subtle floral hint, creating a flavor profile that feels both indulgent and sophisticated.
- Texture: The honeycomb shards are light and airy, with a satisfying snap that gives way to a smooth, velvety ice cream base that coats the palate like velvet.
- Simplicity: You only need five ingredients, all pantry staples, yet the result feels like a gourmet dessert that could have been made in a five-star kitchen.
- Uniqueness: The combination of condensed milk and double cream creates a custard‑like consistency that’s rarely seen in traditional honeycomb recipes.
- Crowd Reaction: Guests will be stunned by the contrast of crunch and cream, and they’ll keep asking for the recipe—no, you’re not the only one who’s fallen in love.
- Ingredient Quality: Using a high‑quality golden syrup and fresh double cream elevates the flavor and ensures a silky mouthfeel that can’t be replicated with cheap substitutes.
- Cooking Method: The step‑by‑step temperature control ensures that the honeycomb reaches the “hard crack” stage without burning, while the gentle heating of the milk mixture preserves the delicate balance of sweetness.
- Make‑Ahead Potential: Once the honeycomb shards are made, they can be stored in an airtight container for weeks, allowing you to build the ice cream base on the fly and keep the process quick.
Inside the Ingredient List
The Flavor Base
Golden syrup is the star of this dessert, providing a rich, buttery sweetness that’s far superior to regular honey or maple syrup. It’s made from sugarcane juice that’s been refined and caramelized, giving it that deep amber hue and a faint floral undertone. If you skip it, the honeycomb will taste flat and lack the silky finish that makes this ice cream so irresistible. For an alternative, you can use dark corn syrup, but be aware it will introduce a slightly different flavor profile.
Caster sugar is the backbone of the caramelization process. Its fine crystals dissolve quickly, allowing the sugar to melt evenly and reach the necessary temperature without scorching. If you only have regular white sugar, you can crush it into smaller granules, but it may take longer to dissolve. A quick trick: stir the sugar into a cold saucepan and heat it gently; this prevents the sugar from clumping and ensures a smooth honeycomb.
The Texture Crew
Bicarbonate of soda is the secret agent that gives honeycomb its signature puff. When it reacts with the hot syrup, it releases carbon dioxide bubbles that expand and trap air, creating that light, airy structure. If you forget the bicarbonate, the shards will be dense and chewy, losing that delightful crunch. A common mistake is adding it too late; add it just as the syrup reaches the hard crack stage for maximum effect.
Condensed milk adds a custard‑like body that balances the sweetness of the honeycomb. It’s thick, creamy, and packed with natural sugars that caramelize gently when heated. The milk’s proteins help stabilize the ice cream base, preventing ice crystals from forming too large. If you’re lactose intolerant, you can substitute a plant‑based condensed milk, but the texture will shift slightly, becoming a bit more watery.
The Unexpected Star
Double cream is the unsung hero that turns a simple custard into a luscious, velvety ice cream. Its high fat content (about 48%) coats the mouth and gives the dessert a luxurious mouthfeel. When combined with condensed milk, it creates a silky base that complements the crunchy shards. If you’re looking to lighten the dish, replace half the double cream with heavy whipping cream, but expect a slightly thinner consistency.
The final flourish of this recipe is the way the honeycomb shards are folded into the warm milk mixture. This step ensures that each bite of ice cream contains a perfectly balanced crunch, rather than a single, isolated candy. If you skip the folding step, you’ll end up with a plain ice cream that lacks the signature honeycomb texture. The folding process also helps to evenly distribute the shards, preventing clumps and ensuring a consistent experience throughout.
Everything's prepped? Good. Let's get into the real action...
The Method — Step by Step
- Step 1: Prep the Pan. Line a 9‑inch square baking pan with parchment paper, ensuring the paper extends a few inches beyond the edges. This will keep the honeycomb from sticking and make cleanup a breeze. Heat a heavy‑bottomed saucepan over medium heat, then pour in the golden syrup and caster sugar, stirring constantly. The sugar will dissolve slowly—patience is key, or you risk burning the syrup.
- Step 2: Bring to a Boil. Allow the mixture to come to a gentle boil, then let it simmer for 5 minutes while stirring every 30 seconds. You’ll notice the color shifting from a pale amber to a rich, deep gold. This is the moment where the sugar’s flavor profile deepens, releasing caramel notes that will permeate the entire dessert.
- Step 3: Hit the Hard Crack Stage. Increase the heat to medium‑high and use a candy thermometer to watch the temperature climb. Once it reaches 120°C (248°F), you’re at the hard crack stage—this is where the magic happens. The syrup will harden instantly when dropped into cold water, forming brittle shards. If you’re not using a thermometer, test by dropping a small amount into a glass of cold water; it should solidify immediately.
- Step 4: Add Bicarbonate. Immediately remove the pan from the heat and sprinkle the bicarbonate of soda over the hot syrup. The mixture will fizz vigorously—this is the pop you’re looking for. Stir for 15 seconds until the fizz subsides. If you add the bicarbonate too late, the shards will be dense and chewy, but if you add it too early, you’ll lose the crunch. Timing is everything.
- Step 5: Pour onto Parchment. Quickly pour the hot mixture onto the lined pan, spreading it evenly with a spatula. The honeycomb will set almost instantly, forming a thin, translucent sheet. Allow it to cool for 10 minutes, then break it into shards using a pizza cutter or a knife. The shards should snap cleanly, revealing a glossy, golden interior.
- Step 6: Warm the Milk Mixture. While the honeycomb cools, combine the condensed milk and double cream in a separate saucepan. Warm the mixture over low heat, stirring constantly to prevent scorching. Once it’s just warm, remove from heat and let it cool slightly. The warm milk will help the shards soften just enough to bind without losing their crunch.
- Step 7: Fold in Honeycomb. Gently fold the honeycomb shards into the warm milk mixture, ensuring each shard is coated. The shards will begin to soften, but they should still maintain their structure. This step creates the signature “honeycomb ice cream” texture, where each bite delivers a burst of caramelized crunch followed by silky cream.
- Step 8: Churn the Ice Cream. Pour the mixture into your ice cream maker and churn according to the manufacturer’s instructions, usually about 20–25 minutes. The churned ice cream will be thick and creamy, with tiny pockets of honeycomb embedded throughout. If you don’t have an ice cream maker, pour the mixture into a shallow dish, freeze, and stir vigorously every 30 minutes for 2–3 hours until the desired consistency is reached.
- Step 9: Freeze to Firm. Transfer the churned ice cream to a freezer‑safe container, smoothing the top with a spatula. Cover with parchment and then foil to prevent ice crystals from forming. Freeze for at least 4 hours, or until firm. When you scoop it, the shards should still be intact, offering that perfect crunch in every spoonful.
That’s it—you did it. But hold on, I’ve got a few more tricks that will elevate this dessert from great to unforgettable.
Insider Tricks for Flawless Results
The Temperature Rule Nobody Follows
Most people think any caramel temperature will work, but the hard crack stage is the only one that guarantees that airy crunch. Use a candy thermometer; if you don’t have one, test the syrup by dropping a small amount into cold water—it should solidify instantly. Skipping this step often results in a sticky, gummy honeycomb that clumps in the ice cream. I once made a batch at 110°C, and the shards turned into a chewy, caramel‑like mess that I had to discard.
Why Your Nose Knows Best
The aroma of caramelized sugar is a powerful indicator of progress. A bright, nutty scent signals that the sugars are caramelizing properly. If the smell is faint or sweet like raw sugar, you’re not yet at the right stage. Trust your nose; it’s a better judge than your eyes or a thermometer in many cases. I’ve saved countless batches by pausing to sniff the mixture and noticing the subtle shift to a deeper, richer aroma.
The 5‑Minute Rest That Changes Everything
After adding the bicarbonate, give the mixture a 5‑minute rest before pouring it onto parchment. This allows the bubbles to stabilize, preventing uneven cracking. During this pause, the shards will begin to form a thin, translucent film that makes them easier to break. I used to pour immediately and ended up with shards that were too brittle, causing them to shatter into fine dust. The 5‑minute rest is a game‑changer.
Keep the Milk Warm, Not Hot
When warming the condensed milk and double cream, keep the temperature low to avoid curdling. A gentle simmer is enough to loosen the mixture, allowing the shards to soften without melting. If the milk gets too hot, it will separate, resulting in a watery ice cream that lacks richness. I’ve learned that a low heat with constant stirring creates the smoothest texture.
Use Parchment for a Clean Release
Lining the pan with parchment not only prevents sticking but also adds a subtle flavor note to the honeycomb. The parchment’s neutral taste allows the caramel flavors to shine. If you’re in a hurry, you can use a silicone mat, but parchment gives a slightly crisp edge to the shards that enhances the crunch.
Freeze Quickly for Smoothness
After churning, transfer the ice cream to a shallow container and freeze it quickly to lock in the texture. A fast freeze reduces the formation of ice crystals, keeping the ice cream silky. I recommend placing the container in the coldest part of the freezer and covering it with a tight lid to prevent freezer burn.
Creative Twists and Variations
Nutty Nirvana
Add toasted almonds or hazelnuts to the honeycomb shards before folding them into the milk mixture. The nuts provide a contrasting crunch and a nutty aroma that complements the caramel. Sprinkle the finished ice cream with extra toasted nuts for an extra layer of texture. This variation is perfect for guests who love a nutty, chocolatey dessert.
Chocolate‑Infused Delight
Swirl in a handful of dark chocolate chips or a tablespoon of cocoa powder into the warm milk mixture before folding in the honeycomb. The chocolate adds depth and a hint of bitterness that balances the sweetness. The result is a chocolate‑honeycomb ice cream that feels like a dessert from a high‑end chocolate shop.
Minty Fresh
Infuse the double cream with a few drops of peppermint extract while warming it. This gives the ice cream a refreshing mint undertone that cuts through the richness of the honeycomb. The mint pairs beautifully with the caramel, creating a dessert that’s both indulgent and cooling.
Citrus Zest
Grate a teaspoon of orange zest into the honeycomb mixture just before adding the bicarbonate. The citrus adds a bright, aromatic note that lifts the overall flavor. It also gives the shards a slightly tangy bite that contrasts nicely with the buttery sweetness.
Sea Salt Finish
Sprinkle a pinch of Maldon sea salt over the finished ice cream before serving. The salt enhances the caramel flavor and adds a subtle briny contrast that elevates the dessert. This simple addition turns the ice cream into a sophisticated treat that’s sure to impress.
Vegan Version
Replace the condensed milk with coconut condensed milk and double cream with full‑fat coconut milk. The result is a vegan honeycomb ice cream that’s still creamy and flavorful, though it carries a coconut undertone. This variation is a great option for plant‑based diners who still crave that caramel crunch.
Storing and Bringing It Back to Life
Fridge Storage
If you have leftovers, keep the ice cream in an airtight container in the fridge for up to 48 hours. The shards will soften slightly, but the texture will still be enjoyable. When you’re ready to serve, let it sit at room temperature for 5–10 minutes to soften before scooping.
Freezer Friendly
For longer storage, keep the ice cream in the freezer for up to 3 months. Use a tightly sealed container to prevent freezer burn. If the ice cream becomes too hard, let it sit at room temperature for 10–15 minutes before scooping; this prevents the shards from cracking too hard.
Best Reheating Method
To refresh the ice cream, gently heat it in a double boiler until it’s just warm. Add a splash of water to steam the mixture and bring back the creamy texture. Be careful not to overheat; you want to soften the ice cream, not melt it. A quick stir and a few minutes of gentle heat will bring the dessert back to its original silky glory.