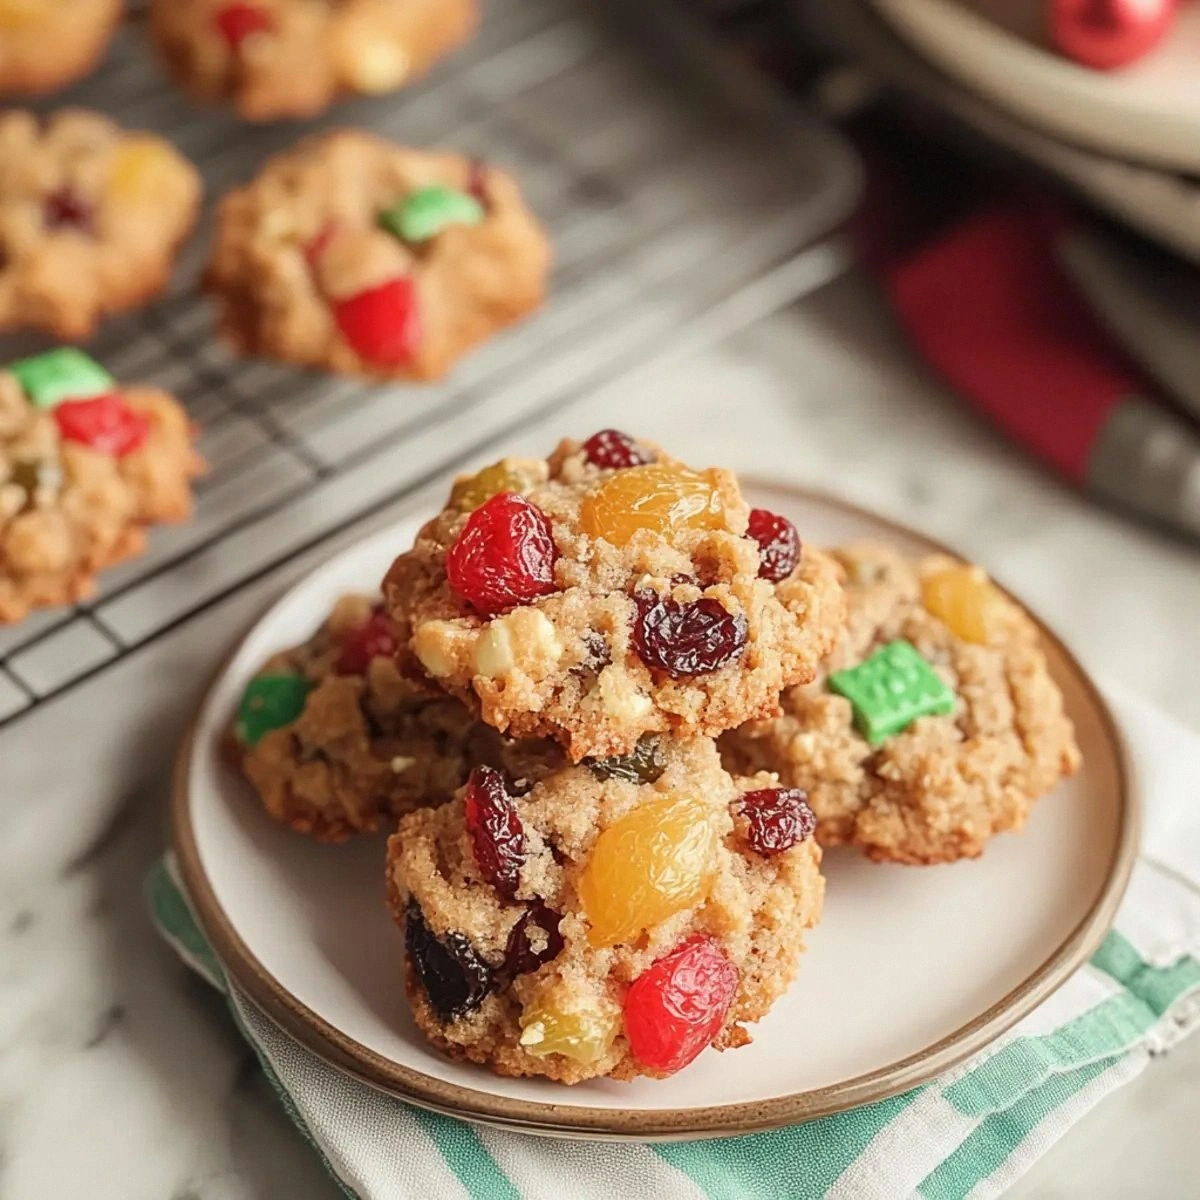
Picture this: it’s a frosty December afternoon, the kind where the wind whistles like a mischievous choir outside, and inside the kitchen you’re battling a mountain of half‑baked cookies that have somehow turned into a crunchy, sad mess. I was in the middle of that exact disaster, clutching a spatula like a lifeline, when my sister dared me to create something that could actually bring the holiday spirit back to the table. I laughed, I rolled my eyes, and I whispered, “I’ll bake you a cookie that could make Santa reconsider his career.” Fast forward a few hours, a batch of golden‑brown, fruit‑laden beauties emerged from the oven, and I swear the whole house inhaled the aroma as if it were a Christmas miracle. That moment was the birth of the ultimate version of Christmas fruitcake cookies you’ll love to bake.
The first bite is a revelation: the buttery melt‑in‑your‑mouth base, the zing of almond and lemon extracts that dance like twinkling lights, and the chewy, candied fruit that pops with festive cheer. You’ll hear a faint crackle as the edges turn crisp, a sound that reminds you of wrapping paper being torn open on Christmas morning. The texture is a perfect balance—soft, dense, and just a little crumbly, like a classic fruitcake that’s been given a modern makeover. I dare you to taste this and not go back for seconds; the combination is so addictive that even the most disciplined cookie‑monster in you will surrender.
Most fruitcake cookie recipes get this completely wrong. They either drown the dough in sugar, turning it into a cloying mess, or they skimp on the fruit, leaving you with a bland bite that feels more like a plain biscuit than a holiday treat. What sets this version apart is a secret weapon: a splash of lemon extract that cuts through the richness, a pinch of almond that adds depth, and a careful balance of butter and sugar that creates a tender crumb without being overly sweet. I’ll be honest — I ate half the batch before anyone else got to try it, and that’s a confession worth sharing because it shows just how irresistible these cookies are.
Now, imagine pulling a tray of these cookies from the oven, the whole kitchen smelling like a winter wonderland, the frosting of caramelized sugar glistening under the soft glow of holiday lights. The scent alone could convince even the most skeptical relative that you’ve finally nailed the perfect Christmas cookie. Okay, ready for the game‑changer? In this post I’ll walk you through every single step, from selecting the best candied fruit to mastering the perfect bake, and by the end you’ll wonder how you ever made it any other way.
What Makes This Version Stand Out
- Flavor Explosion: The trio of vanilla, almond, and lemon extracts creates a layered taste that’s both familiar and surprising, like unwrapping a gift you didn’t know you wanted.
- Texture Harmony: A buttery, soft interior meets a crisp, caramelized edge, delivering a mouthfeel that’s simultaneously tender and satisfying.
- Simplicity: Only ten core ingredients, all pantry‑friendly, mean you won’t need a trip to the specialty store to achieve gourmet results.
- Unique Ingredient: The dash of lemon extract cuts through the richness, preventing the cookie from feeling heavy—most recipes miss this bright note.
- Crowd Reaction: These cookies have a reputation for disappearing within minutes of being placed on a platter; they’re the unofficial holiday “must‑have.”
- Ingredient Quality: Using unsalted butter and fresh, plump candied fruit elevates the flavor profile far beyond store‑bought mixes.
- Cooking Method: Baking at a moderate temperature ensures even browning without burning the delicate fruit pieces.
- Make‑Ahead Potential: They keep beautifully for weeks, getting even more flavorful as the spices meld together over time.
Inside the Ingredient List
The Flavor Base
Unsalted butter (1 cup) is the foundation, providing a rich, creamy mouthfeel that carries the spices and extracts throughout the dough. If you substitute salted butter, you’ll end up with a salty bite that throws off the delicate balance. I always recommend using European‑style butter for its higher butterfat content, which makes the cookies extra tender. Pro tip: Let the butter soften at room temperature, but not melt, to achieve a smooth creaming stage.
The Sweet Symphony
Granulated sugar (1 cup) sweetens the dough while also contributing to the slight caramelization on the edges. Using brown sugar would add a molasses note, but that’s not the profile we’re chasing here. If you’re watching sugar intake, you can replace up to half with a natural sweetener like coconut sugar without compromising texture. The single large egg acts as a binder, giving the cookies structure and a subtle richness that plain water could never provide.
The Unexpected Star
Almond extract (½ tsp) and lemon extract (½ tsp) are the secret weapons. Almond adds a nutty depth that pairs beautifully with the pecans, while lemon injects a bright, citrusy pop that lifts the entire flavor. Skipping these extracts is a common mistake; the cookies become flat and overly buttery. If you’re allergic to nuts, you can omit almond extract and increase the vanilla by a half‑teaspoon for balance.
The Texture Crew
All‑purpose flour (2 cups) provides the structural backbone. Using cake flour would make the cookies too soft, while bread flour would make them overly tough. Baking soda (1 tsp) is the leavening agent that gives the cookies a slight rise, ensuring they stay light despite the dense fruit. Salt (½ tsp) is essential; it enhances the sweetness and rounds out the flavors, acting like a conductor in an orchestra.
The Final Flourish
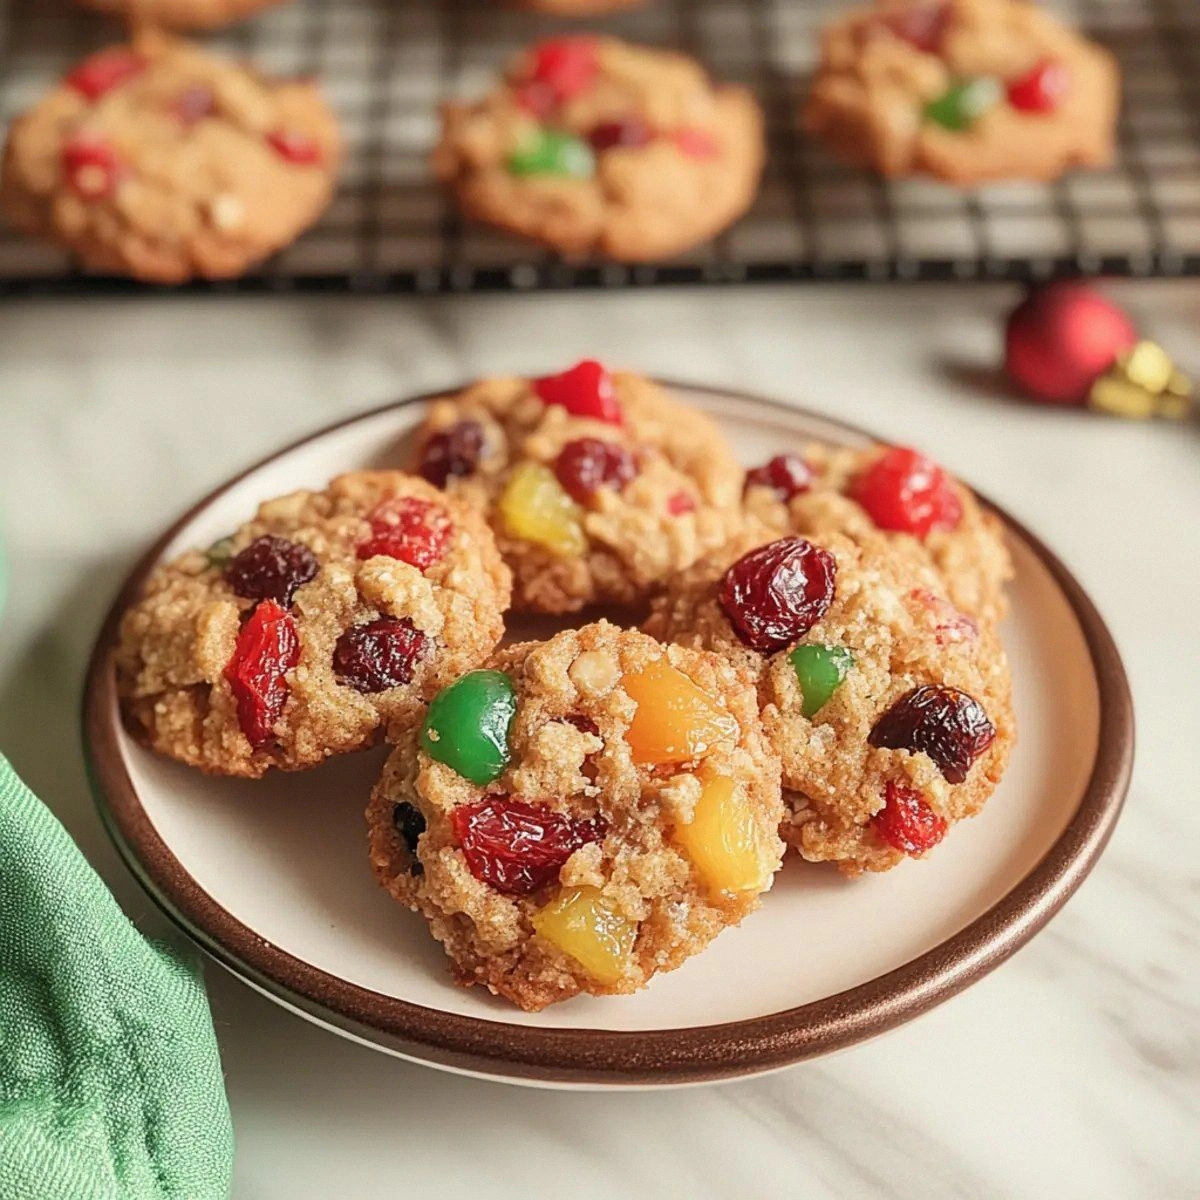
Dried candied fruit (2 cups) and pecan nuts (1 cup) are the festive heart of the cookie. The fruit adds chewy bursts of sweetness, while the nuts contribute a crunchy contrast. If you can’t find candied fruit, chop up dried apricots, figs, and cherries, then toss them in a quick sugar‑syrup glaze before drying. For nut‑free versions, replace pecans with toasted pumpkin seeds; they’ll still give you that satisfying crunch.
Everything’s prepped? Good. Let’s get into the real action…
The Method — Step by Step
Preheat your oven to 350°F (175°C) and line two baking sheets with parchment paper. The moment the oven clicks on, you’ll hear that comforting hum that signals the start of something magical. While the oven warms, take a large mixing bowl and place the softened butter inside. Power tip: The butter should feel like soft clay—firm enough to hold shape but pliable enough to blend smoothly.
Cream the butter and granulated sugar together for about 3‑4 minutes using a handheld mixer on medium speed. This step is where the cookie gets its airy, tender crumb; you’ll notice the mixture turning pale and fluffy, almost like a cloud ready to burst. Stop the mixer occasionally to scrape down the sides; this ensures an even texture.
Kitchen Hack: Add a pinch of sea salt during creaming to amplify the sweetness without making it cloying.Beat in the egg, vanilla extract, almond extract, and lemon extract until fully incorporated. This is the moment of truth; the batter should look glossy and cohesive, with the extracts swirling like tiny fireworks. If the mixture looks curdled, keep mixing—eventually it will smooth out. The lemon extract will give off a faint citrus aroma that’s unmistakably festive.
In a separate bowl, whisk together the flour, baking soda, and salt. Whisking aerates the dry ingredients, preventing any pockets of flour that could lead to uneven baking. Once combined, gently fold the dry mixture into the wet batter using a spatula, turning the bowl over a few times.
Watch Out: Over‑mixing at this stage can develop gluten, resulting in tough cookies.Now, fold in the candied fruit and pecans. The fruit should be evenly distributed, each bite promising a chewy surprise, while the nuts add a satisfying crunch. If the fruit pieces are large, give them a quick chop to ensure they’re bite‑size. The nuts should be roughly the same size as the fruit for a balanced texture.
Cover the dough with plastic wrap and chill in the refrigerator for at least 30 minutes. This cooling step solidifies the butter, preventing excessive spreading during baking. I like to set a timer and use the waiting period to clean up the kitchen—nothing feels better than a tidy workspace when the cookies finally emerge.
Using a cookie scoop (about 2‑tablespoon size), drop rounded mounds onto the prepared baking sheets, spacing them about 2 inches apart. The dough should hold its shape; if it’s too soft, give it a quick flash in the freezer for 5 minutes. This next part? Pure magic. As the cookies bake, the edges will begin to turn a light golden brown, while the tops stay a soft, pale hue.
Bake for 12‑15 minutes, or until the edges are lightly browned and the centers look set but still slightly soft. The scent will fill your kitchen with a warm, buttery fragrance punctuated by caramelized fruit notes. Resist the urge to open the oven door early; the sudden temperature change can cause the cookies to collapse.
Remove the trays and let the cookies cool on the sheet for 5 minutes before transferring them to a wire rack. This brief rest allows the cookies to firm up, making them easier to move without breaking. As they cool, you’ll notice the glossy sheen from the caramelized sugar—a visual cue that they’re perfectly done.
Store the cookies in an airtight container at room temperature. They’ll stay fresh for up to two weeks, and the flavors will deepen as the fruit and spices mingle. If you want to keep them longer, pop them in the freezer (see storage section below). And now the fun part: taste testing! I dare you to try one while it’s still warm; the soft interior will melt in your mouth, while the edges crackle like thin ice.
Insider Tricks for Flawless Results
The Temperature Rule Nobody Follows
Most home bakers bake at 375°F for cookies, but for these fruitcake cookies, 350°F is the sweet spot. The lower temperature allows the butter to melt slowly, giving the fruit time to caramelize without burning. I once tried the higher heat and ended up with burnt edges and a raw center—trust me, the lesson was learned the hard way. Keep the oven door closed until the timer dings; this maintains a stable heat environment.
Why Your Nose Knows Best
Before you even set a timer, learn to trust the aroma. When the edges start to smell nutty and the fruit releases a caramel scent, the cookies are practically done. The scent is a reliable indicator that the interior has set without over‑baking. If you’re ever unsure, pull one out, let it cool for a minute, and give it a gentle press—if it springs back, you’re golden.
The 5‑Minute Rest That Changes Everything
After mixing, let the dough rest for just five minutes on the counter before chilling. This short pause lets the flour fully hydrate, resulting in a more tender crumb. I used to skip this step and ended up with a slightly dry texture. The rest also gives the extracts a chance to meld, ensuring every bite tastes uniformly festive.
Don’t Over‑Mix the Dry Ingredients
When you combine flour, soda, and salt, a gentle whisk is all you need. Over‑mixing creates gluten strands that can make the cookies tough, ruining the soft interior we love. A quick visual check—if the flour looks evenly speckled throughout the batter, you’re good to go.
Cool on the Sheet, Then Transfer
Leaving cookies on the hot baking sheet for too long causes them to continue cooking from residual heat, leading to a drier edge. Let them sit for exactly five minutes, then move them to a wire rack. This short rest also lets steam escape, preserving that delicate crunch on the outside.
Creative Twists and Variations
This recipe is a playground. Here are some of my favorite ways to switch things up:
Spiced Orange Zest
Add the zest of one orange and a pinch of ground cinnamon to the batter. The citrus brightens the flavor, while cinnamon adds a warm, holiday spice. Perfect for anyone who loves a hint of orange in their desserts.
Chocolate‑Covered Delight
After the cookies have cooled, dip half of each cookie in melted dark chocolate and sprinkle with sea salt. The bitter chocolate balances the sweet fruit, creating a sophisticated bite that impresses even the most discerning guests.
Nut‑Free Celebration
Swap pecans for toasted coconut flakes and ensure the candied fruit is nut‑free. The coconut adds a tropical crunch that pairs surprisingly well with the citrus extracts.
Gluten‑Free Version
Replace all‑purpose flour with a 1:1 gluten‑free flour blend that contains xanthan gum. The texture stays delightfully soft, and the cookies remain just as flavorful.
Mini Bite‑Size Cookies
Use a teaspoon to scoop the dough, creating bite‑size treats perfect for a holiday cookie platter. They bake a minute or two faster, and their petite size makes them ideal for kids.
Rum‑Soaked Fruit
Soak the candied fruit in a splash of dark rum for a few hours before folding them into the dough. The rum infuses the fruit with a deep, boozy note that’s perfect for adult gatherings.
Storing and Bringing It Back to Life
Fridge Storage
Place the cookies in an airtight container with a slice of fresh bread; the bread will keep them moist without making them soggy. They’ll stay fresh for up to two weeks, and the flavors will continue to meld, becoming richer over time.
Freezer Friendly
Separate layers of cookies with parchment paper, then seal the container tightly before freezing. They can be stored for up to three months. When you’re ready to enjoy them, let them thaw at room temperature for 15 minutes, then pop them in a preheated 300°F oven for 5 minutes to revive the crisp edge.
Best Reheating Method
To bring a cookie back to life, place it on a baking sheet, add a tiny splash of water (about a teaspoon) next to it, and heat at 300°F for 4‑5 minutes. The steam created by the water re‑hydrates the interior while the oven restores the golden crunch on the outside.