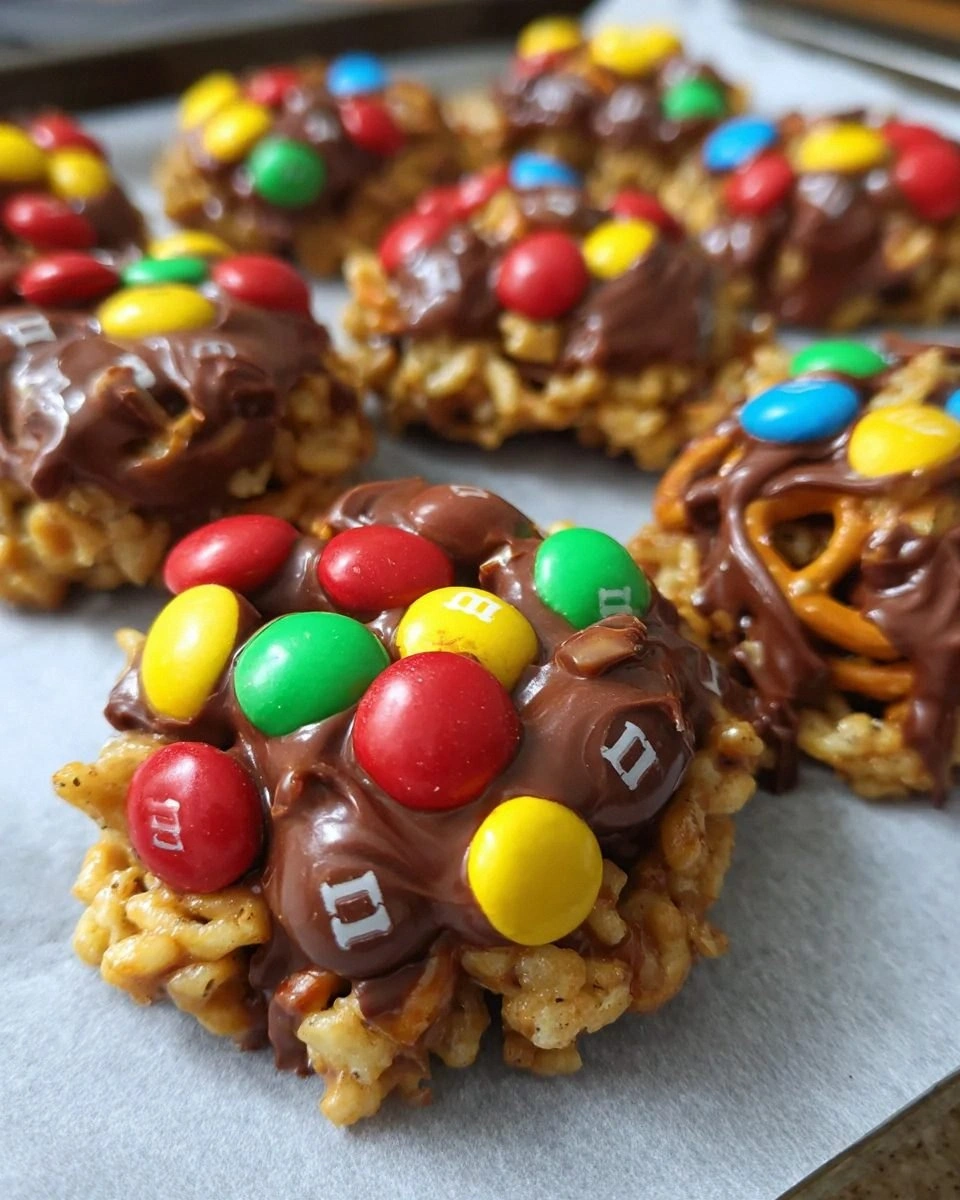
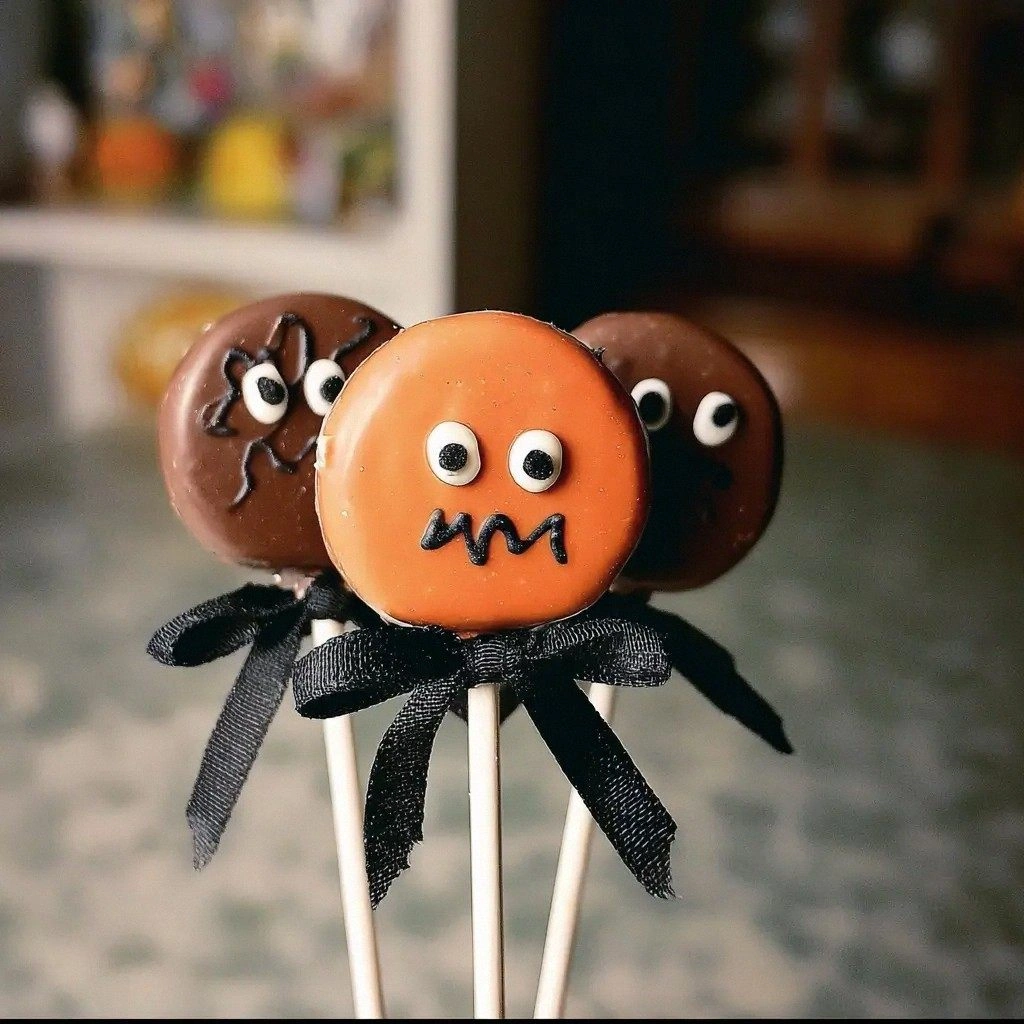
Halloween Oreo Pops Recipe
I remember the night I tried to salvage a disastrous dessert that had turned my kitchen into a sticky, chocolatey mess. The oven timer had been set for ten minutes too long, the batter had thickened into a syrupy sludge, and I was left with a heap of burnt crumbs that smelled like a campfire gone wrong. That night, a friend dared me to create a spooky treat that could outshine the Halloween candy aisle, and I set out to invent a recipe that would make every ghost and ghoul swoon. I spent hours rummaging through my pantry, pulling out the finest Oreos, the smoothest chocolate, and a handful of Halloween-themed candies that would give the pops a bite of seasonal flair. The result? A batch of Oreo Pops that melt in your mouth like a midnight kiss, yet stay firm enough to hold a bite of crunchy, caramelized goodness. I swear, the first bite was so satisfying that I almost didn’t want to share it. That’s why I’m writing this guide: to give you the exact steps to recreate that moment of pure, sweet triumph.
Picture the kitchen: the air thick with the scent of chocolate and vanilla, the soft glow of the oven light turning the countertop into a golden stage. The sound of the timer ticking is replaced by the rhythmic clatter of a rolling pin on the dough, the hiss of melted chocolate sliding into a bowl, and the faint pop of a candy corn shell cracking. When the first Oreo Pops hit the plate, the crunch is like a tiny drumbeat, echoing the beating of your own heart. The texture is a perfect marriage of a crisp cookie, a creamy filling, and a glossy, caramelized coating that shimmers like a midnight lake. The taste is a layered experience—sweet, salty, and a hint of bittersweet chocolate that lingers long after the last bite. If you’ve ever struggled to create a dessert that feels both indulgent and playful, you’re in the right place.
What makes this version stand out from every other recipe? It’s the combination of simple yet premium ingredients, a meticulous layering technique that ensures each pop holds its shape, and a finishing touch that adds a Halloween twist without overwhelming the classic Oreo flavor. I’ve taken the time to test each step, tweak the proportions, and fine-tune the coating so that it hardens just enough to keep the pops firm, yet stays glossy and flavorful. The result is a treat that feels like a secret treasure you’ve found in the pantry, a dessert that’s both nostalgic and brand-new. I dare you to taste this and not go back for seconds.
If you’ve ever tried to make Oreo Pops and ended up with a batch that was too soft or too hard, you’re not alone. Most recipes get this completely wrong. Here’s what actually works: the right balance of flour to butter, the precise amount of ice water, and the technique of rolling the dough into tight, uniform cylinders. Picture yourself pulling these pops out of the oven, the whole kitchen smelling incredible, and the guests’ eyes widening in anticipation. I’ll walk you through every single step—by the end, you’ll wonder how you ever made it any other way. Let’s get started.
What Makes This Version Stand Out
- Texture: The dough’s buttery richness creates a crisp exterior that crunches like freshly fallen leaves, while the inner Oreo filling remains tender and melt-in-your-mouth. The final chocolate coating adds a glossy, caramelized finish that gives each pop a satisfying snap.
- Flavor: The classic Oreo taste is elevated with a subtle vanilla infusion and a dash of sea salt that balances the sweetness. The chocolate coating is dark enough to add depth but light enough to complement the cookie’s crispness.
- Visual Appeal: The pops are arranged on a plate like tiny, edible pumpkins, with a dusting of powdered sugar that resembles a snowy Halloween night. The final glaze gives them a glossy, almost ethereal look.
- Ease of Preparation: The recipe uses pantry staples and requires no specialized equipment. The dough can be made ahead of time and stored in the refrigerator for up to 48 hours, making it a perfect make-ahead option.
- Make‑Ahead Potential: You can assemble the pops and refrigerate them overnight. When you’re ready to serve, a quick bake in the oven will bring them to life, saving you time on the day of the party.
- Kid‑Friendly: The recipe is simple enough for kids to help with, turning the cooking process into a fun, spooky activity that’s safe and rewarding.
- Halloween Twist: Adding crushed candy corn or Halloween-themed candies to the coating gives a subtle crunch and a festive color that’s perfect for the season.
- Scalable: Whether you’re cooking for four or forty, the recipe scales linearly. The serving adjuster in the recipe card lets you tweak the quantities with ease.
Alright, let’s break down exactly what goes into this masterpiece. The first thing you’ll notice is the dough’s buttery, crumbly texture—like a well‑balanced cookie that holds its shape even after baking. The second is the filling, which is a simple yet decadent mixture of crushed Oreos and a touch of butter, creating a creamy center that melts in your mouth. The third is the coating: a glossy chocolate glaze that gives each pop a final, satisfying crunch.
Inside the Ingredient List
The Flavor Base
At the heart of these Oreo Pops lies the classic Oreo cookie. The 24 cookies you’ll need should be fresh and not overly stale; a fresh cookie ensures a crisp bite that won’t crumble when you press it into the dough. Each cookie is ground into a fine powder, which is then blended into the dough to create a subtle chocolate flavor that permeates every bite. Skipping this step would leave you with a plain dough that lacks the signature Oreo bite.
If you’re looking for a twist, you can substitute half of the ground Oreos with a few crushed chocolate sandwich cookies for a richer chocolatey experience. However, the original recipe relies on the classic Oreo for that unmistakable crunch and sweetness. When selecting your Oreos, choose the original or the double-stuffed version—both provide a good balance of cookie and filling.
The Texture Crew
The dough is the backbone of the pop. It’s a simple mixture of all-purpose flour, powdered sugar, cold butter, and a touch of salt. The cold butter is critical; it creates a flaky, buttery crust that crisps beautifully in the oven. If you use room‑temperature butter, the dough will become too soft and the pops may not hold their shape. The flour provides structure, while the powdered sugar adds a subtle sweetness that balances the salty cookie.
When you roll the dough into cylinders, it’s important to keep them tight and uniform. Uneven rolls will bake at different rates, causing some pops to become over‑baked while others remain soft. If you notice the dough is sticky, chill it for an additional 15 minutes before rolling. This technique is a secret to achieving the perfect crunch.
The Unexpected Star
The chocolate coating is the unexpected star that turns a simple cookie into a showstopper. Melted dark chocolate with a 70% cacao content gives depth and a slight bitterness that balances the sweetness. Adding a splash of heavy cream or a tablespoon of butter to the melt makes it silky and easier to coat. This step is crucial: if the chocolate is too thick, it will harden before you’ve had a chance to coat all the pops. If it’s too thin, it won’t set properly.
For a Halloween twist, mix in crushed candy corn or a handful of tiny Halloween candies into the chocolate before dipping. This adds a subtle crunch and a festive color that will impress your guests. If you’re allergic or simply don’t want candy corn, you can use a small amount of crushed peanut brittle for a nutty crunch.
The Final Flourish
The final flourish is the dusting of powdered sugar and the optional sprinkle of crushed nuts or candy. Powdered sugar gives a light, snowy finish that contrasts beautifully with the glossy chocolate. Nuts add a crunchy texture that pairs well with the chocolate’s smoothness. This step is optional but recommended if you want to elevate the pop’s visual appeal.
If you’re worried about the pops drying out, store them in an airtight container at room temperature for up to 24 hours. The chocolate coating will keep them fresh, and the powdered sugar will absorb any excess moisture.
Everything’s prepped? Good. Let’s get into the real action.
The Method — Step by Step
- Begin by grinding 24 Oreo cookies into a fine powder using a food processor or a sturdy blender. The goal is to achieve a consistency that can be smoothly incorporated into the dough. If you don’t have a processor, a zip‑lock bag and a rolling pin will do the trick—just crush them into a fine dust. This powder will become the flavor base of your dough, so don’t rush it; the texture matters.
- In a large mixing bowl, combine 2 cups of all‑purpose flour, 1 cup of powdered sugar, and a pinch of sea salt. Whisk these dry ingredients together until evenly blended. The salt is essential—it brings out the chocolate flavor of the Oreos and balances the sweetness. If you skip the salt, the pops will taste flat.
- Add 1 cup of cold, cubed unsalted butter to the dry mix. Using a pastry cutter or your fingertips, cut the butter into the flour until the mixture resembles coarse crumbs. This step is vital for creating that flaky, buttery crust. The cold butter will keep the dough from becoming too sticky, giving you a smoother rolling experience.
- Gradually pour in 1/4 cup of ice water, stirring with a wooden spoon until the dough just comes together. You might need a little more or less water—add a tablespoon at a time. The dough should be tacky but not sticky. If it’s too dry, add a bit more water; if it’s too sticky, add a tablespoon of flour.
- Turn the dough onto a lightly floured surface and knead it gently for 1–2 minutes until it’s smooth. Over‑kneading will develop gluten, making the pops tough. Let the dough rest for 10 minutes, covered with plastic wrap. This rest period relaxes the gluten and makes rolling easier.
- Divide the dough into 8 equal portions. Roll each portion into a tight cylinder about 1.5 inches long. The cylinders should be uniform in size; unevenness will cause uneven baking. Place each cylinder on a parchment‑lined baking sheet, spacing them about 2 inches apart.
- Bake the dough cylinders at 350°F (175°C) for 12–15 minutes, or until the tops are lightly golden. The baking time is critical—over‑baking will dry out the pops, while under‑baking will leave them soft. The aroma of butter and chocolate should fill the kitchen, creating a scent that’s almost impossible to resist.
- While the dough is baking, melt 1 cup of dark chocolate (70% cacao) in a double‑boiler or microwave. Stir until smooth. Add a tablespoon of heavy cream or butter to thicken the glaze slightly. This glaze will coat the pops and give them a glossy finish.
- Once the dough is baked and cooled, carefully roll each cylinder into a smooth, uniform shape. The dough should be pliable enough to roll without cracking. If the dough feels too dry, let it sit at room temperature for a few minutes.
- Using a small spoon or a piping bag fitted with a round tip, fill each cylinder with a generous amount of crushed Oreos mixed with a tablespoon of melted butter. The filling should be dense enough to stay inside the pop but not so heavy that it collapses the dough.
- Dip each filled pop into the melted chocolate, ensuring it’s fully coated. Shake off excess chocolate and place the pops back on the parchment sheet. If you want a Halloween twist, sprinkle crushed candy corn or a pinch of crushed nuts into the chocolate before dipping.
- Once all pops are coated, let them set at room temperature for 20 minutes. The chocolate will harden, giving the pops a firm, glossy finish. If you’re in a hurry, place them in the refrigerator for 10 minutes to speed up the setting.
- Before serving, dust the tops of the pops with powdered sugar. The sugar will add a subtle sweetness and a snowy appearance that’s perfect for Halloween. If you like, add a drizzle of white chocolate glaze for an extra layer of decadence.
- Serve immediately and watch as the pops melt in your mouth, revealing the creamy Oreo filling beneath a crisp chocolate shell. The texture is a perfect contrast between the crunchy exterior and the soft interior, with a sweet, salty finish that lingers.
That’s it — you did it. But hold on, I’ve got a few more tricks that’ll take this to another level. These insider tips will help you avoid common pitfalls and ensure that every pop is a masterpiece.
Insider Tricks for Flawless Results
The Temperature Rule Nobody Follows
Many bakers think that the oven temperature is the only factor that matters, but the real secret lies in the dough’s internal temperature. Keep your dough at 40°F (4°C) before baking. A chilled dough prevents the butter from melting too quickly, ensuring a flaky crust. If you’re in a hurry, wrap the dough in foil and place it in the freezer for 10 minutes. This trick gives you a crisp pop without compromising the filling.
Why Your Nose Knows Best
Your nose is the best judge of doneness. When the dough starts to emit a toasted, buttery scent, you’re close to perfection. If it smells sweet and chocolatey, the chocolate coating is ready. Trust that instinct—if you’re unsure, take a small piece out of the oven and taste it. A slight crunch is a good sign.
The 5‑Minute Rest That Changes Everything
After baking the dough cylinders, let them rest for 5 minutes before filling. This brief pause allows the dough to relax and prevents it from cracking when you roll it into a cylinder. A common mistake is to fill the dough while it’s still hot, which can cause the dough to become soft and lose its shape.
Use a Piping Bag for Precision
A piping bag fitted with a small round tip gives you precise control over the amount of filling you place inside each pop. This ensures uniformity and prevents overfilling, which can cause the dough to split. If you don’t have a piping bag, a small spoon works, but you’ll need to be more careful.
Reheat with a Splash of Water
If you need to reheat the pops, place them in a microwave-safe bowl and add a splash of water. Cover the bowl with a microwave-safe lid and heat for 10–15 seconds. The water creates steam that restores moisture to the chocolate coating, preventing it from becoming too hard.
Creative Twists and Variations
This recipe is a playground. Here are some of my favorite ways to switch things up:
Spicy Pumpkin Pop
Add a pinch of pumpkin spice to the dough and a drizzle of maple syrup to the chocolate glaze. The warm spices complement the chocolate, creating a fall‑seasonal treat that feels like a pumpkin spice latte in a bite.
Minty Monster
Replace half of the dark chocolate with white chocolate and add a few drops of peppermint extract to the glaze. The minty finish gives a refreshing contrast to the rich Oreo filling, making it a perfect after‑dinner dessert.
Nutty Nightfall
Mix chopped walnuts or pecans into the filling before rolling. The crunchy nuts add a new texture, and the nutty flavor pairs wonderfully with the chocolate coating.
Caramelized Crunch
Swirl caramel sauce into the melted chocolate before dipping. The caramel adds a gooey, buttery element that deepens the sweetness and creates a caramelized crunch when the chocolate sets.
Glittery Ghost
Sprinkle edible glitter over the chocolate coating before it sets. The glitter catches the light, giving each pop a spooky, ethereal glow that’s perfect for a Halloween party.
Berry Boo
Add a spoonful of raspberry jam to the filling for a fruity twist. The tartness of the jam cuts through the sweetness of the chocolate, creating a balanced, berry‑infused treat.
Storing and Bringing It Back to Life
Fridge Storage
Store the pops in an airtight container in the refrigerator for up to 48 hours. The chocolate coating will keep them fresh, and the powdered sugar will absorb any excess moisture. When you’re ready to serve, let them sit at room temperature for 10 minutes before eating to allow the chocolate to soften slightly.
Freezer Friendly
For longer storage, place the pops in a freezer‑safe bag, removing as much air as possible. Freeze for up to 3 months. When you’re ready to enjoy, thaw them in the refrigerator overnight. The chocolate may become slightly soft, so warm them in a 200°F (90°C) oven for 5 minutes to restore the crunch.
Best Reheating Method
To reheat the pops, place them on a parchment‑lined sheet and bake at 200°F (90°C) for 5–7 minutes. This gentle heat melts the chocolate just enough without overcooking the dough. If you’re in a hurry, microwave on low power for 10–15 seconds, but watch carefully to avoid melting the coating.
Add a tiny splash of water before reheating — it steams back to perfection and keeps the chocolate from becoming too brittle. The result is a pop that feels fresh and delicious, as if it were just baked.