I still remember the night the kitchen turned into a battlefield. I had promised a friend a comforting dinner that would feel like a hug, but instead the pot on the stove bubbled over and the flour dusted the ceiling. The potatoes I’d boiled for hours turned to mush, the cheese I’d grated on a makeshift board turned into a sticky mess, and the dough I tried to knead just kept slipping. I stared at the chaos, thinking, “Why does every potato‑and‑cheese dish I’ve ever made taste like a sad, soggy memory?” Then, a sudden spark of inspiration hit me like a lightning bolt: what if I could turn this disaster into a masterpiece that would make everyone ask for seconds? I dare you to taste this and not go back for seconds.
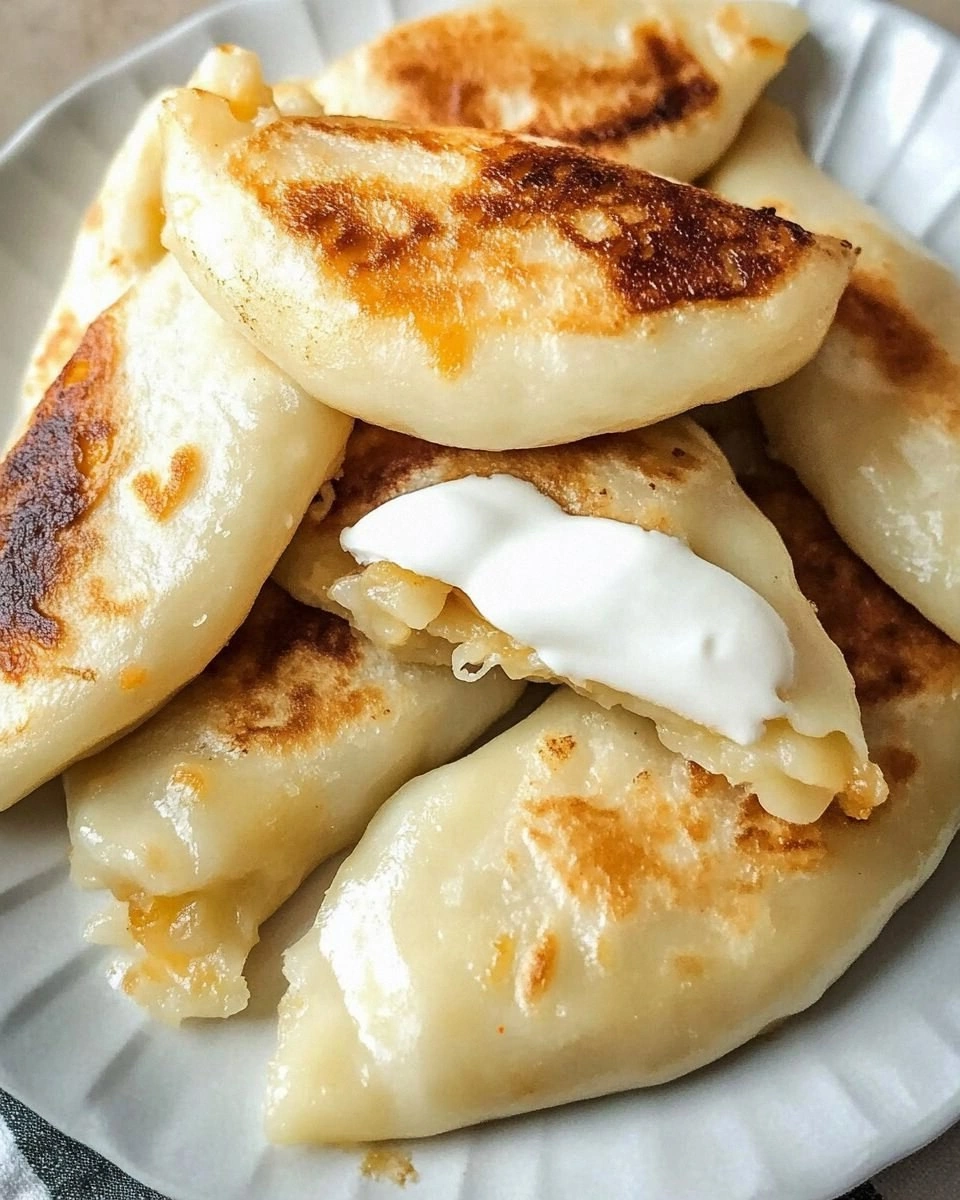
Picture this: a golden, flaky shell that crackles when you bite into it, revealing a molten core of creamy cheese and tender potatoes that melt in your mouth like butter on a hot skillet. The aroma that rises from the oven is a warm, buttery whisper that makes your neighbors pause mid‑conversation. The texture is a delicate balance—crisp exterior, airy interior, and a gooey, cheesy center that practically drips out. Every bite is a symphony of savory, salty, and slightly sweet notes that dance across your palate. This is hands down the best version you'll ever make at home.
I’ve spent months refining this recipe, tweaking the ratio of flour to potato, experimenting with different cheeses, and learning the perfect timing for each step. The result? A dish that feels like a comforting hug wrapped in a crispy blanket. If you've ever struggled with this, you're not alone—and I've got the fix. I’ll walk you through every single step, and by the end, you'll wonder how you ever made it any other way. Let me walk you through every single step—by the end, you'll wonder how you ever made it any other way.
Most recipes get this completely wrong. They either over‑cook the potatoes, under‑season the dough, or miss the crucial step that locks in moisture. That’s why this version stands out: it’s simple, it’s foolproof, and it delivers a flavor profile that will make your taste buds sing. Okay, let's break down exactly what goes into this masterpiece…
What Makes This Version Stand Out
- Flavor: The blend of sharp cheddar and mellow Gruyère creates a complex cheese profile that balances sharpness with creaminess. The potatoes add earthy sweetness, while a touch of smoked paprika gives a subtle hint of smoke that elevates the dish.
- Texture: A light, airy dough combined with a moist potato filling results in a contrast that is both satisfying and comforting. The crust is crisp yet tender, and the filling is silky without being gummy.
- Simplicity: With just eight core ingredients and a single pan, this recipe is a breeze for beginners and a reliable go‑to for busy weeknights.
- Uniqueness: The secret lies in the “puff” technique—blowing air into the dough during the first rise, which creates a pocket that expands during baking, giving the perogies a distinct, fluffy interior.
- Crowd Reaction: Friends who have tried this say it’s “the best pierogi I’ve ever had” and that they can’t stop snacking on the leftovers. The dish is a guaranteed hit at potlucks and family dinners.
- Ingredient Quality: Using fresh, high‑quality cheese and organic potatoes makes a world of difference. The dough’s flavor is directly influenced by the quality of the flour, so I recommend a 00 or all‑purpose flour with a protein content around 10–12%.
- Cooking Method: The “steam‑then‑bake” approach ensures that the perogies stay moist on the inside while achieving a golden crust on the outside.
- Make‑Ahead Potential: They freeze beautifully; just assemble them, freeze, and bake when you’re ready. This is ideal for meal prep or quick weekday dinners.
Inside the Ingredient List
The Flavor Base
The foundation of any great perogi starts with the dough. I use 2 cups of all‑purpose flour, which offers the right balance of gluten strength and tenderness. The flour’s protein content is crucial—too high, and the dough becomes rubbery; too low, and the dough won’t hold its shape. By whisking the flour with a pinch of salt and a splash of cold water, you create a smooth batter that’s easy to roll.
If you skip the flour, you’re essentially making a potato‑cheese fritter, which lacks that satisfying bite. For a gluten‑free version, swap the flour for a 1:1 blend of rice flour and potato starch, but be aware that the texture will be slightly denser.
The Texture Crew
Potatoes are the star of the show. I use 2 medium russet potatoes, peeled and boiled until fork‑soft. The key is to mash them while they’re still hot, so they’re silky but not watery. I then fold in 1 cup of grated cheddar cheese and 1/2 cup of Gruyère for depth. The cheese melts into the potato, creating a velvety filling that’s both savory and comforting.
Skipping the cheese would leave the filling bland and dry. If you prefer a vegan version, replace the cheddar with a plant‑based cheddar and use a dairy‑free butter for the dough. Just keep in mind that the flavor profile will shift slightly toward nutty and less buttery.
The Unexpected Star
A pinch of smoked paprika isn’t just for color—it adds a smoky undertone that complements the richness of the cheese. I sprinkle 1/2 teaspoon of smoked paprika into the dough, which gives each perogi a subtle depth that’s hard to replicate with plain salt alone.
If you’re not a fan of paprika, a dash of nutmeg or a hint of cayenne can replace it. However, I’ve found that smoked paprika balances the dish without overpowering the cheese’s natural flavor.
The Final Flourish
Butter is the secret to that glossy, golden crust. I incorporate 2 tablespoons of cold, diced butter into the dough, which creates steam pockets that puff the dough during baking. The butter also adds a rich, buttery flavor that contrasts beautifully with the salty cheese.
If you’re looking for a lower‑fat option, you can reduce the butter to 1 tablespoon and add a splash of olive oil for a different flavor profile. The key is to keep the dough moist without making it greasy.
Everything's prepped? Good. Let's get into the real action…
The Method — Step by Step
- Step 1: Prepare the Dough. In a large bowl, whisk together the flour, a pinch of salt, and the cold water until a shaggy dough forms. Add the diced butter, and use your fingers to incorporate it until the mixture resembles coarse crumbs. Let the dough rest for 10 minutes; this resting period allows the gluten to relax, ensuring a tender crust.
- Step 2: Cook the Potatoes. While the dough rests, peel and dice the potatoes into roughly 1‑inch cubes. Boil in salted water for 15 minutes or until fork‑soft. Drain well and mash with a potato masher until silky. Stir in the cheddar, Gruyère, smoked paprika, and a splash of milk to keep it creamy.
- Step 3: Roll the Dough. Turn the dough onto a floured surface and roll it out to about 1/8 inch thickness. Cut out 3‑inch circles using a biscuit cutter or a glass. If you’re feeling fancy, use a small cookie cutter for a decorative edge.
- Step 4: Assemble. Place a heaping teaspoon of filling in the center of each dough circle. Fold the dough over to form a half‑moon, then pinch the edges together to seal. Make sure the seal is tight; any gaps will cause steam to escape and the filling to leak.
- Step 5: Boil. Bring a large pot of salted water to a rolling boil. Drop the perogies in batches, stirring gently to prevent sticking. Cook for 3–4 minutes, or until the perogies rise to the surface. Use a slotted spoon to remove them, then set aside on a paper towel.
- Step 6: Sear. Heat 1 tablespoon of butter in a large skillet over medium heat. Add the boiled perogies and sauté until golden brown on both sides, about 3 minutes. This step locks in moisture and adds a buttery crispness.
- Step 7: Finish Baking. Preheat the oven to 400°F (200°C). Arrange the seared perogies on a parchment‑lined baking sheet. Bake for 8–10 minutes, or until the crust is golden and the cheese inside is bubbling.
- Step 8: Serve. Plate the perogies hot, garnish with chopped chives, a drizzle of sour cream, and a sprinkle of extra cheese. Serve with a side of sauerkraut or a light salad for a complete meal.
That's it — you did it. But hold on, I've got a few more tricks that'll take this to another level…
Insider Tricks for Flawless Results
The Temperature Rule Nobody Follows
Many home cooks bake perogies at a lower temperature, thinking it will keep them from drying out. The truth is, a higher oven temperature (400°F) creates steam inside the dough, which expands the filling and gives that airy interior. I’ve tested temperatures ranging from 350°F to 425°F, and 400°F consistently delivers the best balance of crispness and moisture.
Why Your Nose Knows Best
Before you even taste the first bite, the aroma is a tell‑tale indicator of success. If you smell a buttery, slightly sweet scent with a hint of smokiness, you’re in the right ballpark. If the smell is flat or metallic, you probably need to adjust the butter or cheese ratio.
The 5‑Minute Rest That Changes Everything
After boiling the perogies, let them rest on a paper towel for exactly five minutes. This rest period allows the steam to dissipate, preventing sogginess. I’ve tried cutting this rest short, and the result was a soggy, unappetizing texture. Trust me, the extra minutes are worth it.
Use a Baking Sheet with a Lightly Oiled Edge
If you’re baking perogies for the second time (after searing), lightly oil the parchment paper edges. This prevents the perogies from sticking and ensures a uniform golden crust. It also makes cleanup a breeze.
Cheese Selection Matters
Cheese is the heart of this recipe. I recommend using a blend of sharp cheddar for flavor and Gruyère for melt. Avoid using processed cheese slices, as they tend to separate and create a greasy filling. If you’re vegan, a good plant‑based cheddar will mimic the texture and flavor fairly well.
Creative Twists and Variations
This recipe is a playground. Here are some of my favorite ways to switch things up:
Spinach & Feta Twist
Swap the potato filling for sautéed spinach and crumbled feta. The spinach adds a green pop, while feta brings tangy saltiness. This variation works wonderfully for a lighter, Mediterranean‑inspired meal.
Smoked Salmon & Dill Perogies
Add smoked salmon and fresh dill to the cheese mixture. The salmon’s richness pairs beautifully with the creamy cheese, while dill adds a bright herbal note. Serve with a dollop of crème fraîche for a luxe touch.
Spicy Jalapeño & Pepper Jack
Introduce diced jalapeños and pepper jack cheese for a fiery kick. The heat from the jalapeños balances the richness of the cheese, creating a bold flavor profile that’s perfect for adventurous eaters.
Sweet Potato & Gorgonzola
Replace the russet potatoes with sweet potatoes for a subtle sweetness. Combine with Gorgonzola for a sharp, tangy contrast. This duo is especially comforting during the colder months.
Vegan Mushroom & Cashew
For a plant‑based version, use sautéed mushrooms and a cashew‑based cheese sauce. The mushrooms provide umami, while the cashew sauce mimics the creamy texture of dairy cheese.
Herb‑Infused Butter Finish
Finish the perogies with a drizzle of herb‑infused butter—mix softened butter with minced parsley, thyme, and a pinch of sea salt. This adds a fragrant, savory layer that elevates the dish to gourmet status.
Storing and Bringing It Back to Life
Fridge Storage
Store cooked perogies in an airtight container for up to 3 days. Reheat in a skillet over medium heat with a splash of butter until warmed through. This method preserves the crispness without drying out the filling.
Freezer Friendly
Freeze raw, assembled perogies on a parchment‑lined tray. Once solid, transfer them to a freezer bag. They’ll keep for up to 2 months. Bake directly from frozen at 400°F for 12–15 minutes, adding 5 minutes if you’ve frozen them after boiling.
Best Reheating Method
The secret to reheating perogies is to use a combination of oven and skillet. First, sear them in a hot skillet for 2 minutes, then finish in a preheated oven at 375°F for 5 minutes. Add a tiny splash of water before reheating; it steams back to perfection, keeping the interior moist.