I was in the middle of a kitchen fiasco, the oven door stuck, the dough sticking to the counter, and my roommate shouting, “We need chocolate, now!” I had nothing but a bag of hot chocolate mix and a dream. That moment sparked a quest. I wanted cookies that would melt like butter in your mouth and give you the warmth of cocoa wrapped in a crunchy shell. This is the story of how I turned that frantic scramble into the ultimate hot chocolate cookie.
The scent of melting butter hit the air, mingling with the sweet, caramelized aroma of brown sugar. I could hear the rhythmic clack of the spoon against the mixing bowl, a steady drumbeat that promised something delicious. The texture of the dough was a glossy, almost liquid silk that clung to my fingers, a tactile reminder that this was no ordinary cookie. My taste buds tingled even before the first bite, anticipating the deep, bittersweet kiss of cocoa. The sound of the oven door closing felt like a seal, a promise of the transformation to come.
What makes this version stand out is a deliberate layering of flavors and textures that defy the usual cookie expectations. The dough is buttery and airy, yet the chocolate elements provide a dense, fudgy core that melts in your mouth. The combination of hot chocolate mix and natural cocoa powder gives a depth of flavor that feels like a hug in cookie form. I’ve refined the sweetness so that each bite delivers a balanced, not overly sugary, finish. This cookie is not just a treat; it’s an experience that lingers on the palate and in the memory.
I dare you to taste this and not go back for seconds. Picture yourself pulling these out of the oven, the whole kitchen smelling incredible, and then watching the first bite melt into a silky, chocolatey cascade. I’ll be honest — I ate half the batch before anyone else got to try it. If you've ever struggled with cookie dough that feels too dense or too dry, you're not alone — and I've got the fix. Stay with me here — this is worth it. Let me walk you through every single step — by the end, you'll wonder how you ever made it any other way.
What Makes This Version Stand Out
- Flavor Depth: The marriage of hot chocolate mix and natural cocoa powder creates a rich, layered taste profile that feels like a chocolate bomb exploded in your mouth. Each bite delivers a crescendo of sweetness followed by a lingering cocoa finish that keeps you craving more.
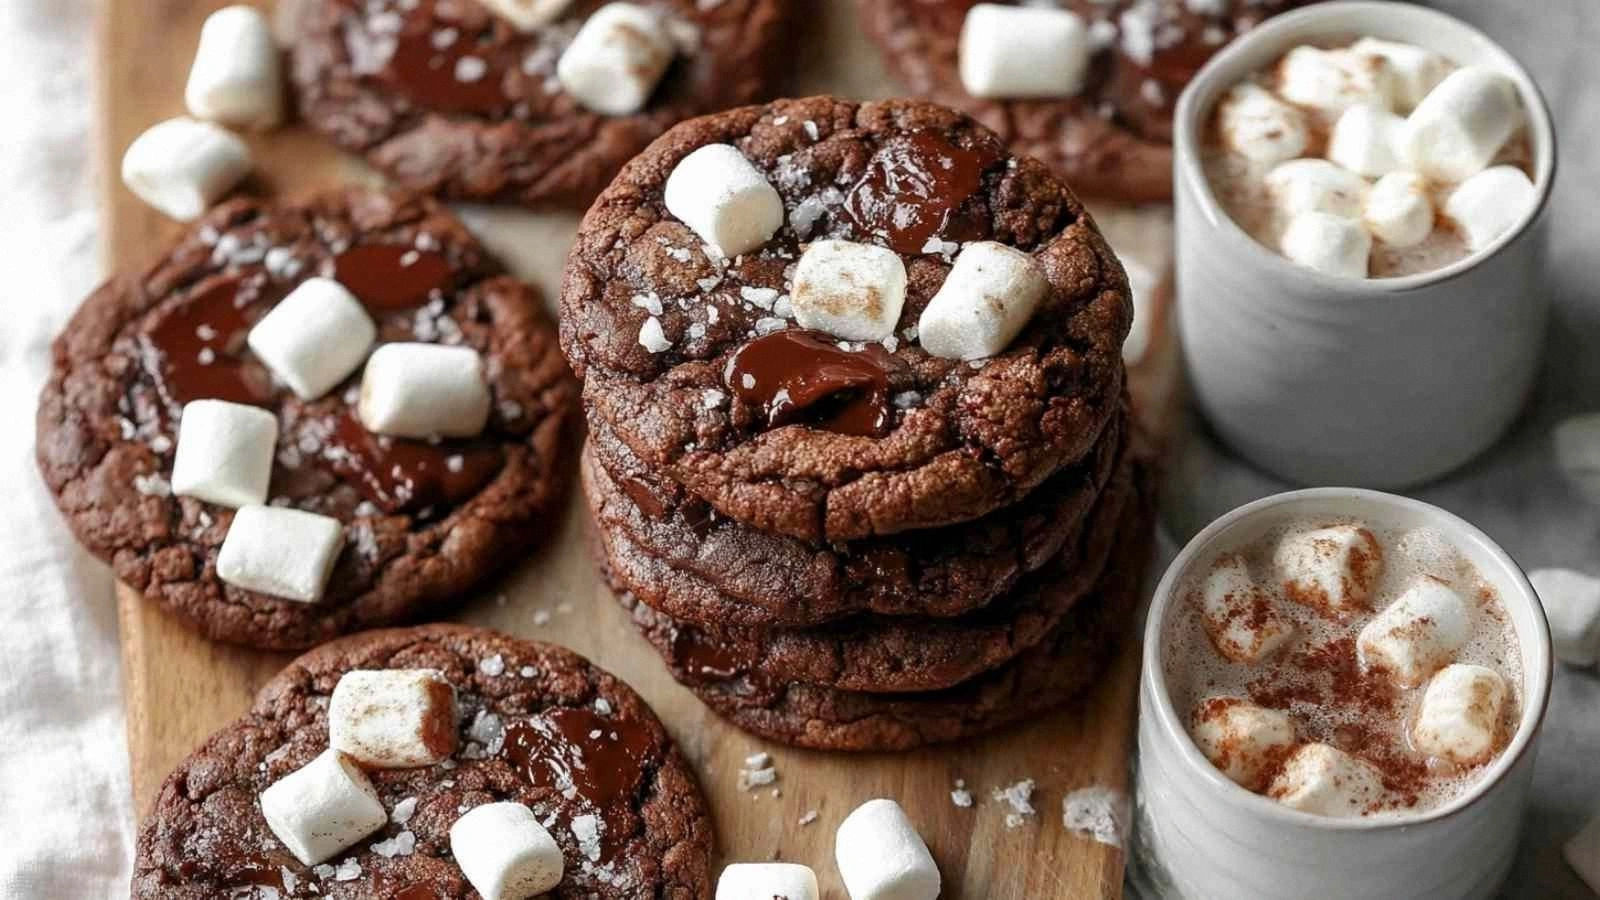
- Texture Contrast: The cookies boast a crisp, golden edge that shatters like thin ice, juxtaposed with a chewy, almost molten center that oozes chocolate when you bite into it. This duality turns every bite into a playful adventure.
- Sweetness Balance: By combining light brown sugar with granulated sugar, the dough achieves a caramelized undertone without becoming cloying. The result is a cookie that feels indulgent yet refined.
- Chocolate Intensity: The semi-sweet chocolate pieces melt into pockets of glossy chocolate that burst with every chew, while the mini marshmallows add a soft, sweet contrast that melts into the dough as it bakes.
- Crowd Appeal: These cookies are a hit at parties, potlucks, or a cozy night in. They’re the kind of treat that makes guests ask for the recipe, and that’s a win in any kitchen.
- Make‑Ahead Friendly: The dough holds up well in the fridge for up to 48 hours, and the cookies can be frozen without losing texture. This makes them a perfect prepped dessert for busy weeks.
Inside the Ingredient List
The Flavor Base
Butter: Unsalted butter is the backbone of this cookie, providing a rich, creamy mouthfeel that elevates the chocolate notes. If you use salted butter, the overall flavor will be more pronounced, potentially masking the delicate cocoa undertones. For a subtle twist, try substituting half the butter with coconut oil to introduce a hint of tropical sweetness.
Light Brown Sugar: This sugar brings a caramel-like depth that balances the bitterness of cocoa. Skipping it would leave the cookies feeling flat and overly sweet from the granulated sugar alone. When selecting brown sugar, choose one with a lower molasses content for a milder flavor profile.
Granulated Sugar: Granulated sugar provides the necessary sweetness and helps the dough spread evenly during baking. Removing it would result in a denser, less tender cookie that doesn’t caramelize as beautifully. If you prefer a healthier option, experiment with a 25% reduction and add a touch of maple syrup for natural sweetness.
Vanilla Extract: Vanilla acts as a flavor enhancer, bringing out the chocolate’s complexity. A poor-quality vanilla will leave a harsh aftertaste, so invest in a pure vanilla bean or high-grade extract. For a nutty twist, replace half the vanilla with almond extract.
The Texture Crew
All-Purpose Flour: Flour provides structure; it’s the foundation that holds everything together. Using bread flour would make the cookies chewy, while cake flour would make them cakey. Stick to all-purpose flour for that classic cookie bite.
Baking Soda: This leavening agent creates tiny air pockets, giving the cookies a lightness that contrasts with the dense chocolate centers. Without baking soda, the cookies would be flat and heavy. If you’re sensitive to sodium, reduce the amount by a quarter and add a pinch of salt to balance.
Salt: Salt is the secret weapon that amplifies all flavors and tempers the sweetness. Skipping it will make the cookies taste flat and overly sugary. If you’re on a low-sodium diet, use a sodium-free salt alternative, but keep the same quantity.
The Unexpected Star
Hot Chocolate Mix: This is the heart of the cookie’s chocolatey punch. It’s a pre‑sweetened blend that brings instant depth without the need for complex chocolate powders. If you prefer a more natural flavor, replace the mix with an equal amount of unsweetened cocoa powder and add an extra 1/4 cup of sugar.
Natural Cocoa Powder: Cocoa powder adds a subtle bitterness that balances the sweetness of the sugars and the richness of the chocolate pieces. Skipping it would result in a cookie that tastes like a sweet butter cookie with a hint of chocolate. For a vegan version, use a dairy-free cocoa powder that’s free from added sugars.
Semi-Sweet Chocolate: The chocolate pieces melt into glossy pockets, providing a luxurious mouthfeel. Using dark chocolate would increase bitterness, while milk chocolate would make the cookie sweeter. If you’re a chocolate aficionado, consider adding a splash of espresso powder to deepen the flavor profile.
The Final Flourish
Mini Marshmallows: The marshmallows add a playful, gooey texture that contrasts with the crisp edges. They also provide a sweet, airy center that melts into the cookie, creating a delightful surprise. If you’re allergic to marshmallows, substitute with small chocolate chips or dried fruit pieces for a different twist.
Everything's prepped? Good. Let's get into the real action.
The Method — Step by Step
- Step 1: Preheat your oven to 350°F (175°C). Line two baking sheets with parchment paper or silicone mats to prevent sticking. Let the oven heat up while you prepare the dough; a hot oven ensures the cookies rise evenly. The aroma will start to mingle with the buttery scent, signaling that the adventure is underway.
- Step 2: In a large bowl, cream the butter, light brown sugar, and granulated sugar together until the mixture is light and fluffy. Use an electric mixer on medium speed for 2–3 minutes, watching the color shift from pale to golden. This aeration is essential for the cookie’s tender crumb. The batter should feel silky to the touch.
- Step 3: Add the eggs, one at a time, beating well after each addition. Stir in the vanilla extract, ensuring it’s fully incorporated. The batter should become slightly thicker, but still pourable. This is where the cookie’s structure begins to form, setting the stage for the chocolatey surprises.
- Step 4: In a separate bowl, whisk together the all-purpose flour, baking soda, and salt. Sift the dry mixture over the wet batter, folding gently until just combined. Overmixing will develop gluten and make the cookies tough. The dough should feel firm but still hold together when pressed.
- Step 5: Fold in the hot chocolate mix, natural cocoa powder, semi-sweet chocolate pieces, and mini marshmallows. The dough should look like a dark, chocolatey sea with floating islands. Watch out: if you add too much wet ingredient after this point, the dough will become sticky and difficult to scoop.
- Step 6: Using a cookie scoop or tablespoon, drop rounded balls of dough onto the prepared baking sheets, spacing them 2 inches apart. Flatten each ball slightly with the back of a spoon to ensure even baking. The cookies should be about 1.5 inches in diameter.
- Step 7: Bake for 12–15 minutes, or until the edges are golden brown and the centers have set but still look slightly soft. The cookies will continue to firm up as they cool. Watch the timer closely; overbaking will result in a crumbly texture.
- Step 8: Allow the cookies to cool completely on a wire rack before serving. The marshmallows will have melted into a gooey center, and the chocolate will have set into a glossy sheen. The aroma will still be strong, making the cookies irresistible. Store them in an airtight container at room temperature for up to 5 days.
That's it — you did it. But hold on, I've got a few more tricks that'll take this to another level.
Insider Tricks for Flawless Results
The Temperature Rule Nobody Follows
Many bakers bake at 375°F, which can cause the cookies to spread too much and lose their chewy center. Lowering the temperature to 350°F ensures even baking and a perfect rise. This subtle change might feel insignificant, but it transforms the cookie’s texture dramatically.
Why Your Nose Knows Best
As soon as the dough hits the oven, the scent of butter and chocolate will begin to dance. Trust that aroma; if it starts to smell slightly burnt, pull the cookies out immediately. A quick check with your nose can save a batch from becoming a crispy disaster.
The 5-Minute Rest That Changes Everything
After removing the cookies from the oven, let them rest on the baking sheet for 5 minutes. This short pause allows the edges to set and the center to firm up, preventing the cookies from breaking when transferred. Many people skip this step, resulting in fragile cookies.
The Perfect Scoop
Using an ice cream scoop ensures uniform cookie size and consistent baking time. A tablespoon can lead to uneven sizes, causing some cookies to bake too fast or too slow. Consistency in size also means a more predictable flavor profile.
The Secret Ingredient Swap
If you’re craving a nutty twist, add a handful of chopped walnuts or pecans to the dough. The nuts provide crunch and a subtle earthy flavor that pairs beautifully with chocolate. Just remember to toast them lightly beforehand to bring out their aroma.
Creative Twists and Variations
This recipe is a playground. Here are some of my favorite ways to switch things up:
Cocoa Powder Swirl
Instead of hot chocolate mix, use a generous swirl of unsweetened cocoa powder throughout the dough. The result is a more intense chocolate flavor with a slightly bitter undertone, perfect for the serious chocolate lover.
Salted Caramel Crunch
Add a tablespoon of caramel sauce to the dough and sprinkle sea salt on top before baking. The caramel adds a buttery sweetness while the sea salt provides a savory counterpoint. This variation is ideal for dessert tables.
Espresso Explosion
Stir in 1 teaspoon of instant espresso powder into the dry mixture. The espresso deepens the chocolate flavor and gives the cookies a subtle caffeine kick. Pair with a latte for a perfect coffeehouse vibe.
Minty Marvel
Add 1 teaspoon of peppermint extract to the wet ingredients. The mint pairs beautifully with chocolate, creating a refreshing twist that’s especially popular during holidays.
Almond Joy Delight
Replace mini marshmallows with shredded coconut and add a handful of chopped almonds. The coconut adds chewiness while the almonds provide crunch. This version feels like a bite of a classic candy bar.
Vegan Version
Swap butter for dairy-free margarine, use a plant-based milk in the dough, and choose a vegan chocolate bar. The result is a cookie that’s just as indulgent and meets vegan dietary needs.
Storing and Bringing It Back to Life
Fridge Storage
Store cooled cookies in an airtight container at room temperature for up to 5 days. If you want to keep them fresher, place the container in the fridge for up to 10 days. The cookies will stay soft, and the chocolate will maintain its sheen.
Freezer Friendly
Lay the cooled cookies in a single layer on a baking sheet and freeze until solid. Transfer them to a freezer bag or container. They can stay frozen for up to 3 months without losing flavor or texture.
Best Reheating Method
To revive frozen cookies, place them on a parchment-lined tray and bake at 300°F for 5–7 minutes. For a quick snack, microwave on high for 15 seconds. Add a tiny splash of water before reheating to create steam, which helps the cookies regain their moist center.