It started with a kitchen catastrophe that could only be described as a culinary nightmare. I was attempting a classic banana split cake, but the batter had turned into a lumpy, unappetizing mess that looked like a banana‑filled swamp. The smell of burnt sugar filled the air, and I could hear the faint hiss of a failed attempt. In that moment, I swore to myself that I would never again let a dessert flop like that. That vow sparked a midnight brainstorming session that birthed the No‑Bake Banana Split Cake Reci.
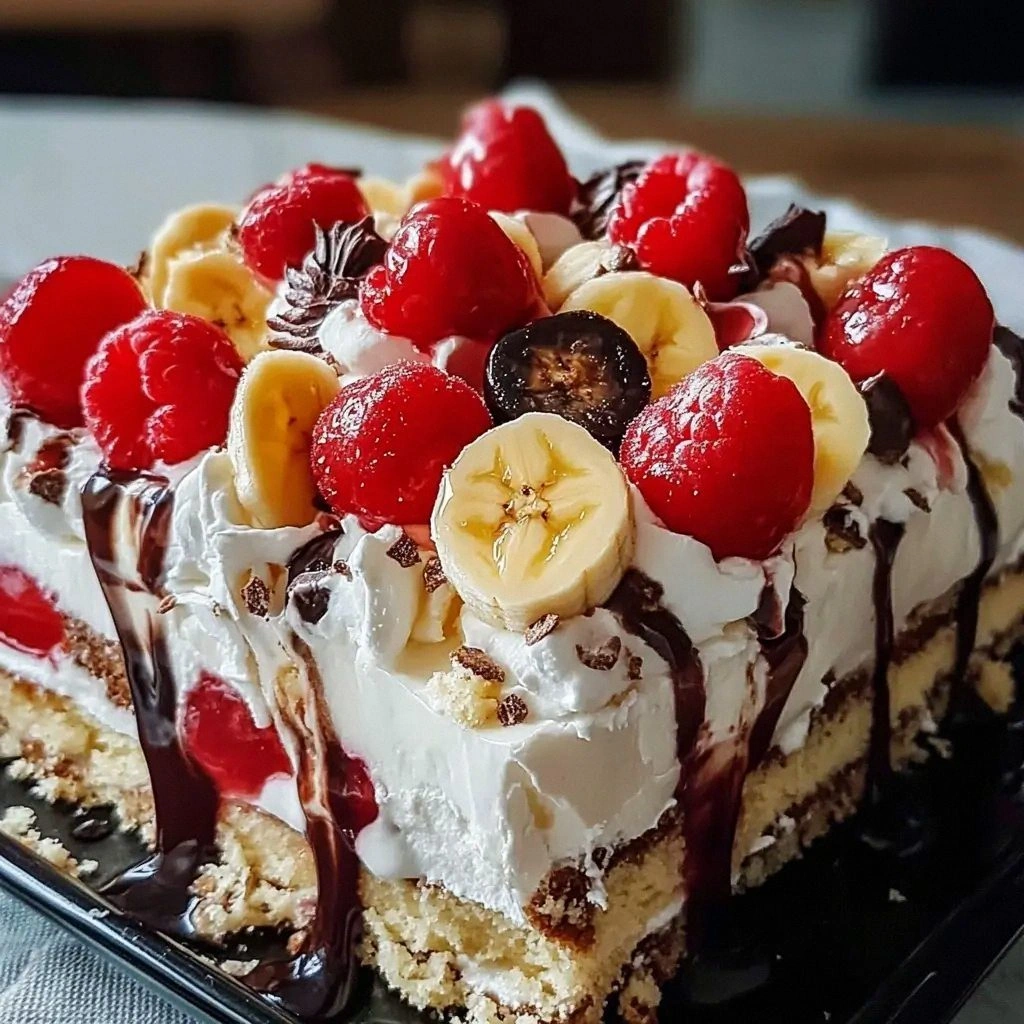
Imagine the first bite: silky banana cream that slides over your tongue, a crunchy graham crumb base that snaps like fresh‑cut paper, and a glossy chocolate glaze that shimmers like liquid midnight. The aroma of toasted graham crackers mingles with the sweet scent of ripe bananas, while a faint whisper of vanilla and chocolate lingers in the air. The texture is a perfect harmony of soft, creamy, and crunchy, creating a sensory experience that feels both nostalgic and entirely new. Each spoonful feels like a small, indulgent adventure that turns an ordinary dessert into a celebration.
This version of the banana split cake is a revelation because it eliminates the need for baking and still delivers a depth of flavor that rivals any oven‑baked counterpart. The key lies in the combination of a buttery graham cracker crust, a luscious banana‑whipped cream filling, and a chocolate‑nut topping that provides a satisfying crunch. Unlike other no‑bake desserts that end up soggy or bland, this recipe locks in freshness and texture, making it hands down the best version you'll ever make at home. I dare you to taste this and not go back for seconds.
But here’s the kicker: the secret ingredient that elevates the entire cake is a splash of espresso‑infused chocolate sauce that adds depth and a subtle bitter note. This unexpected twist transforms the classic banana split into a gourmet delight that feels like a dessert you’d find in a high‑end café. Picture yourself pulling this out of the fridge, the whole kitchen smelling incredible, and watching friends’ eyes widen as they take their first bite. Let me walk you through every single step — by the end, you'll wonder how you ever made it any other way.
What Makes This Version Stand Out
- Flavor: The combination of ripe bananas, rich chocolate, and a subtle espresso note creates a layered taste profile that dances on the palate. Each bite offers a sweet, creamy center with a hint of bitterness that keeps the flavor complex. This contrast makes the dessert memorable and satisfying.
- Texture: The graham cracker base provides a satisfying crunch, while the whipped cream filling remains airy and light. The chocolate glaze adds a glossy finish that melts gently on the tongue. The result is a multi‑sensory experience that feels like a dessert and a snack rolled into one.
- Convenience: No oven required, no complicated steps, and minimal cleanup. The entire process takes under an hour, making it perfect for busy evenings or spontaneous gatherings. This simplicity is a game‑changer for anyone who loves dessert but hates the hassle.
- Make‑ahead Potential: The cake can be assembled days in advance and kept refrigerated, allowing you to serve it on short notice. The ingredients hold their texture well, and the chocolate glaze can be refreshed just before serving. This feature makes it ideal for parties or last‑minute celebrations.
- Visual Appeal: The layered construction, with its contrasting colors and glossy finish, is Instagram‑ready. The cake’s appearance will make your guests pause and take a photo before even tasting. This visual element turns the dessert into a centerpiece.
- Ingredient Quality: Using premium chocolate chips, fresh bananas, and real butter elevates the overall experience. Each component contributes to a refined flavor that feels indulgent without being overpowering. The quality of the ingredients is the backbone of the recipe’s success.
Inside the Ingredient List
The Flavor Base
Graham cracker crumbs form the foundational crunch that holds the cake together. They provide a buttery, slightly sweet backdrop that complements the banana and chocolate layers. Skipping them would leave the dessert soggy and lacking structure.
Powdered sugar sweetens the crumb mixture, ensuring it’s not too dry. The sugar dissolves quickly, allowing the butter to bind the crumbs effectively. If you prefer a less sweet base, reduce the sugar by a quarter cup.
Instant coffee powder subtly enhances the chocolate flavor, adding depth without an overt coffee taste. It also helps to intensify the chocolate’s richness. If you’re sensitive to caffeine, replace it with a small pinch of cocoa powder.
The Texture Crew
Heavy whipping cream is the heart of the cake’s filling. When whipped, it creates a light, airy texture that balances the dense graham base. If you’re looking for a dairy‑free version, substitute with coconut cream whipped to the same consistency.
Fresh bananas add natural sweetness and moisture, creating a smooth, creamy interior. Use ripe bananas for maximum flavor; overripe bananas will give a stronger banana taste that can overpower the chocolate.
Crushed nuts, preferably pecans or walnuts, add a nutty crunch and a subtle earthy flavor. They also provide a textural contrast that keeps each bite interesting. If you’re allergic, you can omit them or replace them with chopped dried fruit.
The Unexpected Star
Chocolate chips are more than just a topping; they melt into a glossy sauce that coats the cake. The high cocoa content gives the chocolate a deep, bittersweet finish that balances the sweetness of the bananas. For a richer chocolate flavor, use dark chocolate chips with at least 70% cocoa.
Coconut oil helps the chocolate sauce set into a firm glaze while adding a subtle tropical aroma. It also keeps the glaze from becoming too brittle. If you prefer a nutty flavor, use toasted coconut oil instead.
The Final Flourish
Vanilla extract enhances all the flavors, tying the ingredients together into a cohesive whole. It also adds a fragrant aroma that elevates the dessert’s overall appeal. Use pure vanilla extract for the best results.
Milk is used sparingly to adjust the consistency of the chocolate glaze, ensuring it’s pourable yet thick enough to coat the cake. If you’re lactose intolerant, swap it for almond milk or oat milk; just be aware it may slightly alter the glaze’s thickness.
Everything’s prepped? Good. Let’s get into the real action.
The Method — Step by Step
- Prepare the crust: In a medium bowl, combine the graham cracker crumbs, powdered sugar, and instant coffee powder. Add the melted butter and mix until the crumbs are evenly coated. Press the mixture into the bottom of a 9‑inch springform pan, creating a solid, even layer. Chill in the refrigerator for 10 minutes to firm up the crust. This step ensures the base stays intact when you add the filling.
- Whip the cream: Place the heavy whipping cream in a chilled mixing bowl. Using an electric mixer, whip the cream on medium speed until soft peaks form. Add the vanilla extract and continue whipping until stiff peaks form. The cream should be light and airy, like a cloud ready to be folded into the banana mixture. This is the moment of truth for the filling’s texture.
- Blend the bananas: In a blender, puree the ripe bananas until completely smooth. If you prefer a chunkier texture, pulse a few times instead of blending fully. Pour the banana puree into a large mixing bowl and let it cool slightly. This step ensures the banana flavor is evenly distributed throughout the cake.
- Combine banana and cream: Gently fold the whipped cream into the banana puree, taking care not to deflate the mixture. The goal is a silky, cohesive filling that holds together but remains fluffy. Taste the mixture; it should be sweet enough but not overpowering. This blend forms the heart of the dessert.
- Add the nuts: Stir in the crushed pecans or walnuts until evenly distributed. The nuts add a delightful crunch and a nutty undertone that balances the sweetness. If you’re avoiding nuts, simply omit this step and let the banana‑cream mixture shine.
- Layer the cake: Spoon half of the banana‑cream mixture onto the chilled crust, spreading it evenly. Gently press it down to create a smooth surface. Add the second half of the mixture on top, smoothing the top with a spatula. Chill the assembled cake in the refrigerator for at least 30 minutes to set the layers.
- Prepare the chocolate glaze: In a small saucepan, melt the chocolate chips over low heat, stirring constantly. Add the coconut oil and milk, whisking until the mixture is glossy and pourable. If the glaze is too thick, add a splash more milk; if too thin, let it simmer a bit longer. This glaze will coat the cake like a velvet finish.
- Finish and serve: Drizzle the chocolate glaze over the chilled cake, allowing it to cascade down the sides. For an extra touch, sprinkle a few extra nuts on top and add a dollop of whipped cream if desired. Let the glaze set for 5 minutes before slicing. Serve immediately, and watch the smiles appear. That sizzle when it hits the pan? Absolute perfection.
That’s it — you did it. But hold on, I've got a few more tricks that'll take this to another level.
Insider Tricks for Flawless Results
The Temperature Rule Nobody Follows
Keep all your ingredients at the same room temperature before you start mixing. Cold butter or cold cream can cause the mixture to separate or become lumpy. This simple step ensures a silky, cohesive texture that feels luxurious.
Why Your Nose Knows Best
Before you add the chocolate glaze, give it a quick sniff. A faint chocolate aroma signals that the cocoa is fresh and the glaze will coat the cake beautifully. If it smells flat, let it simmer a bit longer to develop depth.
The 5‑Minute Rest That Changes Everything
After pouring the glaze, let the cake rest for exactly five minutes before slicing. This brief pause allows the glaze to set into a glossy, firm finish. Skipping this step can leave the glaze too runny, making the cake look messy.
How to Avoid the Soggy Bottom
Press the crust firmly into the pan and let it chill for ten minutes before adding the filling. This creates a barrier that prevents the banana‑cream mixture from seeping into the crumbs. The result is a crisp base that stays firm even after refrigeration.
Quick Fix for a Sticky Mix
If the banana‑cream mixture feels too thick, add a splash of milk or a teaspoon of yogurt to thin it out. This tweak keeps the filling light without compromising flavor.
Creative Twists and Variations
This recipe is a playground. Here are some of my favorite ways to switch things up:
Nutty Delight
Swap the pecans for toasted almonds or hazelnuts. The toasted nuts bring a caramelized flavor that pairs wonderfully with the banana and chocolate. This version is perfect for nut lovers who want an extra crunch.
Berry Burst
Replace the banana puree with a blend of strawberries and blueberries. Add a splash of lemon juice to brighten the flavor. The berries give the cake a fresh, tart contrast that feels like a summer dessert.
Chocolate‑Only Edition
Omit the banana entirely and use a thick chocolate ganache as the filling. Layer the ganache with chocolate‑crusted crumbs and finish with a drizzle of dark chocolate. This decadent version satisfies chocolate cravings without any fruit.
Spiced Surprise
Introduce a pinch of ground cinnamon and a dash of nutmeg into the banana mixture. The spices add warmth and depth, turning the cake into a cozy fall treat. Pair it with a scoop of vanilla ice cream for extra indulgence.
Caramel Swirl
Swirl in a generous amount of caramel sauce into the banana‑cream mixture before layering. The caramel adds a buttery sweetness that balances the chocolate glaze. This variant feels like a caramel‑filled brownie.
Vegan Variation
Use coconut cream for the filling, coconut oil for the glaze, and a dairy‑free chocolate spread. This vegan version maintains all the textures and flavors while being completely plant‑based. It’s a win‑win for both vegans and non‑vegans.
Storing and Bringing It Back to Life
Fridge Storage
Store the assembled cake in an airtight container in the refrigerator for up to five days. The chilled environment keeps the banana‑cream filling firm and the chocolate glaze glossy. When you’re ready to serve, let it sit at room temperature for ten minutes to soften slightly.
Freezer Friendly
Wrap the cake tightly in plastic wrap, then place it in a freezer‑safe container. It will keep for up to two weeks. Thaw overnight in the refrigerator before serving. This method preserves the texture and flavor without any freezer burn.
Best Reheating Method
To refresh a chilled cake, gently warm it in a microwave at 30‑second intervals, checking for softness. Add a tiny splash of water before reheating; it steams the cake back to perfection. Avoid high heat to keep the chocolate glaze from melting away.