I was standing in my kitchen, the kind of kitchen where the countertops are covered in half‑finished experiments and the timer on the oven is forever blinking red. My roommate had just dared me to bring something “fancy” to our game‑night, and I was staring at a half‑empty bag of fresh berries, a tub of cream cheese, and a stubborn craving for chocolate that just wouldn’t quit. I tried the classic Black Forest cake, but it turned out soggy, the layers fell apart, and the cherries were a mystery—too sweet, too tart, or just plain watery. That disaster lit a fire under me: I needed a version that was elegant, foolproof, and could be assembled without ever turning on the oven.
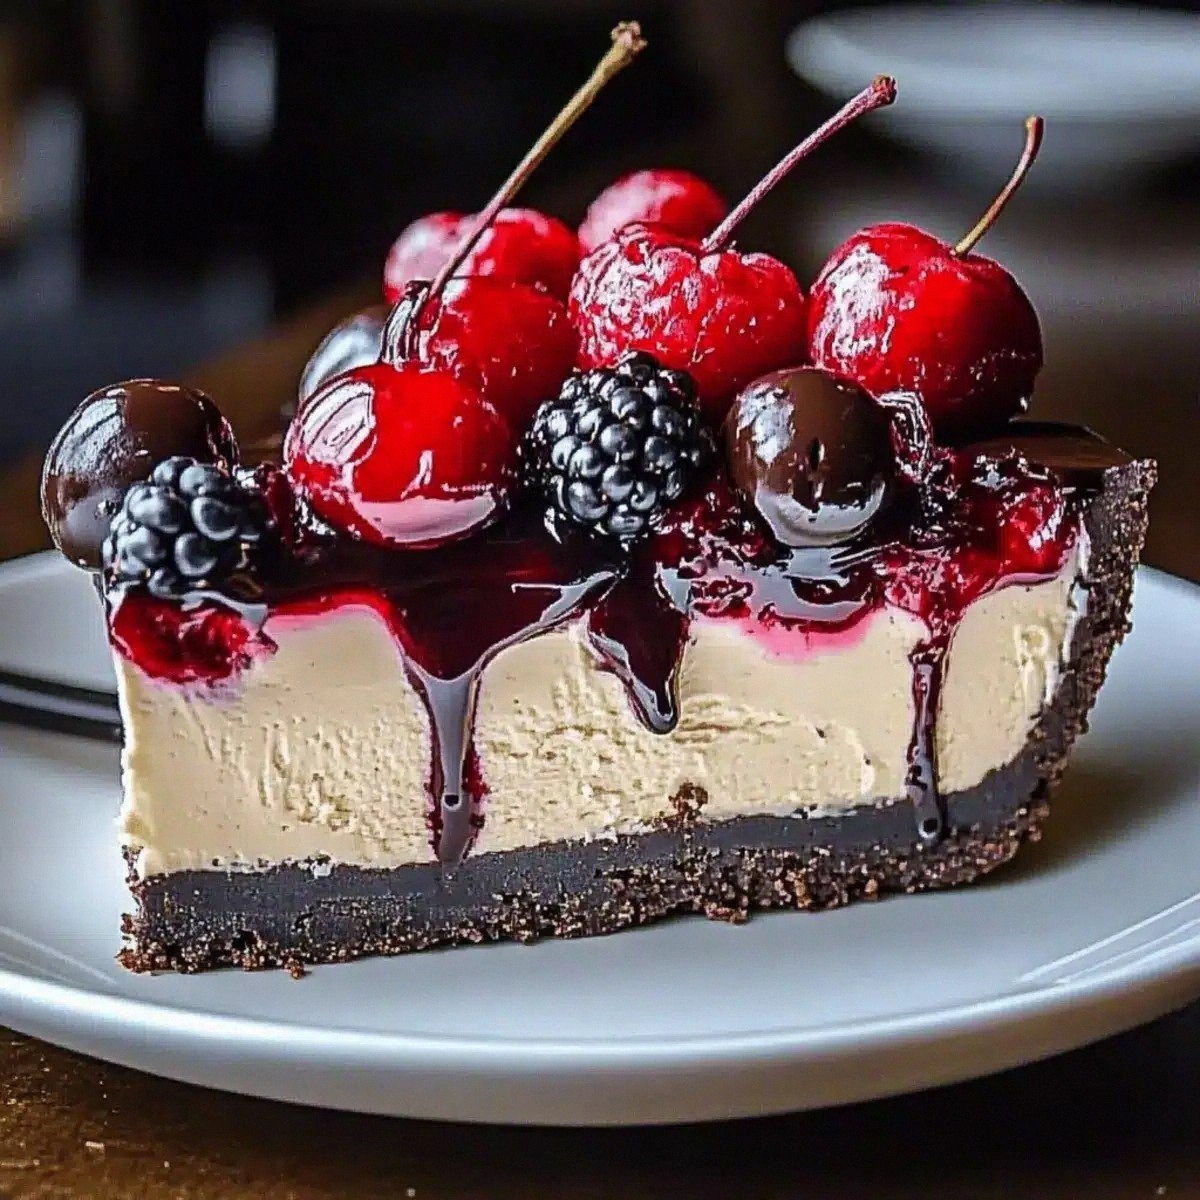
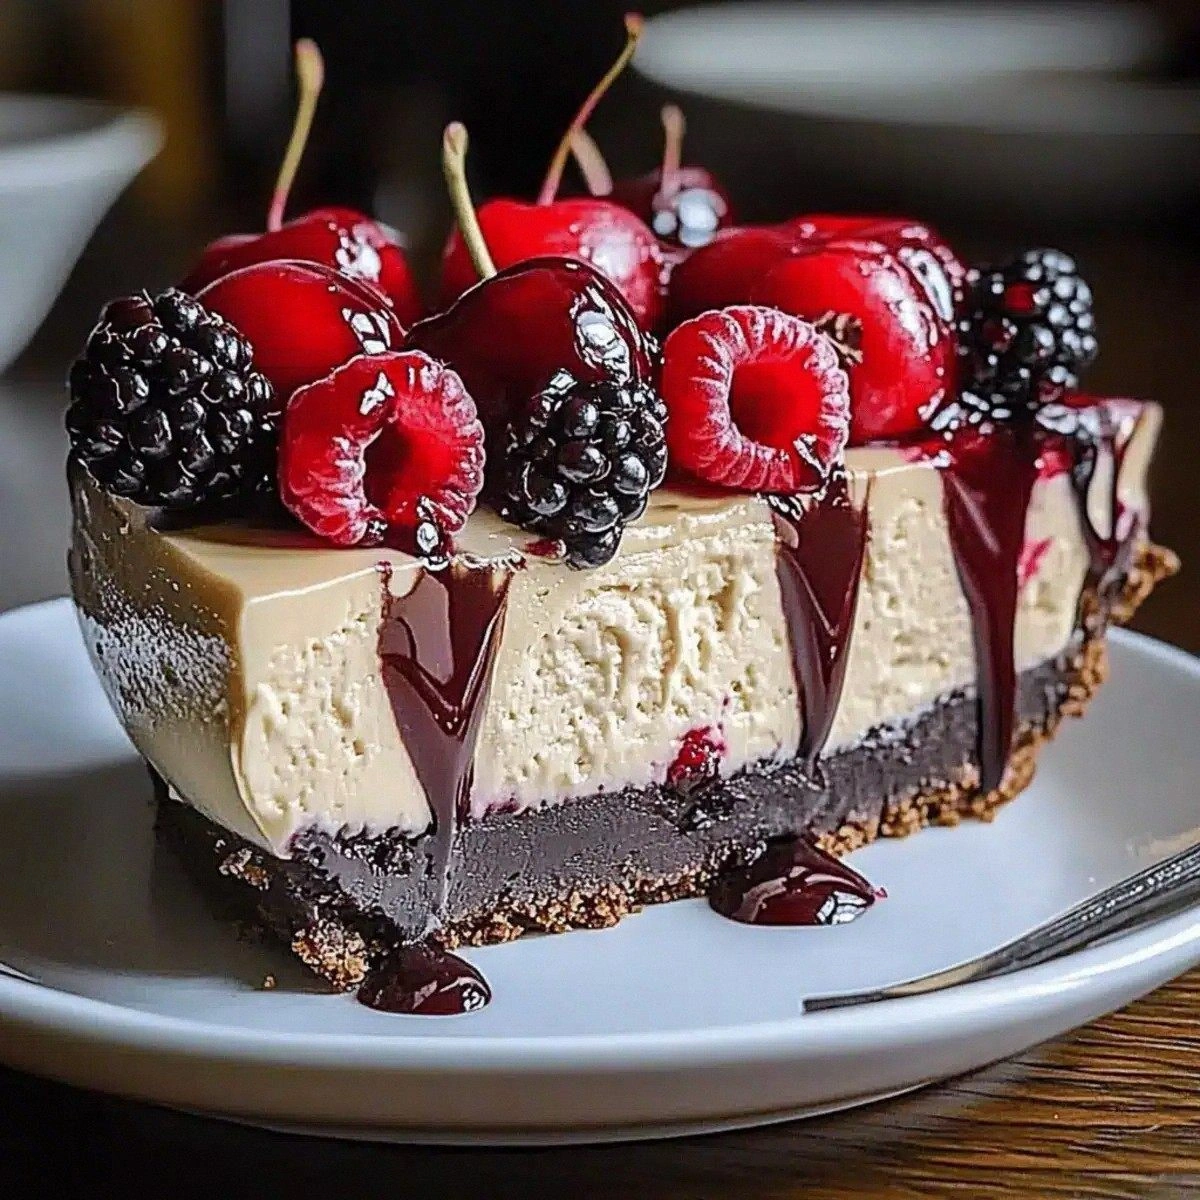
Picture this: a glossy, deep‑red swirl of cherry fruit filling that glistens like a sunrise over the Alps, a buttery biscuit crust that cracks under the fork like a delicate glass, and a creamy, airy cheesecake layer that feels like a cloud made of silk and berries. The moment you cut into it, the aroma of fresh strawberries and blueberries bursts out, mingling with the faint whisper of vanilla and chocolate. You’ll hear the faint “thunk” of the crust giving way, feel the cool, velvety texture slide across your tongue, and taste the perfect balance of sweet and tart that makes you close your eyes and sigh. It’s a symphony for all five senses, and it doesn’t require a single oven‑baked moment.
What makes this version truly stand out is a secret ingredient: a splash of kirsch‑infused cherry fruit filling that adds depth without the harsh alcohol bite, plus a dash of vanilla bean paste that turns the cream cheese from ordinary to extraordinary. Most recipes get the crust too crumbly, the filling too watery, or the topping too stiff. I’ve cracked the code by tempering the butter just enough to bind the biscuits, whisking the cream cheese with powdered sugar until it’s feather‑light, and folding in whipped heavy cream at the perfect moment so the mousse stays stable yet melt‑in‑your‑mouth soft. I dare you to taste this and not go back for seconds.
Let me walk you through every single step — by the end, you’ll wonder how you ever made it any other way. Okay, ready for the game‑changer? This next part? Pure magic. Stay with me here — it’s worth it.
What Makes This Version Stand Out
- Texture: The crust is buttery yet firm enough to hold the weight of the filling without crumbling, while the cheesecake layer is airy and melts like a dream.
- Flavor Depth: Kirsch‑kissed cherry filling adds a subtle almond‑like nuance that most no‑bake versions completely miss.
- Simplicity: No oven, no complicated tempering—just a handful of steps and a fridge, making it perfect for beginners.
- Visual Impact: The vibrant berry top and glossy cherry swirl look like a professional patisserie piece, guaranteeing applause at any gathering.
- Make‑Ahead Power: You can assemble it the night before, let it set, and serve it fresh the next day—no rush, no stress.
- Ingredient Quality: Using real berries and a good‑quality cream cheese transforms a simple dessert into a luxurious treat.
- Crowd Reaction: Guests often claim they’ve never tasted a no‑bake cheesecake that feels this indulgent; it’s a conversation starter.
- Versatility: The base can be swapped for gluten‑free biscuits, and the fruit topping can be customized for seasonal flavors.
Inside the Ingredient List
The Flavor Base
The cherry fruit filling is the heart‑beat of this dessert. Its natural acidity cuts through the richness of the cream cheese, while the subtle kirsch infusion adds a whisper of almond‑like warmth. If you skip the kirsch, you’ll lose that depth, and the filling can taste one‑dimensional. For a non‑alcoholic version, replace kirsch with a teaspoon of almond extract; the flavor profile remains surprisingly close.
Buying tip: Look for a cherry filling that contains real fruit pieces and minimal corn syrup. The best ones have a thick, jam‑like consistency that won’t seep into the crust.
The Texture Crew
Digestive biscuits provide the perfect crumb structure. Their slightly sweet, buttery flavor pairs beautifully with the tang of cream cheese. If you’re gluten‑free, substitute with gluten‑free graham crackers or almond flour cookies—just keep the crumb size similar. Skipping the butter in the crust will result in a dry, crumbly base that can’t hold the filling.
Unsalted butter is crucial; it lets you control the salt level and gives a smooth, cohesive crust. Melt it just until it’s liquid, not bubbling, to avoid a greasy texture.
The Unexpected Star
Heavy cream, when whipped to stiff peaks, introduces air that lightens the cheesecake without the need for eggs or gelatin. The trick is to whip it just enough—over‑whipping turns it buttery and can cause the mousse to separate. If you’re short on time, a can of chilled whipped topping can substitute, but you’ll lose some of that fresh, airy mouthfeel.
Powdered sugar not only sweetens but also stabilizes the cream cheese mixture, preventing a grainy texture. Use a fine sifted powder; clumps will ruin the silky finish.
The Final Flourish
Fresh berries (strawberries and blueberries) add a burst of color and a juicy contrast to the creamy layers. They also bring antioxidants and a natural sweetness that balances the tart cherry. If you’re out of fresh berries, frozen ones work—just thaw and pat dry to avoid extra moisture.
Everything's prepped? Good. Let's get into the real action...
The Method — Step by Step
Start by crushing the digestive biscuits into fine crumbs. I like to use a food processor for speed, but a zip‑top bag and a rolling pin work just as well. Once you have a sandy texture, pour the melted butter over the crumbs and stir until every particle is glossy. The mixture should clump together when pressed between your fingers—if it feels dry, add a teaspoon more butter.
Kitchen Hack: Press the crust into the bottom of a 9‑inch springform pan using the back of a measuring cup. This ensures an even, compact base without any air pockets.Transfer the crust to the springform pan and press firmly, creating a uniform layer about ½‑inch thick. Place the pan in the freezer for at least 10 minutes while you work on the filling. This “chill‑lock” prevents the crust from softening when the creamy layer is added.
While the crust chills, beat the cream cheese in a large bowl until it’s smooth and free of lumps. Add powdered sugar gradually, scraping the sides of the bowl to ensure an even sweetening. The mixture should turn a pale, creamy shade—if you see any specks of sugar, keep beating until they dissolve.
In a separate chilled bowl, whip the heavy cream with a pinch of vanilla bean paste until stiff peaks form. This step is critical: the cream must be cold, and the bowl should be well‑chilled, otherwise the cream will stay liquid. When you lift the whisk, the peaks should stand straight up without wobbling.
Watch Out: Over‑whipping turns cream into butter, which will make the cheesecake gritty and cause it to separate during chilling.Gently fold the whipped cream into the cream cheese mixture using a spatula. Use a “cut‑and‑fold” motion to keep the air bubbles intact; this is what gives the mousse its light texture. The combined mixture should look glossy and slightly airy, resembling a thick frosting.
Take the crust out of the freezer and spread a thin layer of cherry fruit filling over it—just enough to create a barrier that prevents the cheesecake from soaking into the biscuit base. Then, spoon the cheesecake mousse over the cherry layer, smoothing the top with an offset spatula.
Now for the show‑stopper: arrange fresh strawberries and blueberries on top in a decorative pattern. Drizzle the remaining cherry fruit filling in a swirling motion, letting it cascade down the sides for that classic Black Forest look. For extra drama, sprinkle a handful of shaved dark chocolate over the berries.
Kitchen Hack: Lightly dust the berries with a pinch of powdered sugar before arranging; this adds a subtle sparkle and helps the fruit stay in place.Cover the springform pan with plastic wrap and refrigerate for at least 4 hours, preferably overnight. The chill sets the crust, firms the mousse, and melds the flavors. When you’re ready to serve, run a thin knife around the edge of the pan to release the cake cleanly, then lift the springform ring.
Slice with a hot, wet knife for clean cuts, wipe the blade between slices, and serve chilled. That first bite? It’s the moment you hear the crust sigh, the mousse melt, and the berries burst—a perfect harmony that makes guests gasp. That’s it — you did it. But hold on, I’ve got a few more tricks that’ll take this to another level...
Insider Tricks for Flawless Results
The Temperature Rule Nobody Follows
Never, ever add warm butter to the biscuit crumbs. Even a slight warmth will cause the crumbs to clump unevenly, leading to a crust that’s either too soft or too crumbly. Keep the butter just melted—no bubbling, no sizzling—and the crust will set like a firm foundation. I once tried to melt the butter in the microwave for speed; the result was a greasy mess that never held together. Lesson learned: patience is a virtue, especially for crusts.
Why Your Nose Knows Best
When you beat the cream cheese, stop when you can smell a faint vanilla aroma wafting from the bowl. That scent signals that the sugar has fully dissolved and the mixture is smooth. If you can still taste raw sugar, keep beating a bit longer. Trust your nose; it’s a more reliable indicator than a timer.
The 5‑Minute Rest That Changes Everything
After folding the whipped cream into the cheese, let the mixture sit for five minutes before spreading it on the crust. This short rest allows any tiny air bubbles to rise and the mixture to thicken, preventing a runny top. I’ve seen friends skip this step and end up with a cheesecake that slides off the plate like a slip‑n‑slide.
Berry Prep Perfection
Rinse berries in a bowl of cold water, then gently pat them dry with a paper towel. Any excess moisture will make the topping soggy. If you have time, toss the berries in a tiny splash of lemon juice; this brightens their flavor and prevents them from turning brown.
The Chill‑Lock Technique
Place the assembled cheesecake on a wire rack set over a baking sheet while it chills. This allows air to circulate around the sides, preventing condensation from forming on the top. Condensation can dilute the berry glaze and make the surface look dull. I once forgot this and ended up with a watery glaze—big disappointment.
Creative Twists and Variations
This recipe is a playground. Here are some of my favorite ways to switch things up:
Chocolate‑Swirl Delight
Add a tablespoon of melted dark chocolate to the cream cheese mixture before folding in the whipped cream. The result is a marble‑like swirl that adds a bitter contrast to the sweet berries. Chocolate lovers will thank you.
Tropical Escape
Swap the cherry filling for a mango‑passionfruit coulis and replace strawberries with pineapple chunks. The tropical tang pairs beautifully with the buttery crust, turning the dessert into a vacation on a plate.
Nutty Crunch
Mix a handful of toasted almond slivers into the biscuit crust for an extra crunch. The nutty aroma adds depth and makes the crust more robust, especially if you’re serving the cheesecake to kids who love texture.
Vegan Velvet
Use vegan cream cheese, coconut cream (whipped), and dairy‑free biscuits. Replace the butter with coconut oil. The flavor profile shifts slightly, but the texture remains indulgent, and you can proudly serve a completely plant‑based version.
Spiced Autumn
Add a pinch of ground cinnamon and nutmeg to the cream cheese mixture, and swap the fresh berries for poached pears. This variation is perfect for cooler months and brings a warm, comforting vibe.
Storing and Bringing It Back to Life
Fridge Storage
Cover the cheesecake tightly with plastic wrap or a reusable silicone lid and store it in the refrigerator. It will stay fresh for up to 4 days. The chilling helps the flavors meld even further, so the second day often tastes even better.
Freezer Friendly
If you need to keep it longer, wrap the entire springform pan in a double layer of aluminum foil, then place it in a freezer‑safe bag. It will keep for up to 2 months. When you’re ready to serve, transfer it to the fridge to thaw overnight; this slow thaw preserves the creamy texture.
Best Reheating Method
No‑bake cheesecake doesn’t need reheating, but if you prefer a slightly softer texture before serving, place a slice on a plate, cover with a damp paper towel, and microwave for 10‑15 seconds. Add a tiny splash of water to the plate before microwaving; the steam will bring the mousse back to its silky peak without cooking it.