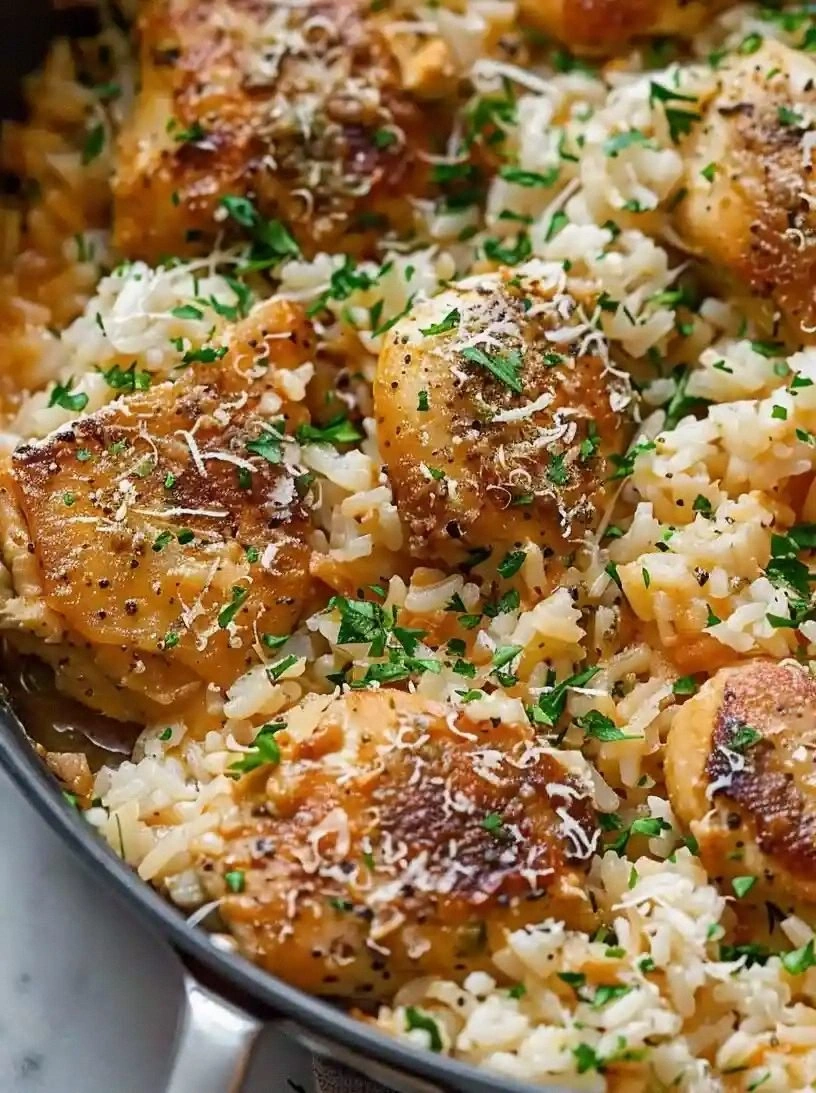
Picture this: I’m standing in a cramped kitchen, the clock ticking toward 7 p.m., and the only thing that’s burning is my patience. The dinner I had planned for tonight—simple grilled chicken and rice—has been abandoned because the chicken went soggy and the rice ended up a mushy pile. I’m staring at the stove, thinking, “I need a rescue recipe that screams confidence, flavor, and instant comfort.” That’s when I discovered the ultimate one‑pan Parmesan chicken and rice, a dish that turns a kitchen disaster into a culinary triumph with just a handful of ingredients and a single pan.
The first thing that hits you is the aroma: a buttery, garlicky perfume that makes your mouth water before you even taste it. The sound of the sizzling chicken, the crackle of the breadcrumbs, and the gentle hiss of the broth bubbling up create a soundtrack that says, “This is going to be good.” The texture is a glorious contrast—crisp, golden edges that shatter like thin ice, a creamy sauce that coats the rice like velvet, and tender chicken that melts in your mouth. And the best part? The entire meal is cooked in one pan, so cleanup is a breeze, and the kitchen stays smelling like a home‑cooked masterpiece.
I dare you to taste this and not go back for seconds. The bold claim that this is hands down the best version you’ll ever make at home isn’t just hype; it’s backed by the way the flavors mingle and the way the rice absorbs every drop of broth. Most recipes get this completely wrong, leaving you with a dry chicken or a soggy rice. Here, the technique is simple: coat the chicken in a Parmesan‑breadcrumb mix, brown it, then let it simmer in a savory broth that turns the rice into a fragrant, silky side. If you’re like me and you’ve struggled with one‑pan dinners, you’re not alone—this is the fix you’ve been waiting for.
Picture yourself pulling this dish out of the oven, the whole kitchen smelling incredible, and a crowd of friends gathering around the table, eyes wide as they watch the golden crust. The moment the pan is lifted, steam curls like a fragrant cloud, and the sound of the first bite is a satisfying crunch that confirms everything worked. The anticipation builds, the flavors promise comfort, and the result is a dish that feels like a gourmet treat but is built from pantry staples. Let me walk you through every single step—by the end, you’ll wonder how you ever made it any other way.
What Makes This Version Stand Out
- Taste: The Parmesan‑breadcrumb coating delivers a savory, umami punch that elevates the chicken to restaurant quality.
- Texture: Crispy edges that shatter like thin ice contrast with a silky sauce that clings to the rice.
- Convenience: One pan, one pot, one cleanup—perfect for busy nights or a last‑minute dinner party.
- Ingredient Quality: Freshly grated Parmesan and high‑quality breadcrumbs create depth that canned substitutes can’t match.
- Versatility: The base can be swapped for different grains, meats, or even a vegetarian protein.
- Crowd Appeal: The familiar comfort of chicken and rice meets a gourmet twist that will impress family and friends alike.
- Make‑Ahead Potential: This dish stays delicious when reheated, making it ideal for meal prep or a second day’s dinner.
Inside the Ingredient List
The Flavor Base
The foundation of this dish is a savory broth that infuses every grain of rice with richness. Chicken broth is the star, but you can swap it for vegetable broth if you’re aiming for a lighter version. The broth’s sodium level is crucial; if it’s too low, the dish will taste flat, so taste as you go and adjust with salt. Remember, broth is the liquid that ties all elements together, so don’t rush this step.
The Texture Crew
Breadcrumbs and Parmesan cheese form the crunchy exterior that becomes the showstopper. The breadcrumbs should be fine, not coarse, to give a crisp bite without a gritty feel. Parmesan adds a nutty depth that elevates the dish from ordinary to extraordinary. When you combine them, you create a coating that locks in juices, keeping the chicken moist inside.
The Unexpected Star
Fresh parsley isn’t just a garnish; it’s a bright, herbal contrast that lifts the entire dish. A handful of chopped parsley adds a pop of color and a fresh finish that cuts through the richness. If you’re adventurous, try adding a sprinkle of lemon zest for a citrusy brightness that pairs beautifully with the Parmesan.
The Final Flourish
Butter is the secret to a silky sauce that clings to the rice. A tablespoon of butter, melted at the end, adds a glossy sheen and a subtle richness that makes the dish feel indulgent. This small touch is often overlooked but can transform a simple meal into a memorable experience. Keep the butter warm until you’re ready to stir it in, and watch the sauce coat every grain.
Everything’s prepped? Good. Let’s get into the real action.
The Method — Step by Step
- Preheat your oven to 375°F (190°C). While it heats, pat the chicken breasts dry with paper towels. This step ensures the coating sticks and the chicken browns evenly. I always hear people say “dry chicken” is a trick—trust me, it works.
- In a shallow dish, whisk the eggs. In a second dish, combine the breadcrumbs, grated Parmesan, garlic powder, and Italian seasoning. The mixture should be well blended; if you’re feeling bold, add a pinch of cayenne for heat. This double-dip technique creates a thick, flavorful crust.
- Dip each chicken breast first in the beaten eggs, then dredge in the breadcrumb mixture, pressing gently to ensure an even coating. Let the coated chicken rest on a plate for 5 minutes—this helps the coating set before browning.
- Heat 2 tablespoons of olive oil in a large oven‑proof skillet over medium‑high heat. Once the oil shimmers, add the chicken breasts skin‑side down. Sear for 3–4 minutes until golden brown, then flip. The sear locks in juices and creates a caramelized crust that’s pure bliss.
- Add the long‑grain rice to the skillet, spreading it evenly around the chicken. Stir once to coat the rice with the oil and the flavorful chicken drippings. This step is crucial because it ensures every grain of rice receives the savory base.
- Pour in 2 cups of chicken broth, then sprinkle 1 tablespoon of butter on top. Gently bring the mixture to a simmer, ensuring the broth is just below boiling. The butter will melt into the sauce, giving it a silky finish.
- Place the skillet in the preheated oven and bake for 20–25 minutes, or until the rice is tender and the chicken reaches an internal temperature of 165°F (74°C). The oven’s even heat ensures the chicken stays juicy while the rice absorbs the broth. The aroma at this point is irresistible.
- Remove the skillet from the oven and let it rest for 5 minutes. This short rest allows the juices to redistribute, ensuring the chicken remains moist. While resting, sprinkle fresh parsley over the dish for a burst of color and freshness.
- Serve hot, spooning the buttery sauce over the rice and chicken. If desired, add a squeeze of lemon juice for a bright finish. This final touch balances the richness with a citrusy lift.
That’s it— you did it. But hold on, I’ve got a few more tricks that’ll take this to another level. These insider tips will help you master the dish and avoid common pitfalls.
Insider Tricks for Flawless Results
The Temperature Rule Nobody Follows
Many cooks assume the oven temperature is irrelevant, but a precise 375°F (190°C) is essential for even cooking. Too hot, and the chicken skin will burn while the interior remains undercooked. Too cool, and the rice will become mushy. Keep the oven rack centered to allow airflow and ensure consistent heat distribution.
Why Your Nose Knows Best
Before you even taste the dish, inhale the aroma of the simmering broth and the golden crust. Your nose can tell you if the sauce is too thin or if the rice needs more time. A rich, fragrant smell is a sign of a well‑balanced dish, while a flat scent indicates you may need to add a pinch of salt.
The 5-Minute Rest That Changes Everything
After baking, let the dish rest for five minutes. This short pause lets the juices redistribute, preventing the chicken from drying out. It also allows the rice to finish absorbing the broth, resulting in a fluffy, tender texture. Skipping this step can lead to a dry, uneven finish.
Butter vs. Oil: The Secret Sauce
Using butter at the end of cooking adds a glossy sheen and a subtle richness that oil alone can’t provide. Butter also helps emulsify the sauce, giving it a silky mouthfeel. If you’re avoiding dairy, try a tablespoon of coconut oil for a similar effect.
The “Resting” Chicken Trick
Let the chicken rest on a wire rack after searing. This keeps the bottom crispy and prevents the chicken from steaming in its own juices. It also allows excess moisture to evaporate, giving the crust a satisfying crunch.
Creative Twists and Variations
This recipe is a playground. Here are some of my favorite ways to switch things up:
Mediterranean Spin
Swap the long‑grain rice for quinoa and add chopped sun‑dried tomatoes and Kalamata olives. The result is a vibrant, Mediterranean‑inspired dish that still retains the comforting crunch.
Spicy Kick
Add a pinch of red pepper flakes to the breadcrumb mixture and stir in a splash of hot sauce before serving. The heat pairs beautifully with the buttery sauce, giving the dish a bold, fiery edge.
Vegetarian Version
Replace the chicken with thick slices of portobello mushrooms. Use vegetable broth and sprinkle nutritional yeast in place of Parmesan for a vegan-friendly option.
Curry Twist
Stir in a tablespoon of curry powder with the garlic powder. Add a splash of coconut milk to the broth for a creamy, aromatic flavor that transports you to India.
Herb Garden
Incorporate fresh basil, oregano, and thyme into the breadcrumb mix. The herbs infuse the dish with a fragrant, garden‑fresh aroma that elevates every bite.
Cheese Lover’s Delight
Add a handful of shredded mozzarella to the rice before baking. The cheese melts into the sauce, creating a gooey, indulgent texture that cheese lovers will adore.
Storing and Bringing It Back to Life
Fridge Storage
Cool the dish completely, then transfer to an airtight container. Store in the refrigerator for up to 3 days. The flavors intensify, making it even more delicious when reheated.
Freezer Friendly
Pack the cooled dish in a freezer‑safe container or zip‑lock bag. Freeze for up to 2 months. When ready to eat, thaw overnight in the refrigerator.
Best Reheating Method
Reheat in the oven at 350°F (175°C) for 15 minutes, or until warmed through. Add a splash of water or broth before reheating to steam the rice back to perfection. Finish with a sprinkle of fresh parsley for a fresh touch.