I was in the middle of a rainy Tuesday, the kind where the clouds look like someone spilled a bucket of charcoal across the sky, when my roommate dared me to create a snack that could actually power a marathon. I laughed, grabbed the nearest pumpkin puree from the pantry, and set the oven to a modest 350°F, thinking I’d just make a quick batch of muffins. Within minutes, the kitchen filled with the warm, earthy scent of cinnamon and nutmeg, and I realized I was on the cusp of something far bigger than a simple muffin. That moment – the smell of toasted oats mingling with the sweet, buttery notes of pumpkin – was the spark that ignited this obsession.
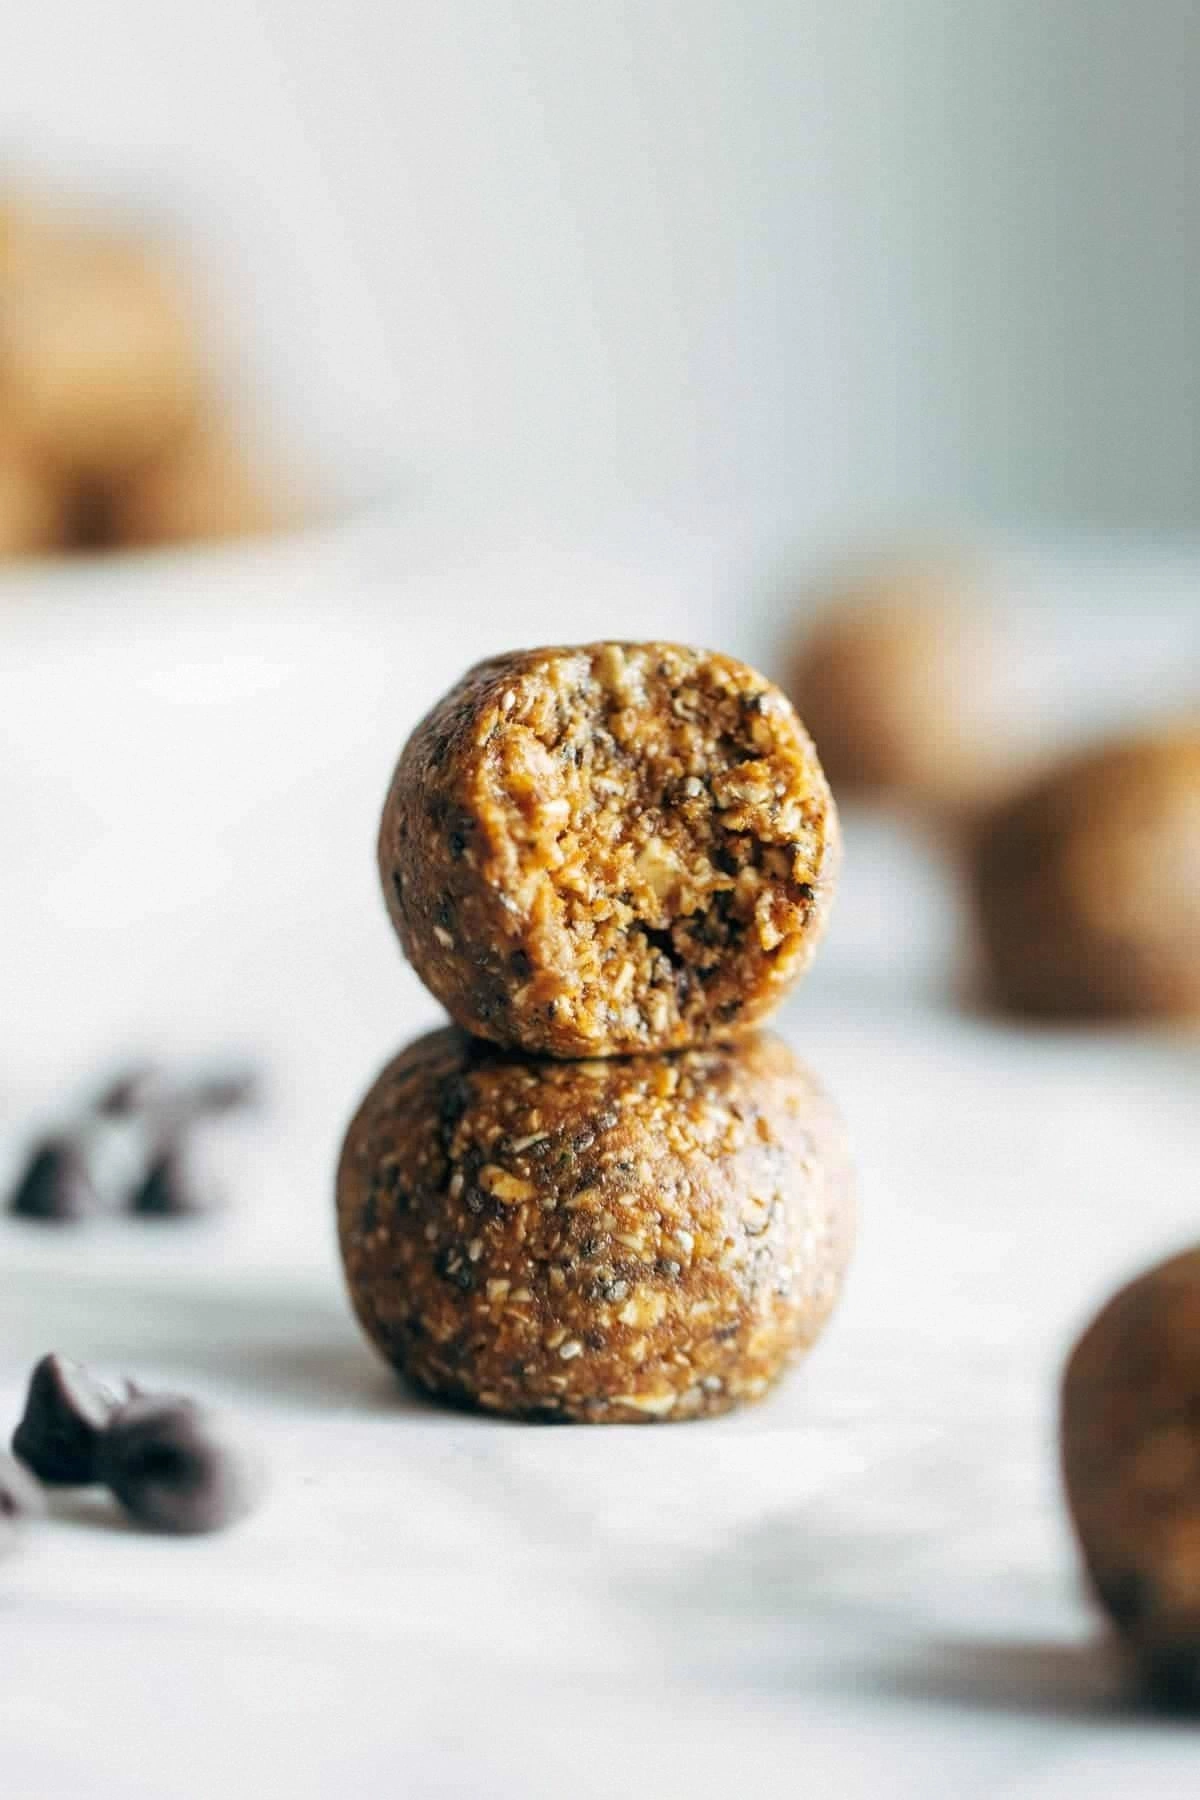
Picture this: a golden-brown bite that crumbles at the first pressure of your teeth, yet holds together like a tiny, chewy brick of pure comfort. The texture is a perfect marriage of crunchy oat flakes and a soft, almost caramelized pumpkin center that melts on your tongue. The first taste hits you with a buttery richness, then a subtle spice kick that lingers just long enough to make you wonder why you ever settled for bland granola bars. I dare you to taste this and not go back for seconds – it’s that good.
Most pumpkin snack recipes get this completely wrong. They either drown the pumpkin in sugar, or they forget the spice entirely, leaving a bland mush. This version, however, balances natural sweetness from honey with the deep, nutty flavor of almond flour and peanut butter, while the chia and flax seeds add a secret boost of protein and omega‑3s. The result? Hands down the best version you’ll ever make at home, and I’m about to prove it to you step by step.
But wait, there’s a twist you won’t see in any other blog post: a splash of vanilla extract and a quick flash‑freeze before baking. This tiny hack locks in moisture, giving you that coveted chewy‑inside, crispy‑outside contrast that makes these bites unforgettable. Okay, ready for the game‑changer? Let me walk you through every single step – by the end, you’ll wonder how you ever made it any other way.
What Makes This Version Stand Out
- Flavor Harmony: The pumpkin’s natural earthiness is amplified by cinnamon, nutmeg, and a whisper of ginger, creating a spice profile that sings without overwhelming.
- Texture Balance: Toasted oats give a satisfying crunch, while the pumpkin‑peanut butter mix stays soft, delivering that melt‑in‑your‑mouth sensation.
- Protein Power: Chia, flaxseed, and peanut butter collectively pack over 20 grams of protein per batch, making these bites a legit energy booster.
- Minimal Sugar: Only a quarter‑cup of honey sweetens the batch, letting the natural sugars from pumpkin and oats do most of the work.
- Make‑Ahead Magic: The dough freezes beautifully, so you can prep a whole batch on Sunday and have snack‑ready treats all week.
- Ingredient Quality: Using pure pumpkin puree (no additives) and raw, unsalted nut butter ensures every bite is as clean as it is delicious.
- Cooking Simplicity: Only one bowl, a quick bake, and a handful of minutes of hands‑on time – perfect for busy lives.
- Crowd Reaction: Serve these at a brunch or a post‑workout gathering and watch the empty plates disappear faster than you can say “pumpkin”.
Inside the Ingredient List
The Flavor Base
Pumpkin puree is the heart of this recipe. Choose a canned puree that’s 100 % pumpkin with no added sugars or spices. Its natural sweetness and velvety texture are what give the bites that silky interior. If you skip it, you’ll lose the moisture and the subtle earthy flavor that pairs so beautifully with the spices.
Ground cinnamon and nutmeg are the dynamic duo that turn ordinary pumpkin into a fall‑infused masterpiece. Cinnamon adds a warm, sweet spiciness, while nutmeg contributes a slightly floral, almost peppery note. Together they create a depth that makes each bite feel like a cozy sweater. If you’re out of nutmeg, a pinch of allspice works as a decent stand‑in.
The Texture Crew
Rolled oats provide the essential crunch. Opt for thick‑cut oats rather than instant; they hold their shape during baking, delivering that satisfying snap. If you swap them for quick‑cooking oats, the texture will become mushier, and the bites won’t hold together as well.
Almond flour adds a delicate, nutty richness while keeping the mixture gluten‑free for those with sensitivities. It also helps bind the dough without making it too dense. For a nut‑free version, try oat flour – the texture will stay similar, though the flavor will shift slightly.
Chia seeds and flaxseed meal are the unsung heroes. They absorb liquid, creating a gel‑like consistency that locks the bites together, and they boost the nutritional profile with omega‑3 fatty acids. If you’re allergic to seeds, you can replace them with an extra tablespoon of peanut butter, but you’ll miss out on the slight crunch they add.
The Unexpected Star
Natural peanut butter (or any nut butter of your choice) brings a creamy, salty depth that balances the sweet pumpkin. Its healthy fats also help keep the bites moist after baking. If you prefer a different flavor, almond butter works beautifully, though it will make the bites a tad sweeter.
A drizzle of honey is the only added sweetener, letting the natural flavors shine. It also aids in caramelization during baking, giving those golden edges. For a vegan version, swap honey for maple syrup – the flavor will be lighter but still delicious.
The Final Flourish
Dark chocolate chips melt just enough to create pockets of gooey indulgence without overpowering the pumpkin. Choose chips with at least 70 % cocoa for a bittersweet contrast. If you’re not a chocolate fan, dried cranberries or chopped walnuts add a complementary tang and crunch.
A splash of vanilla extract ties everything together, adding a fragrant undertone that rounds out the spice profile. It’s a subtle secret that elevates the overall flavor harmony. Skipping vanilla is fine, but you’ll miss that extra layer of aromatic depth.
Everything's prepped? Good. Let's get into the real action…
The Method — Step by Step
-
Preheat your oven to 350°F (175°C) and line a baking sheet with parchment paper. While the oven warms, the kitchen will fill with a faint, toasty aroma that hints at the caramelization to come – a good sign that you’re on the right track.
Kitchen Hack: Use a silicone baking mat instead of parchment for an even browning and easy cleanup. -
In a large mixing bowl, whisk together the pumpkin puree, peanut butter, honey, and vanilla extract until the mixture is glossy and homogenous. The moment the honey dissolves and the bowl glistens is the moment of truth – you’ll know the flavors are marrying perfectly.
-
Add rolled oats, almond flour, cinnamon, nutmeg, ginger, and salt to the wet mixture. Stir with a sturdy wooden spoon until everything is just combined; you’ll see the oats coating the pumpkin like tiny, golden rafts. Over‑mixing can make the bites tough, so stop as soon as you no longer see dry flour.
-
Fold in chia seeds, flaxseed meal, and dark chocolate chips. The chips should distribute evenly, creating pockets of future molten chocolate. If you notice the dough feels too sticky, sprinkle in a tablespoon more oat flour – but be careful not to over‑dry.
Watch Out: Adding the chocolate chips too early can cause them to melt into the batter when the dough heats up. Fold them in at the very end to keep distinct pockets. -
Cover the bowl with plastic wrap and place it in the freezer for about 10 minutes. This quick chill firms up the dough, making it easier to scoop and roll without sticking to your hands. This step is pure magic – the bites will keep their shape perfectly during baking.
-
Using a tablespoon or small ice‑cream scoop, portion out the dough onto the prepared sheet, spacing them about 2 inches apart. Gently press each mound down with the back of a spoon to flatten them into discs roughly ½‑inch thick. The edges should start pulling away from the parchment – that’s your visual cue for a good thickness.
-
Bake for 12‑15 minutes, or until the tops turn a deep golden‑amber and you can smell a sweet, nutty perfume wafting through the kitchen. The edges will become crisp while the centers stay soft; if they brown too quickly, tent with foil for the last 3 minutes.
Kitchen Hack: Rotate the baking sheet halfway through the bake for an even color on both sides. -
Allow the bites to cool on the sheet for 5 minutes, then transfer them to a wire rack to finish cooling completely. As they cool, you’ll notice the edges firm up while the interiors stay plush – that contrast is the hallmark of a perfect bite.
That’s it — you did it. But hold on, I’ve got a few more tricks that'll take this to another level…
Insider Tricks for Flawless Results
The Temperature Rule Nobody Follows
Never bake at a temperature lower than 350°F; lower temps cause the oats to dry out before the pumpkin can set, resulting in a crumbly texture. A hotter oven (up to 375°F) can give you a quicker caramelized crust, but keep a close eye on the edges to avoid burning. If you’re using a convection oven, drop the temperature by 25°F and you’ll still get that perfect golden‑brown finish.
Why Your Nose Knows Best
When the kitchen fills with that sweet‑spice perfume, it’s your cue that the bites are near done. Trust that aromatic signal more than the timer. I’ve found that pulling them out a minute early, based on scent, yields a softer interior, while waiting too long makes the edges too crunchy.
The 5‑Minute Rest That Changes Everything
After baking, let the sheet sit untouched for exactly five minutes before moving the bites. This short rest lets the steam finish cooking the center gently, preventing a gummy middle. Skipping this step often leads to a dense, under‑cooked core that feels raw.
The Freeze‑Before‑Bake Secret
Even if you’re short on time, pop the dough in the freezer for just 5 minutes. This quick chill firms the mixture, ensuring each bite holds its shape and doesn’t spread during baking. I’ll be honest — I ate half the batch before anyone else got to try it, simply because the frozen dough made rolling a breeze.
The Double‑Layer Chocolate Finish
For an extra indulgent twist, drizzle melted dark chocolate over the cooled bites. The chocolate hardens into a thin shell, adding a snap that contrasts with the soft pumpkin interior. This step is pure magic and turns a simple snack into a dessert‑worthy treat.
Creative Twists and Variations
This recipe is a playground. Here are some of my favorite ways to switch things up:
Maple‑Pecan Power
Swap honey for pure maple syrup and fold in chopped toasted pecans. The maple adds a caramel depth, while the pecans contribute a buttery crunch that pairs beautifully with pumpkin.
Coconut‑Cranberry Dream
Replace almond flour with shredded coconut and add dried cranberries. The tropical note of coconut brightens the spice, and the cranberries introduce a tart pop that balances the sweetness.
Spicy Chili Chocolate
Add a pinch of cayenne pepper to the spice blend and use dark chocolate chips with a hint of sea salt. The subtle heat amplifies the chocolate, turning each bite into a flavor adventure.
Protein‑Packed Peanut Butter
Incorporate a scoop of vanilla whey protein powder into the dry mix and increase the peanut butter slightly. This version is perfect for post‑gym recovery, delivering an extra 10 grams of protein per serving.
Apple‑Cinnamon Surprise
Add finely diced dried apple pieces and a dash more cinnamon. The apple provides a chewy texture and a sweet tartness that mimics a classic pumpkin‑apple crumble.
Storing and Bringing It Back to Life
Fridge Storage
Place the cooled bites in an airtight container lined with a parchment sheet. They’ll stay fresh for up to 5 days. If you notice any condensation, lift the top layer of parchment and replace it to keep the bites from getting soggy.
Freezer Friendly
Arrange the bites on a baking sheet in a single layer and freeze until solid, then transfer to a zip‑top freezer bag. They’ll keep for 2‑3 months. When you’re ready to eat, let them thaw at room temperature for 10 minutes, or pop them straight into the microwave for 15 seconds.
Best Reheating Method
To revive that fresh‑out‑of‑the‑oven crunch, preheat your oven to 300°F, place the bites on a parchment‑lined sheet, and warm for 5‑7 minutes. Add a tiny splash of water to the tray before reheating; the steam will bring back the soft interior while the edges crisp up again.