I still remember the exact moment these S'mores Gingerbread Cookie Bars were born. It was one of those chaotic December evenings when my kitchen looked like Santa's workshop had exploded — gingerbread dough here, marshmallows there, and chocolate absolutely everywhere. I was supposed to be making two separate desserts for a holiday party, but in my typical fashion, I got distracted mid-recipe and accidentally grabbed the graham cracker crumbs instead of the flour for my gingerbread base. What happened next was pure culinary magic. The aroma that wafted from the oven was like someone had bottled up every childhood campfire memory and sprinkled it with holiday spice. My neighbors actually knocked on my door to investigate, and by the time the bars cooled enough to slice, half the pan had mysteriously disappeared.
Picture this for a second: you're standing in your kitchen, the windows fogged from the warmth inside contrasting with the chilly air outside. The scent of molasses and cinnamon mingles with toasted marshmallows and melty chocolate, creating this incredible perfume that makes your stomach growl even if you just ate dinner. These bars aren't just another holiday dessert — they're a complete sensory experience that bridges the gap between summer camp nostalgia and winter holiday traditions. The edges get these crispy, caramelized bits that shatter like thin ice when you bite into them, while the center stays gloriously gooey and fudgy, studded with pockets of molten chocolate that stretch like edible ribbons.
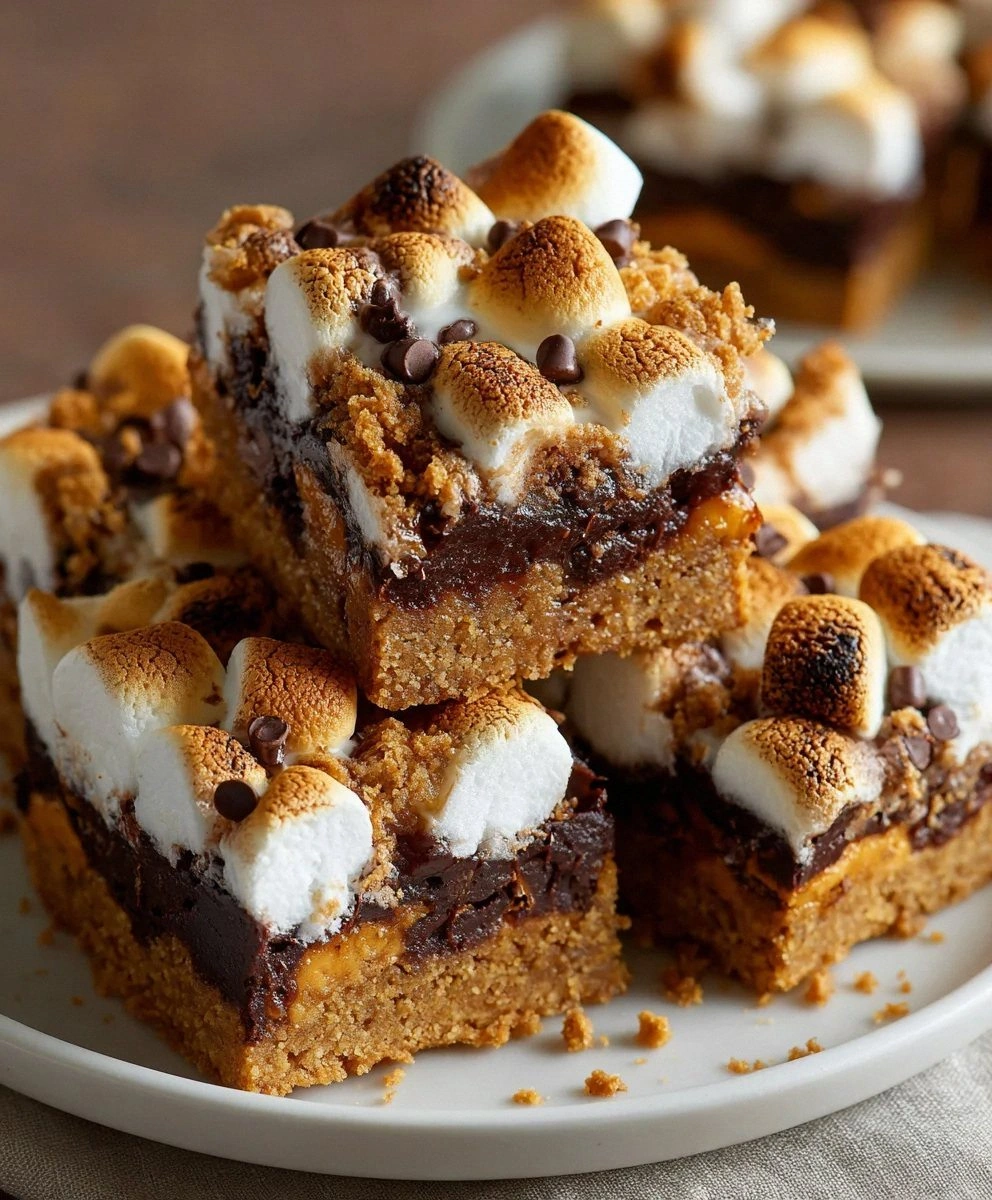
What makes these bars absolutely legendary is the way they solve the eternal problem with s'mores: the structural integrity issue. You know the drill — you're trying to eat a s'more and suddenly everything's sliding around, the graham cracker crumbles, and you've got marshmallow all over your face. These bars capture every single flavor of the classic campfire treat while being completely fork-friendly. The gingerbread base adds this warm, spicy backbone that makes the whole thing taste like Christmas decided to crash a summer campout, and honestly, it's the best party crasher ever.
Here's the kicker that most recipes get wrong: they either make the gingerbread too aggressive and it overpowers the s'mores element, or they go too subtle and you lose that holiday magic. This version hits the perfect balance where each bite gives you this beautiful dance between spicy gingerbread and sweet s'mores, with neither one stealing the show. The secret lies in the timing of when you add each component, and trust me, this technique will change your dessert game forever. Let me walk you through every single step — by the end, you'll wonder how you ever made it any other way.
What Makes This Version Stand Out
Before we dive into the nitty-gritty, let me hit you with the reasons this recipe will become your new holiday obsession. These aren't just empty claims — I've tested these bars on the pickiest eaters I know, including my grandmother who thinks dessert is a waste of perfectly good dinner space.
- Flavor Fusion: The combination of spicy gingerbread with classic s'mores creates this mind-blowing taste experience that somehow feels both nostalgic and brand new. It's like your taste buds are getting a warm hug from two different memories at once.
- Texture Paradise: We're talking about a base that's crisp on the edges and chewy in the center, topped with a marshmallow layer that gets those golden, toasted peaks while staying gooey underneath, all finished with a chocolate layer that melts into every nook and cranny.
- Make-Ahead Marvel: Unlike regular s'mores that need to be eaten immediately, these bars actually taste better the next day as the flavors have time to mingle and marry. I dare you to taste this and not go back for seconds — it's physically impossible.
- Crowd Psychology: Bring these to any gathering and watch grown adults turn into competitive dessert hoarders. I've seen people hide extras in their coat pockets, and honestly, I respect the commitment.
- Ingredient Quality Matters: Using real butter instead of margarine and dark chocolate instead of milk chocolate transforms these from good to absolutely transcendent. Most recipes get this completely wrong — they prioritize convenience over flavor.
- Technique Triumph: The way we layer the components and control the baking temperature means no more soggy bottoms or burnt marshmallows. This next part? Pure magic.
Inside the Ingredient List
The Flavor Base
The foundation of any great gingerbread starts with molasses, and not just any bottle you grabbed from the baking aisle. You want the dark, robust variety that pours like liquid velvet and smells like deep, caramelized sugar. This isn't just sweetener — it's the soul of your bars, adding that distinctive depth that makes people close their eyes and sigh when they taste it. Skip the fancy blackstrap molasses though; it's too bitter and will make your bars taste like health food in disguise. If you absolutely can't find dark molasses, swap in equal parts honey and dark brown sugar, but know that you're missing out on that authentic gingerbread soul.
Brown sugar gets packed into the measuring cup like you're trying to smuggle as much as possible across state lines. The moisture content is what keeps your bars from turning into edible bricks, and the molasses already in the brown sugar amplifies that gingerbread flavor we're chasing. Don't even think about substituting white sugar here — you'll end up with bars that taste like you forgot half the recipe. Dark brown sugar is my preference because it brings more of that toffee-like richness, but light brown works if that's what you've got on hand.
The Spice Cabinet
Ground ginger is the obvious star, but here's where most recipes miss the mark — they use stale, ancient ginger that's been sitting in the pantry since last Christmas. Fresh ground ginger should smell bright and sharp, almost lemony, and it should make your nose tingle when you take a whiff. If your ginger doesn't have a scent, it's dead and will contribute nothing but disappointment. I go heavy on the ginger because these are gingerbread bars, not shy-bread bars, and the bold spice stands up beautifully to all that chocolate and marshmallow.
Cinnamon, nutmeg, and cloves form the supporting cast, but they need to be treated like precious commodities. These spices lose potency faster than you'd think, so if you can't remember when you bought them, it's time for a spice cabinet intervention. The cinnamon should be warm and sweet-smelling, the nutmeg should be freshly grated if you're fancy (pre-ground is fine, just use more), and the cloves should be used with a gentle hand — too much and suddenly your bars taste like potpourri.
The S'mores Components
Marshmallows are where things get interesting. You want the regular-sized ones, not mini, because they create those gorgeous toasted peaks that make everyone reach for their phone camera. The key is to tear them in half before layering — this creates more surface area for toasting and prevents the dreaded marshmallow avalanche when you cut the bars. If you're feeling extra, homemade marshmallows will make these bars legendary, but let's be real, who has time for that during holiday chaos?
Chocolate selection is deeply personal, but I'm going to make a bold claim: use dark chocolate in the 60-70% range, not milk chocolate. The bitterness of dark chocolate creates this incredible contrast with the sweet marshmallow and spicy gingerbread that will make your taste buds do a happy dance. Milk chocolate just makes everything taste like a sugar bomb, and we want complexity here, not a cavity. Chop it roughly so you get some big melty pools and some smaller shards that distribute throughout.
The Unexpected Star
Graham cracker crumbs aren't just for cheesecake crusts — they add this subtle honey-wheat flavor that ties the whole s'mores experience together. Pulse them in your food processor until they're like coarse sand, not dust. You want some texture to remind you that yes, this is indeed a s'mores experience. If you can't find graham crackers, digestive biscuits work beautifully, and if you're gluten-free, crushed gluten-free pretzels add an amazing salty crunch that might be even better than the original.
Everything's prepped? Good. Let's get into the real action...
The Method — Step by Step
- Start by preheating your oven to 350°F, but here's the thing — don't just trust the dial. Most home ovens run either hot or cold, and for this recipe, precision matters. Get yourself an oven thermometer (they're like five bucks and will change your baking life) and adjust accordingly. While the oven's heating, line your 9x13 pan with parchment paper, leaving enough overhang to create little handles. This isn't just for easy removal — it prevents the marshmallows from welding themselves to your pan like sugary cement.
- In a medium bowl, whisk together your flour, graham cracker crumbs, ginger, cinnamon, nutmeg, cloves, baking powder, and salt. This step seems basic, but it's crucial — those leavening agents need to be evenly distributed, or you'll end up with bars that rise like the Himalayas in some spots and stay flat as Kansas in others. The graham cracker crumbs should integrate completely with the flour, creating what looks like slightly sandy flour. Take a moment to appreciate how good this smells — it's like Christmas and a campfire had a baby.
- Now for the wet ingredients — cream together your butter and brown sugar until it looks like fluffy, caramel-colored clouds. This takes about 3-4 minutes with a hand mixer, and you want to scrape down the bowl at least twice. The mixture should lighten in color and increase in volume, which means you've incorporated air that will help create that perfect texture. Add the molasses and beat for another minute — it will look like you're making a caramel swamp, and that's exactly right.
- Beat in your egg and vanilla until completely combined, but don't overmix here. The egg should incorporate fully, creating this gorgeous, glossy mixture that smells like liquid gingerbread cookies. If you've ever struggled with dry, crumbly bars, you're not alone — and I've got the fix. The key is adding the egg when the butter mixture is still slightly warm (not hot!), which helps it emulsify properly.
- Gradually add your dry ingredients to the wet, mixing just until no flour streaks remain. This is where most people mess up — they keep mixing until the dough looks smooth, but by then, you've developed the gluten and your bars will be tough. The dough will be thick and slightly sticky, like the consistency of soft play-doh. Press it evenly into your prepared pan — I like to use the bottom of a measuring cup to get it perfectly flat, but your fingers work too.
- Bake the base for 12 minutes — no more, no less. It should look slightly puffed and just starting to pull away from the edges. The top will be set but not browned. This is the moment of truth because we're about to add the toppings, and if the base isn't partially baked, everything will sink into a soggy mess. Let it cool for exactly 5 minutes — any longer and the marshmallows won't stick properly.
- Now comes the fun part — arrange your halved marshmallows cut-side down across the surface. They should be touching but not overlapping, creating a marshmallow blanket that will puff and toast into golden perfection. Sprinkle your chopped chocolate over the marshmallows, pushing some pieces down between them so every bite gets chocolate distribution. The chocolate will melt and create these gorgeous rivers of molten goodness that weave through the toasted marshmallow peaks.
- Return to the oven for 8-10 minutes, watching like a hawk for the marshmallows to start turning golden. Then switch to broil for the final 1-2 minutes — this is where the magic happens. The marshmallows will puff dramatically and develop those gorgeous toasted spots that look like mini mountain peaks. The chocolate should be glossy and melted but not burnt. The sizzle when it hits the pan? Absolute perfection.
- Cool for at least 30 minutes before cutting — I know, this feels like torture, especially when your kitchen smells like Willy Wonka's factory during Christmas. But cutting too early means marshmallow strings everywhere and chocolate that hasn't set properly. Use a sharp knife dipped in hot water for clean cuts, wiping between slices. These bars will keep for up to 5 days, but let's be honest, they'll be gone long before then.
That's it — you did it. But hold on, I've got a few more tricks that'll take this to another level...
Insider Tricks for Flawless Results
The Temperature Rule Nobody Follows
Room temperature isn't just a suggestion — it's the difference between bars that slice cleanly and bars that fall apart faster than my New Year's resolutions. Cold ingredients don't incorporate properly, leading to a base that's greasy in some spots and dry in others. Take everything out of the fridge 2 hours before you start, except the butter, which needs exactly 1 hour to reach that perfect soft-but-not-melty stage. If you forgot (and we've all been there), cut the butter into small cubes and let it sit for 15 minutes while you prep everything else.
Why Your Nose Knows Best
Timing is everything with these bars, and your nose is actually more reliable than the clock. When the gingerbread base is ready, your kitchen will smell like a spice shop and the edges will look slightly darker than the center. For the marshmallow toasting, wait until you smell that distinct caramelized sugar scent — it's like someone lit a campfire in your oven. A friend tried skipping this step once — let's just say it didn't end well, and we had to order pizza for dessert instead.
The 5-Minute Rest That Changes Everything
After the bars come out of the oven, resist every instinct to cut them immediately. Instead, let them rest for exactly 5 minutes, then run a thin knife around the edges. This prevents the marshmallows from sticking to the sides like they're holding on for dear life. During this rest, the chocolate finishes melting and the marshmallows deflate slightly, creating those gorgeous toasted peaks that make everyone reach for their camera before their fork.
The Storage Secret
Here's what nobody tells you about marshmallow-topped desserts: they continue to absorb moisture from the air, which can make your bars soggy if you don't store them right. Once completely cool, cut them into squares and layer them in an airtight container with sheets of parchment paper between layers. They'll stay fresh for up to 5 days at room temperature, though I've never seen them last more than 2 days before mysteriously disappearing. If you live in a humid climate, add a packet of food-safe silica gel to the container — it sounds excessive, but it keeps the marshmallows perfectly soft instead of sticky.
Creative Twists and Variations
This recipe is a playground. Here are some of my favorite ways to switch things up:
The Campfire Classic
Add a teaspoon of liquid smoke to the dough for that authentic campfire flavor without having to actually build a fire. It's subtle but adds this incredible depth that makes people ask what your secret is. You can also substitute half the graham cracker crumbs with crushed toasted hazelnuts for a nuttier, more rustic flavor that tastes like you made these over an actual campfire.
The White Chocolate Wonder
Swap the dark chocolate for white chocolate and add dried cranberries to the top layer. The tart cranberries cut through the sweetness of the white chocolate, and the whole thing tastes like Christmas morning in dessert form. I'll be honest — I ate half the batch before anyone else got to try it when I made this version.
The Spicy Surprise
Add a quarter teaspoon of cayenne pepper to the dough and use Mexican chocolate instead of regular dark chocolate. The heat builds slowly and pairs beautifully with the gingerbread spices, creating this sophisticated flavor profile that'll have people guessing. It's like your taste buds are going on a culinary adventure from Mexico to Germany in one bite.
The Salted Caramel Dream
Drizzle homemade caramel sauce over the marshmallows before adding the chocolate, then finish with a sprinkle of flaky sea salt. The salt intensifies all the flavors and the caramel adds this buttery richness that makes these bars completely irresistible. Picture yourself pulling this out of the oven, the whole kitchen smelling incredible, and knowing you're about to become a dessert legend.
The Peanut Butter Paradise
Swirl three tablespoons of peanut butter into the dough before pressing it into the pan, and use peanut butter cups instead of chocolate chunks. It's like a gingerbread peanut butter cup bar, and if you've ever struggled with deciding between desserts, this is your solution. Kids go absolutely wild for this version, and adults pretend they're being sophisticated by eating "just one more piece."
The Tropical Twist
Add half a cup of toasted coconut to the dough and use milk chocolate with macadamia nuts on top. The coconut adds this tropical note that somehow works beautifully with the gingerbread spices, creating this vacation-meets-holiday vibe that's perfect for winter when you're dreaming of warmer places.
Storing and Bringing It Back to Life
Fridge Storage
Contrary to popular belief, these bars actually don't need refrigeration and taste better at room temperature. The fridge can make the marshmallows rubbery and the chocolate develops that weird white film. Store them in an airtight container at room temperature for up to 5 days, though they'll taste best within the first 3 days when the marshmallows are still perfectly soft and the chocolate hasn't started to bloom.
Freezer Friendly
These bars freeze beautifully — cut them into squares, wrap each one individually in plastic wrap, then store in a freezer bag for up to 3 months. Thaw at room temperature for about an hour, or microwave for 15-20 seconds if you're impatient (and who isn't when dessert is involved?). The texture changes slightly after freezing, but the flavor is still incredible, making these perfect for holiday prep.
Best Reheating Method
If your bars have been sitting for a day or two and lost that fresh-from-the-oven appeal, here's how to bring them back to life. Warm them in a 300°F oven for 5-7 minutes, just until the chocolate starts to look glossy again. Add a tiny splash of water to the pan before reheating — it creates steam that rehydrates the marshmallows without making them soggy. It's like having fresh-baked bars all over again, and honestly, this trick has saved many a dessert emergency.