I was standing in my kitchen, staring at a half‑baked loaf that looked like a sad, doughy disappointment, when my friend dared me to make a sourdough that was both soft and fluffy. The smell of fresh yeast hit me like a warm hug, and the sound of the dough rising was a drumbeat I could feel in my bones. I had spent months chasing the perfect loaf, only to end up with crusty, dense bread that left my stomach feeling like it had been in a sandstorm. That night, after a particularly disastrous batch that tasted like cardboard, I made a promise to myself: I would discover a recipe that would make my mouth water, my kitchen smell heavenly, and my friends beg for seconds. I was ready to turn that promise into a reality, and I’m about to share the exact method that will change how you bake sourdough forever.
Picture yourself pulling this loaf out of the oven, the whole kitchen smelling incredible, the crust crackling like a gentle applause, and the inside steaming with airy pockets that melt your tongue. I dare you to taste this and not go back for seconds. The first bite is a buttery, slightly sweet explosion, with a crisp, golden crust that shatters like thin ice, revealing a tender, airy interior that feels like a cloud on a plate. Most recipes get this completely wrong, but here’s what actually works: a precise hydration level, a splash of olive oil, and a secret egg drizzle that creates a crunchy, caramelized crust. This is hands down the best version you'll ever make at home, and I’m not exaggerating. If you’ve ever struggled with sourdough, you’re not alone — and I’ve got the fix that will make your loaf rise like a champion. Stay with me here — this is worth it.
Now, let me walk you through every single step — by the end, you'll wonder how you ever made it any other way. The journey begins with a simple, honest mix of flour, water, and starter, but the real magic lies in the hidden ingredients that give this loaf its signature lightness and depth. I’ll reveal the technique that lets the dough breathe, the timing that locks in the perfect rise, and the finishing touch that turns a humble loaf into a showstopper. The result? A loaf that feels like a hug, with a crust that crackles and a crumb that feels like a sigh of relief. I’ll also throw in a twist you won’t expect: a drizzle of egg and a splash of olive oil that caramelize into a buttery crunch. Picture yourself biting into that first piece, the sound of the crust popping, and the aroma of toasted olive oil mingling with a hint of honey. That sizzle when it hits the pan? Absolute perfection.
Alright, let’s break down exactly what goes into this masterpiece and why every single component matters. The combination of bread flour and whole wheat flour gives the loaf a robust flavor while keeping it tender. The active sourdough starter provides natural leavening and a complex tang that’s far superior to commercial yeast. Warm water activates the yeast and hydrates the flour, creating a smooth, cohesive dough. Salt balances the flavors and strengthens the gluten structure. Olive oil adds richness, tenderizes the crumb, and contributes to that glossy, caramelized crust. Honey introduces a subtle sweetness that balances the acidity and encourages browning. The egg, brushed on top before baking, creates a golden, slightly crisp shell that holds the steam inside, locking in moisture. Baking powder or a pinch of baking soda gives an extra lift, ensuring the loaf stays light even after a long rise. Each ingredient is a piece of a carefully orchestrated symphony that culminates in a loaf that’s as beautiful as it is delicious.
What Makes This Version Stand Out
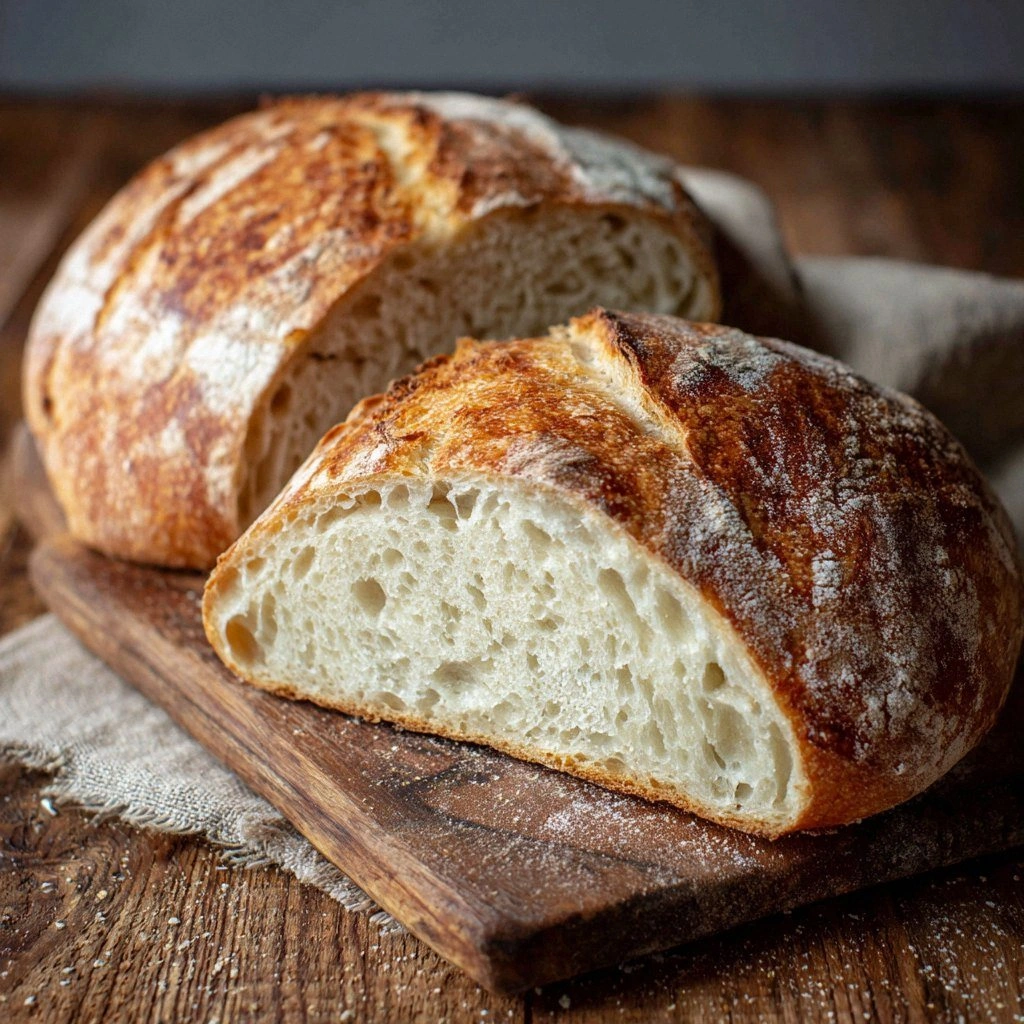
- Texture: The crumb is airy and springy, thanks to a high hydration dough that allows the gluten to stretch without overworking, creating a tender bite that melts in your mouth.
- Crust: A glossy, caramelized crust with a subtle crunch results from the egg wash and olive oil, giving the loaf a professional finish.
- Flavor: A balanced tang from the sourdough starter, a hint of sweetness from honey, and a savory depth from olive oil combine to create a complex, satisfying taste.
- Ease: The method is straightforward, with no need for a banneton or a Dutch oven, making it accessible for bakers of all skill levels.
- Versatility: The base recipe can be easily tweaked with seeds, herbs, or cheeses, turning a simple loaf into a gourmet centerpiece.
- Make‑ahead: The dough can be refrigerated for up to 24 hours, allowing you to bake a fresh loaf on a busy day without sacrificing quality.
- Nutrition: A balanced blend of protein, healthy fats, and complex carbs keeps you satisfied and energized.
- Audience: Whether you’re a seasoned sourdough enthusiast or a kitchen newcomer, this loaf delivers a wow factor that will impress family and friends.
Inside the Ingredient List
The Flour Blend
The combination of bread flour and whole wheat flour is the backbone of this loaf. Bread flour, with its high protein content, provides the necessary gluten network for lift, while whole wheat flour adds fiber, flavor, and a rustic touch. If you’re looking for an even lighter crumb, replace the whole wheat with rye flour for a slightly denser, more flavorful loaf. Skipping either flour will alter the texture; a loaf made solely of bread flour will be too airy and lack the earthy undertones that whole wheat brings.
The Starter and Hydration
The active sourdough starter is the soul of the bread. It ferments the dough naturally, producing lactic and acetic acids that enhance flavor and improve shelf life. The hydration level—about 75% in this recipe—creates a sticky, open crumb. If you prefer a denser loaf, reduce the water by 10%; if you want an extra airy loaf, increase it by 10%. Always use water at room temperature to encourage optimal yeast activity.
The Flavor Enhancers
Olive oil adds a silky richness that softens the crumb and promotes a glossy crust. Honey provides subtle sweetness that balances the sour notes and aids in browning. The egg wash, brushed over the dough before baking, creates a golden, slightly crisp shell that seals in steam, ensuring moisture stays inside the loaf. If you’re vegan, replace the egg with a tablespoon of melted coconut oil for a similar effect.
The Final Touches
Baking powder or baking soda is optional but recommended for a slight lift, especially if you’re using a high hydration dough. A pinch of caraway seeds can add a nutty, earthy flavor that pairs beautifully with the olive oil. Remember, each ingredient has a role: the salt tightens the gluten and balances flavors; the olive oil and honey caramelize on the surface, while the egg creates that coveted crunch. If you’re experimenting, feel free to tweak the quantities, but keep the proportions in mind to maintain the structure.
Everything's prepped? Good. Let's get into the real action.
The Method — Step by Step
- In a large bowl, whisk together the bread flour and whole wheat flour. Add the salt, honey, and baking powder (if using). This dry mix sets the stage for the wet ingredients, ensuring even distribution of leavening agents. Feel the flour’s texture—smooth, powdery, and ready to transform.
- In a separate container, combine the active sourdough starter with the warm water. Stir until the mixture is smooth and slightly frothy, indicating the yeast is awake and ready. The aroma will be tangy and slightly sweet, a promise of the flavor to come.
- Pour the wet mixture into the dry flour bowl. Using a wooden spoon or your hand, fold until a shaggy dough forms. The dough should be sticky but manageable; if it feels too dry, add a tablespoon of water at a time.
- Add the olive oil and mix until fully incorporated. The dough will start to smooth out, and the oil will coat the strands, making the crumb tender. Kitchen Hack: To speed up the first rise, place the bowl in a warm spot (around 80°F) or wrap it in a damp towel. This creates a mini incubator for the yeast.
- Cover the bowl with plastic wrap or a damp cloth and let it rest for 30 minutes. This autolyse period allows the flour to fully hydrate and gluten strands to align. During this time, the dough will become more elastic and easier to handle.
- After the rest, perform a series of stretch and folds: pull a portion of the dough up and fold it over the rest, turning the bowl 90 degrees each time. Do this four times. This strengthens the gluten network and creates a uniform rise. The dough should feel a bit firmer, like a rubber band, but still pliable.
- Cover again and let the dough rise until it has doubled in size—usually about 3 to 4 hours at room temperature. If you’re in a cooler kitchen, let it rise longer, up to 6 hours. Watch for a gentle expansion and the appearance of small bubbles on the surface.
- Preheat your oven to 450°F (230°C) with a Dutch oven or a heavy, lidded pot inside. The high heat and steam from the pot will give the loaf a blistered, crunchy crust. If you don’t have a Dutch oven, a baking sheet with a tray of water works too.
- Turn the dough onto a parchment-lined baking sheet or into the preheated pot. Shape it into a round loaf by gently folding the edges into the center and tightening the surface. This step is where the loaf’s final form is decided; a well‑shaped loaf will rise evenly.
- Brush the top of the loaf with a beaten egg mixed with a tablespoon of water. This creates a glossy, caramelized crust that’s both beautiful and delicious. If you’re vegan, simply brush with a tablespoon of melted coconut oil.
- Place the loaf in the oven and bake for 30 minutes. After the first 15 minutes, remove the lid (if using a Dutch oven) to allow the crust to brown. The loaf should smell like toasted bread and have a golden, slightly caramelized crust.
- Once baked, transfer the loaf to a wire rack and let it cool for at least 30 minutes before slicing. Cooling allows the steam to redistribute, preventing a gummy crumb. The result? A loaf that looks like a masterpiece and tastes like a dream.
That's it — you did it. But hold on, I've got a few more tricks that'll take this to another level. The secret to a perfect crumb? A little extra rest after the final rise, a gentle touch when shaping, and a careful eye on the oven temperature. Keep these in mind, and you’ll always bake a loaf that’s as beautiful as it is delicious.
Insider Tricks for Flawless Results
The Temperature Rule Nobody Follows
The oven temperature is the unsung hero of sourdough baking. Many bakers set the oven to 425°F, but that’s too low for a crisp crust. I recommend 450°F to 475°F for a blistered surface and a golden interior. The high heat also helps the dough expand quickly, giving you that coveted rise. If your oven runs hot, reduce the temperature by 25°F to avoid burning.
Why Your Nose Knows Best
Your sense of smell is your best gauge for doneness. When the loaf emits a nutty, toasted aroma, it’s almost ready. A faint sour smell indicates the dough is still rising. If it smells like burnt sugar, you’ve gone too far. Trust your nose, and you’ll never over‑bake again.
The 5‑Minute Rest That Changes Everything
After removing the loaf from the oven, let it rest for five minutes before slicing. This short pause allows the steam to redistribute, ensuring a moist crumb. Cutting too early will release steam and cause a dry center. A quick rest also gives the crust a chance to firm up, giving that satisfying crunch.
The Secret to a Crispy Crust
A splash of water in the oven during the first 10 minutes creates steam, which prevents the crust from forming too quickly. This allows the bread to rise fully before the crust sets. If you don’t have a Dutch oven, place a shallow pan of water on the lower rack of the oven.
The Magic of Egg Wash
The egg wash not only gives a golden finish but also seals in moisture. For a richer crust, whisk the egg with a tablespoon of milk or water. If you’re vegan, a splash of soy milk or a tablespoon of melted coconut oil works just as well.
Creative Twists and Variations
This recipe is a playground. Here are some of my favorite ways to switch things up:
Herb‑Infused Loaf
Add 2 tablespoons of dried rosemary or thyme to the dry mix for a fragrant, savory loaf. The herbs pair beautifully with the olive oil, creating a Mediterranean vibe. Serve with a drizzle of balsamic glaze for an extra pop of flavor.
Cheese‑Crunch Variation
Fold in ½ cup of shredded mozzarella or cheddar before the final rise. The cheese melts into pockets of gooey goo, turning each bite into a melty delight. Sprinkle grated parmesan on top before baking for a savory crust.
Nutty Delight
Stir in ¼ cup of chopped walnuts or pecans for crunch and a buttery undertone. The nuts add texture and a subtle sweetness that complements the honey. This version is perfect for brunch or a midday snack.
Spiced Sweet Loaf
Replace the honey with 2 tablespoons of maple syrup and add 1 teaspoon of cinnamon and ¼ teaspoon of nutmeg. The spices give the loaf a warm, comforting flavor, ideal for a cozy afternoon.
Savory Seeded Bread
Sprinkle a mixture of sunflower, pumpkin, and sesame seeds on top before baking. The seeds toast to a golden hue, adding a nutty crunch. This version works great for breakfast or as a sandwich base.
Storing and Bringing It Back to Life
Fridge Storage
Wrap the cooled loaf in parchment paper, then place it in a plastic bag. Store in the fridge for up to 5 days. The bread will stay fresh, but the crust may soften over time. To revive, slice and toast or warm in a low‑heat oven.
Freezer Friendly
Wrap the loaf tightly in foil and then place it in a freezer bag. Freeze for up to 3 months. When ready to eat, let it thaw at room temperature for an hour, then warm in a 350°F oven for 10 minutes to restore crispness.
Best Reheating Method
To bring the loaf back to life, add a splash of water to the bottom of a skillet and heat on medium. Place the loaf slices on the skillet, cover, and heat for 2 minutes per side. The steam will re‑soften the crumb and crisp the crust.
Now that you’ve mastered the art of this soft, fluffy sourdough loaf, it’s time to experiment, share, and enjoy. Every bite is a testament to patience, precision, and a little bit of magic. Happy baking!