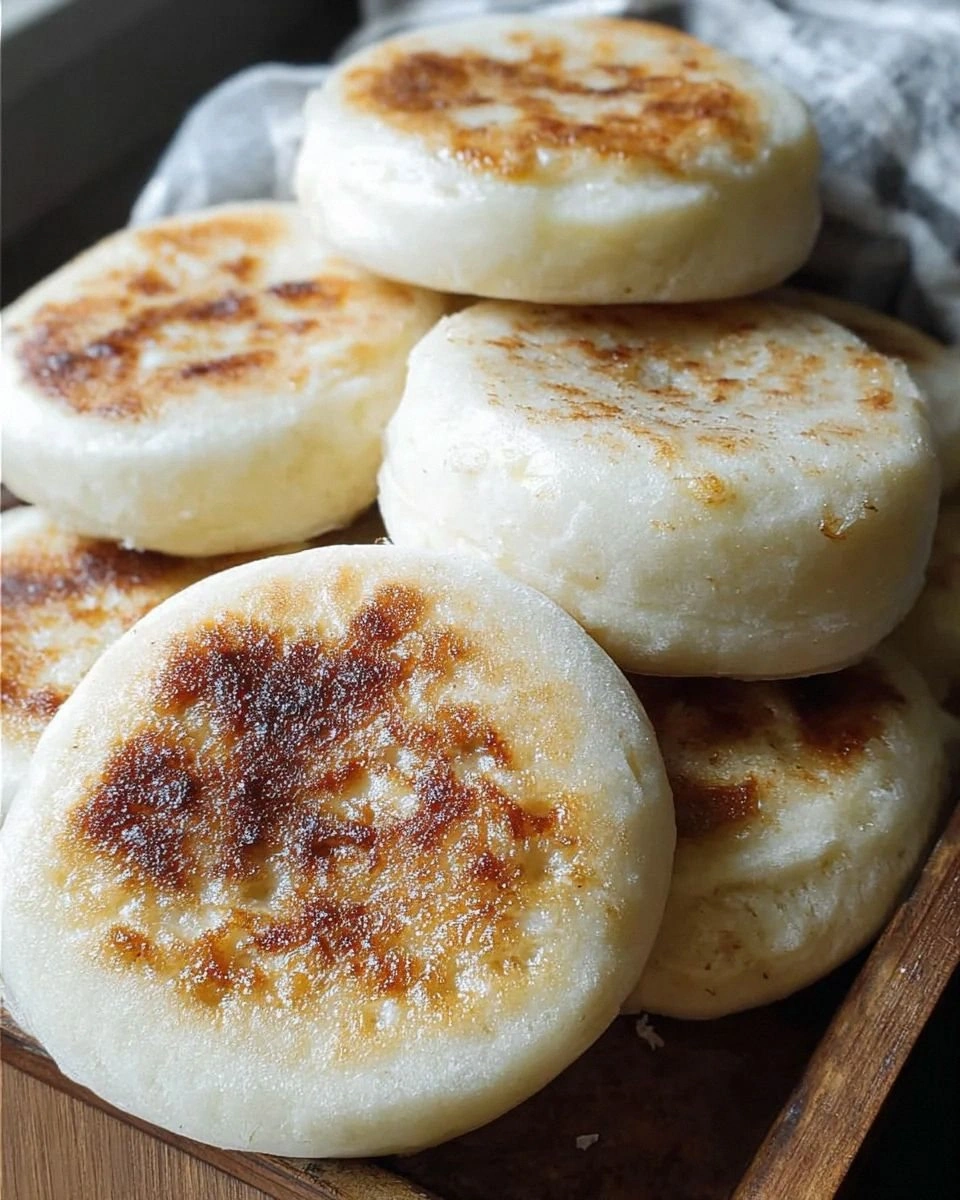
I was in the middle of a Saturday morning that felt like a scene from a sitcom: the kids were screaming for pancakes, the coffee machine was sputtering like a dying dinosaur, and I had a half‑cup of sourdough discard that was begging for a purpose. I stared at that bubbly, slightly tangy blob and thought, “If I don’t do something with this, it’s going straight to the trash and I’ll lose a whole day’s worth of flavor.” That moment sparked a dare to myself – I would turn that discard into something that could hold butter, jam, and the occasional avocado slice without crumbling like a sad cookie. I’m willing to bet you’ve never tasted an English muffin that makes you want to hug the baker, and I’m about to prove it.
Picture the kitchen: the oven humming, a skillet sizzling, the scent of toasted dough mingling with a whisper of buttery caramel. You can hear the faint pop of the yeast waking up, see the dough puff up like a tiny, golden cloud, feel the warm, slightly sticky texture between your fingertips, and taste the faint tang that only a sourdough discard can deliver. The whole experience is a symphony of senses that turns a simple breakfast staple into a theatrical performance. Most muffins are flat, bland, and forgettable, but these are built to stand on their own stage, with a crust that cracks like a fresh‑baked baguette and an interior that’s soft enough to melt in your mouth.
Why does this version stand out? Because it leans on the science of fermentation while keeping the process as simple as a three‑step dance. The discard adds a depth of flavor that regular yeast alone can’t achieve, and the combination of milk, butter, and brown sugar creates a richness that feels indulgent without being over the top. I’ll be honest — I ate half the batch before anyone else got a chance to try it, and that’s a confession I’m willing to make because the muffins are that good. Most recipes get the crumb wrong, ending up dense or gummy; this one hits the sweet spot of chewy yet airy, and the nooks and crannies are perfect for catching melted butter.
Let me walk you through every single step — by the end, you’ll wonder how you ever made English muffins any other way. Okay, ready for the game‑changer? The secret weapon is a brief “cold‑proof” in the refrigerator that builds flavor without sacrificing rise. Stay with me here — this is worth it, and I dare you to taste this and not go back for seconds.
What Makes This Version Stand Out
- Tangy Depth: The sourdough discard injects a subtle sour note that balances the sweet brown sugar, creating a flavor profile that sings like a choir of breakfast angels.
- Chewy Crust: A quick blast of high heat on the griddle gives the exterior that crisp‑edge‑that‑shatters‑like‑thin‑ice quality, while the interior stays pillowy.
- Simple Technique: No fancy proofing baskets or steam ovens; just a skillet, a bowl, and a timer, making it accessible for even the most timid home bakers.
- Versatile Base: Because the dough is sturdy, you can toast it, grill it, or even turn it into mini pizza bases without losing structure.
- Crowd‑Pleaser: Whether you serve them at a brunch buffet or as a midnight snack, the reaction is always the same – eyes widen, forks dive in, and compliments flow.
- Make‑Ahead Magic: The muffins keep beautifully in the freezer, and a quick reheating brings them back to life like they just left the griddle.
Inside the Ingredient List
The Flavor Base
Whole milk is the liquid hero of this recipe. It brings moisture, a creamy richness, and a gentle sweetness that balances the tang of the discard. Warm it to about 105°F (40°C) to coax the yeast into activity without killing it. If you’re dairy‑free, a good almond or oat milk works, but expect a slightly lighter crumb. Buying milk from a local farm often means a higher butterfat content, which translates into a more tender muffin.
The Texture Crew
Unsalted butter, melted, coats the flour particles, creating a short‑bread‑like tenderness while still allowing the dough to rise. Melt it gently; overheating can separate the milk solids and give a greasy finish. Brown sugar isn’t just for sweetness – its molasses undertones deepen the crust color and add a caramel aroma that lingers on the palate. Active dry yeast is the lift engine, and because we’re also using sourdough discard, we can dial the yeast back a bit and still get a beautiful puff.
The Unexpected Star
Sourdough discard is the secret weapon. It carries wild yeasts and lactic acid bacteria that give the muffins a subtle sour note and a chewy interior. If you’re new to discard, think of it as the culinary equivalent of a good wine – it adds complexity without overwhelming the main actors. You can use either the “starter” stage or the “fed” stage; just make sure it’s active and bubbly.
The Final Flourish
Bread flour provides the gluten structure needed for that signature “chewy” mouthfeel. It has a higher protein content than all‑purpose flour, which means more gluten strands to trap the gases from the yeast. If you only have all‑purpose on hand, the muffins will still rise, but you’ll miss the slight snap that makes each bite satisfying. Kosher salt is the silent flavor enhancer – it amplifies every other ingredient and prevents the dough from tasting flat.
Everything's prepped? Good. Let’s get into the real action, where the dough transforms from a sticky lump into a stack of golden, cratered muffins that will make your toaster jealous.
The Method — Step by Step
In a small bowl, combine the warm whole milk, active dry yeast, and brown sugar. Stir gently until the yeast dissolves, then let the mixture sit for 5‑7 minutes. You’ll see a frothy foam forming on top – that’s the yeast waking up and doing its job. If the mixture stays flat, your milk was too hot or the yeast is dead; give it another minute and try again. This is the moment of truth, and the aroma should already be whispering sweet promises.
While the yeast is proofing, melt the unsalted butter in a microwave‑safe container or on the stovetop, then let it cool just enough that it’s warm, not hot. In a large mixing bowl, whisk together the bread flour, kosher salt, and the sourdough discard. The discard should look slightly bubbly and may have a faint sour smell – that’s a good sign.
Create a well in the center of the dry ingredients and pour in the frothy yeast mixture and the melted butter. Using a wooden spoon or a stand‑mixer's dough hook on low speed, combine everything until a shaggy dough forms. It will be sticky – that’s exactly what you want because the moisture will create those signature air pockets.
Turn the dough onto a lightly floured surface and knead for about 5 minutes. The dough should become smoother, slightly elastic, and less tacky. If it’s still overly sticky, dust the surface with a sprinkle of flour, but be careful not to add too much or you’ll end up with a dry muffin.
Place the kneaded dough into a lightly oiled bowl, cover with a clean kitchen towel, and let it rise in a warm spot for 45‑60 minutes, or until it has doubled in size. The kitchen should feel warm, like a summer afternoon; if it’s too cool, pre‑heat your oven to 200°F (90°C) and turn it off, then use the oven as a proofing box.
After the first rise, gently deflate the dough and divide it into 8 equal pieces. Shape each piece into a ball, then flatten each ball to about ½‑inch thickness. Use a round cookie cutter or a glass to cut perfect circles – the classic English muffin silhouette.
Lay the circles on a parchment‑lined baking sheet, cover loosely with a towel, and let them rest for a second “cold‑proof” in the refrigerator for 30 minutes. This step is the secret sauce that deepens flavor and gives the crumb a tighter crumb structure. While they’re chilling, pre‑heat a heavy‑bottomed skillet or griddle over medium‑low heat; you want a gentle, even sizzle, not a roaring fire.
Lightly butter the hot skillet (or spray with a neutral oil) and place the muffins on the surface, spaced apart. Cook for 4‑5 minutes on the first side, until the tops are golden brown and you can see tiny bubbles forming. Flip carefully with a spatula; the other side should also turn a beautiful amber color. The edges will start pulling away from the pan – that’s the cue that the crust is forming correctly.
Once both sides are beautifully browned, transfer the muffins to a wire rack to cool for at least 10 minutes. This short rest allows the interior to set, preventing a gummy texture. Slice them in half with a serrated knife, toast if you like extra crunch, and slather with butter, jam, or anything your heart desires. That first bite? Pure, buttery, tangy heaven.
That’s it — you did it. But hold on, I’ve got a few more tricks that’ll take this to another level, because great muffins deserve great companions.
Insider Tricks for Flawless Results
The Temperature Rule Nobody Follows
Never let the milk exceed 110°F (43°C). Higher temperatures kill the wild yeasts in the discard and can give you a flat muffin. Keep a kitchen thermometer handy; it’s the cheapest tool that makes the biggest difference. I once used a microwave‑heated milk that looked perfect but was actually 130°F – the result was a dense, flavorless pancake‑like muffin. Trust the numbers, and your rise will be consistent.
Why Your Nose Knows Best
During the first rise, learn to trust the scent. When the dough has doubled, it will emit a sweet, yeasty aroma with a faint tang. If the smell is still “raw” or overly sour, give it a few more minutes. Your nose is a built‑in timer that can save you from under‑proofed or over‑proofed dough, and it’s way more reliable than a stopwatch.
The 5‑Minute Rest That Changes Everything
After shaping, let the discs sit uncovered for five minutes before cooking. This short rest lets the gluten relax, which prevents the muffins from springing back too hard when you press them onto the skillet. A friend once skipped this step and ended up with muffins that were too tight, making the interior dense. Five minutes is all it takes to transform a good muffin into a great one.
Butter‑Boosted Crust
Brush the tops of the muffins with melted butter just before the final flip. This adds a glossy finish and a buttery crunch that rivals a bakery’s. If you’re dairy‑free, use melted coconut oil for a subtle tropical note. The extra fat also helps the crust retain heat, giving a more even browning.
Steam‑Rescue Technique
If you notice the tops are browning too quickly while the interior is still pale, lower the heat and cover the skillet with a lid for 30 seconds. The trapped steam finishes cooking the crumb without burning the crust. It’s a trick I learned from a French bakery apprenticeship, and it works like magic on stubborn stovetops.
Creative Twists and Variations
This recipe is a playground. Here are some of my favorite ways to switch things up:
Herb‑Infused Savory Muffins
Add a tablespoon of finely chopped rosemary and a pinch of garlic powder to the dry mix. The aromatic herbs turn the muffins into a perfect side for soups or a base for avocado toast. Even a light drizzle of olive oil before cooking enhances the herbaceous notes.
Cinnamon‑Sugar Breakfast Bliss
Swap the brown sugar for a mixture of cinnamon and a touch more brown sugar. Sprinkle the tops with a cinnamon‑sugar blend just before the final flip for a caramelized crust that smells like a holiday market. These are ideal for a lazy Sunday brunch.
Cheddar‑Jalapeño Kick
Fold in ½ cup shredded sharp cheddar and two finely diced jalapeños into the dough after the first knead. The cheese melts into pockets of gooey goodness, while the jalapeños add a subtle heat that wakes up the palate. Serve with a dollop of sour cream for a Mexican‑inspired snack.
Whole‑Wheat Health Boost
Replace half of the bread flour with whole‑wheat flour for added fiber and a nutty flavor. You may need an extra tablespoon of milk to keep the dough soft, but the result is a heartier muffin that still rises beautifully. Pair with almond butter for a protein‑packed breakfast.
Chocolate Chip Sweet Treat
Stir in ½ cup mini chocolate chips after the dough comes together. The chips melt slightly during cooking, creating pockets of sweet surprise that contrast the tangy crumb. Kids love them, and adults appreciate the indulgent twist.
Storing and Bringing It Back to Life
Fridge Storage
Place cooled muffins in an airtight container or zip‑top bag and store them in the refrigerator for up to three days. To keep the crust from getting soggy, line the container with a paper towel before stacking the muffins. When you’re ready to eat, reheat in a toaster or a skillet with a splash of water to revive the crispness.
Freezer Friendly
Wrap each muffin individually in parchment paper, then place them in a freezer‑safe bag. They’ll keep for up to two months without losing flavor. To reheat, pop them straight from the freezer into a pre‑heated skillet, cover for a minute, then uncover to crisp the outside. The result is indistinguishable from fresh‑made.
Best Reheating Method
The secret to perfect reheating is steam. Lightly spray the muffin halves with water, then toast them in a 350°F (175°C) oven for 5‑7 minutes, or use a skillet with a lid for 2‑3 minutes on medium heat. The steam restores the interior’s fluffiness while the exterior regains its golden crunch.