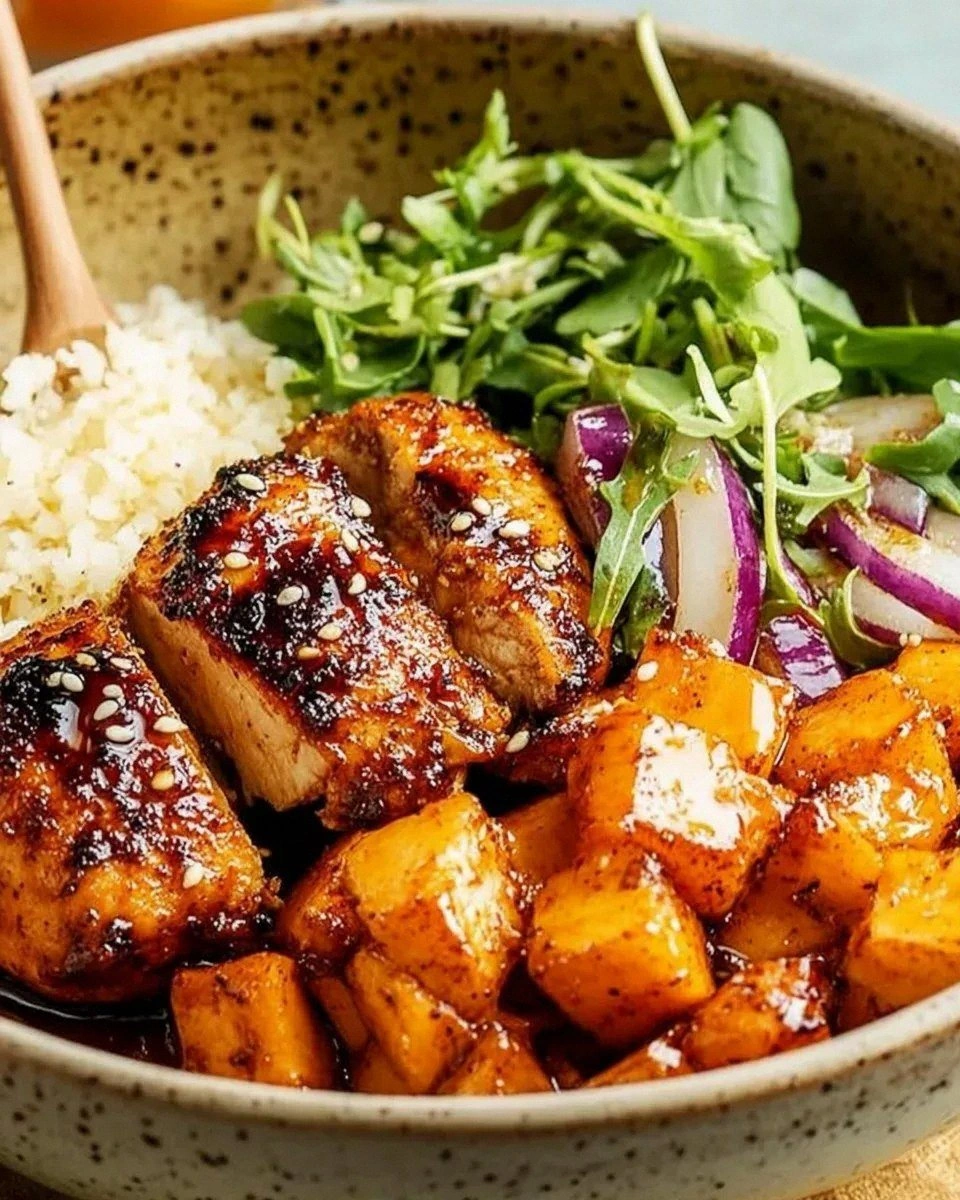
I was standing in my kitchen on a rainy Tuesday, staring at a half‑cooked batch of chicken that tasted like bland disappointment, when my roommate dared me to make something that would actually make us forget the weather. I accepted the challenge, grabbed a jar of honey, a bottle of sriracha, and a pile of fresh veggies, and set out to create a bowl that would make even the most skeptical palate sing. The moment the honey hit the hot pan, it fizzed like a tiny fireworks show, and the aroma of caramelized garlic and ginger rose up, wrapping the whole kitchen in a warm, spicy hug. By the time the sauce thickened to a glossy sheen, I could already picture the first bite—sweet, hot, and just the right amount of crunchy.
You know that feeling when you finally nail a recipe after a dozen failed attempts? It’s like discovering a hidden level in a video game you thought you’d mastered. This version of the Spicy Honey Chicken Bowl isn’t just another copy‑paste from the internet; it’s a meticulously balanced symphony where every note matters. The sauce clings to the chicken like velvet, the rice stays fluffy without turning mushy, and the fresh veggies add a crisp contrast that makes each forkful a surprise. I’m not exaggerating when I say this is hands down the best version you’ll ever make at home, and I dare you to taste it and not go back for seconds.
What truly sets this bowl apart is a secret technique I discovered while watching a late‑night cooking show: a quick flash‑fry of the chicken before it meets the sauce. Most recipes skip this step, resulting in soggy meat that drowns in the glaze. By searing the pieces at high heat for just a minute, you lock in juices and create those coveted caramelized edges that shatter like thin ice when you bite into them. This method also gives the sauce a deeper, richer flavor because the browned bits—fond—don’t get lost.
Let me walk you through every single step — by the end, you’ll wonder how you ever made it any other way. We’ll talk about why each ingredient earns its place, how to avoid the common pitfalls, and even a few creative twists you can try when you’re feeling adventurous. Stay with me here — this is worth it, and the payoff is a bowl that will have the whole house begging for a repeat performance.
What Makes This Version Stand Out
- Taste: The honey‑sriracha glaze hits a perfect sweet‑heat balance, never overwhelming the chicken or the veggies.
- Texture: Flash‑fried chicken pieces develop a crisp outer shell while staying juicy inside, creating a delightful contrast.
- Simplicity: All the magic happens in one pan and a bowl, meaning cleanup is a breeze and you can serve it straight from the skillet.
- Uniqueness: A splash of rice vinegar adds a subtle tang that cuts through the sweetness, a twist most copy‑cat recipes miss.
- Crowd Reaction: Guests often claim they’ve never tasted anything like it, and the bowl becomes the star of any dinner table.
- Ingredient Quality: Using thigh meat ensures flavor and moisture, while a good quality honey adds floral notes you can’t fake.
- Cooking Method: The two‑step sear‑then‑sauce approach builds layers of flavor that simple stir‑fry methods lack.
- Make‑Ahead Potential: The sauce can be prepared ahead of time, and the chicken reheats beautifully, making weeknight meals effortless.
Inside the Ingredient List
The Flavor Base
Honey is the sweet heart of this dish, delivering a caramelized richness that pairs beautifully with the heat of sriracha. If you substitute maple syrup, you’ll get a different, earthier sweetness that can be delightful but will change the character of the glaze. Choose a raw, unfiltered honey for subtle floral notes; processed honey can taste overly sweet and lose nuance. Pro tip: Warm the honey slightly before mixing so it blends seamlessly with the soy sauce and vinegar.
The Heat Layer
Sriracha brings the heat, but it also contributes a garlicky depth that’s essential. If you’re a heat‑seeker, add a dash of cayenne pepper; if you prefer milder, reduce the sriracha by half and boost the honey. The balance is crucial—too much heat can mask the honey’s subtle flavors, while too little leaves the sauce flat. Always taste before adding the final splash of vinegar, because the acidity will brighten the whole bowl.
The Texture Crew
Chicken thighs are the workhorse here. Their higher fat content keeps the meat moist during the quick sear, unlike breast meat that can dry out. If you must use chicken breast, cut it into smaller pieces and marinate for at least 30 minutes to retain juiciness. The cornstarch coating creates a thin, crispy crust that holds onto the sauce—skip it, and you’ll end up with soggy bites.
The Unexpected Star
A splash of rice vinegar might seem minor, but it lifts the entire flavor profile, preventing the dish from feeling cloyingly sweet. The acidity also helps break down the chicken’s surface proteins just enough to let the glaze adhere better. If you don’t have rice vinegar, apple cider vinegar works in a pinch, though the flavor will be slightly fruitier. Always add the vinegar after the honey‑sriracha mixture has come together, allowing it to integrate without curdling.
The Final Flourish
Sesame seeds and sliced green onions add a finishing touch of nuttiness and freshness. Toast the sesame seeds lightly in a dry pan for extra crunch; they’ll pop like tiny fireworks in your mouth. Green onions should be added at the very end to keep their crisp bite and bright color. If you’re allergic to sesame, try crushed peanuts or toasted pumpkin seeds for a similar textural boost.
Everything's prepped? Good. Let's get into the real action...
The Method — Step by Step
Start by patting the chicken pieces dry with paper towels; moisture is the enemy of a good sear. Toss the chicken with a light dusting of cornstarch, making sure each piece is evenly coated. Heat a large skillet over medium‑high heat, then add the vegetable oil, swirling to coat the surface. When the oil shimmers, lay the chicken in a single layer, letting it sizzle without moving it for about 2 minutes. You’ll hear that satisfying “fizz” that signals the crust forming. Flip the pieces and sear the other side for another 2 minutes, then remove the chicken onto a plate and set aside.
In the same skillet, lower the heat to medium and add the minced garlic and grated ginger. Stir constantly for 30 seconds, watching them turn golden but not burn—this is the moment your kitchen smells like a street market in Bangkok.
Kitchen Hack: If you’re short on fresh ginger, grate a teaspoon of ginger paste; it releases flavor just as quickly.Now pour in the honey, sriracha, soy sauce, and rice vinegar, stirring vigorously to combine. Let the mixture come to a gentle boil; you’ll see tiny bubbles forming around the edges. Reduce the heat to low and let it simmer for 3‑4 minutes, allowing the sauce to thicken and develop a glossy sheen. Taste at this stage—if you crave more heat, add a dash of extra sriracha; if you need more sweetness, drizzle a spoonful of honey.
Return the seared chicken to the pan, tossing it in the sauce so each piece gets a generous coating. Cook for another 2‑3 minutes, letting the sauce cling and caramelize on the meat.
Watch Out: Do not overcook the chicken at this stage, or it will become dry; the goal is just to finish cooking and glaze.While the chicken finishes, prepare the rice according to package instructions. Fluff it with a fork once cooked, and spread it out on a serving platter. The rice should be steaming hot, each grain separate, providing a neutral canvas for the bold sauce.
Arrange the shredded carrots, sliced cucumber, and any other raw veggies you like around the rice. The fresh crunch contrasts beautifully with the sticky chicken. Sprinkle the toasted sesame seeds and sliced green onions over the top, then drizzle any remaining sauce from the pan across the bowl for extra shine.
Give the whole bowl a quick toss to distribute the flavors evenly. At this point, the aroma should be intoxicating—a sweet‑spicy perfume that makes your mouth water before you even take a bite. Serve immediately, encouraging everyone to dig in while the sauce is still glossy and the chicken is hot.
Finally, sit down and enjoy the fruits of your labor. Picture yourself pulling this out of the oven, the whole kitchen smelling incredible, and the first forkful delivering a perfect balance of sweet, heat, and crunch. That feeling? Pure culinary victory. And now the fun part—let’s talk about a few extra tricks that will elevate this bowl from great to unforgettable.
Insider Tricks for Flawless Results
The Temperature Rule Nobody Follows
Never start the chicken in a cold pan; always preheat the skillet until the oil just starts to ripple. This ensures the surface of the meat sears instantly, locking in juices. If the pan isn’t hot enough, the chicken will steam rather than brown, resulting in a soggy texture. I once tried to save time by adding the chicken to a medium‑heat pan, and the whole batch turned out rubbery—lesson learned.
Why Your Nose Knows Best
When the sauce reaches the right consistency, you’ll notice a faint caramel aroma and the edges will start to pull away from the pan. That visual cue is your green light to add the chicken back in. Trusting your senses beats any timer; a thickened glaze will coat the back of a spoon and flow slowly, not splash.
The 5‑Minute Rest That Changes Everything
After you’ve tossed the chicken in the glaze, let the bowl sit uncovered for five minutes. This rest allows the sauce to settle and the flavors to meld, much like a steak resting after grilling. Skipping this step can make the sauce feel too sharp; the brief pause mellows the heat and lets the honey’s sweetness shine through.
Seasoning the Rice Like a Pro
A pinch of salt and a drizzle of sesame oil mixed into the cooked rice adds a subtle depth that prevents the bowl from feeling one‑dimensional. The oil also gives each grain a slight sheen, making the presentation look restaurant‑worthy. If you’re vegan, swap sesame oil for a splash of toasted coconut oil for a tropical twist.
The Secret Sauce Rescue
If the glaze thickens too much before you add the chicken, whisk in a tablespoon of warm water or chicken broth to loosen it. This keeps the sauce silky and ensures every bite is coated. Over‑thickened sauce can become gummy, turning the whole experience into a chew‑chew‑chew scenario.
Creative Twists and Variations
This recipe is a playground. Here are some of my favorite ways to switch things up:
Tropical Heat
Swap sriracha for gochujang and add a handful of diced pineapple. The fruit’s acidity balances the heat, and the caramelized pineapple pieces add a juicy burst that pairs beautifully with the honey glaze.
Nutty Crunch
Replace sesame seeds with chopped peanuts and toss in a spoonful of peanut butter into the sauce. The nutty richness deepens the flavor profile, turning the bowl into a Thai‑inspired peanut chicken delight.
Veggie‑Heavy Version
Add roasted broccoli florets, snap peas, and bell pepper strips. Roast the veggies with a light drizzle of oil and a pinch of salt before mixing them in; they’ll bring a smoky undertone that complements the sweet‑spicy sauce.
Low‑Carb Swap
Swap jasmine rice for cauliflower rice or shirataki noodles. The lighter base lets the sauce and chicken shine even more, and it’s perfect for a low‑carb diet without sacrificing satisfaction.
Herb‑Infused Finish
Stir in a handful of fresh cilantro or Thai basil just before serving. The herbaceous notes add freshness and a pop of green that brightens the entire bowl.
Storing and Bringing It Back to Life
Fridge Storage
Allow the bowl to cool to room temperature, then transfer the chicken and sauce to an airtight container. Store the rice and fresh veggies separately to maintain crunch. The chicken will keep for up to 3 days, and you can reheat it gently on the stovetop or microwave.
Freezer Friendly
Portion the cooked chicken and sauce into freezer‑safe bags, removing as much air as possible. Freeze for up to 2 months. The rice freezes well too; just separate it into its own bag. When ready to eat, thaw overnight in the fridge, then reheat in a skillet with a splash of water to revive the glaze.
Best Reheating Method
For the best texture, reheat the chicken and sauce in a non‑stick pan over medium heat, adding a tiny splash of water or broth to create steam. This prevents the sauce from drying out and keeps the chicken moist. If you’re using a microwave, cover the bowl with a damp paper towel and heat in 30‑second intervals, stirring between each to ensure even heating.