I was standing in my kitchen, staring at a half‑finished batch of “healthy” brownies that tasted like cardboard, when a friend dared me to create a chocolate dessert that wouldn’t make my waistline weep. The challenge was simple on paper: a chocolate indulgence that feels like a sin but is actually a saint. I could already hear the sighs of disappointment that usually follow a low‑calorie dessert—until the moment I remembered that cottage cheese can turn into a silky, mousse‑like base if you treat it right. I grabbed a blender, a handful of cocoa, and a sprinkle of erythritol, and what happened next was nothing short of culinary alchemy. This is the story of how I turned a pantry staple into the most decadent, guilt‑free chocolate treat you’ve ever tasted.
Picture this: the kitchen filled with the intoxicating aroma of unsweetened cocoa, a faint vanilla perfume drifting from the bowl, and the gentle hum of the blender turning cottage cheese into a glossy river of chocolatey goodness. The air feels warm, the counter is a battlefield of measuring spoons, and the only sound is the occasional clink of a metal whisk against glass. When you finally scoop the mixture into ramekins, it spreads like melted midnight, setting the stage for a surface that will crack ever so slightly as it cools—an invitation to dive in. The first bite is a revelation; the texture is as smooth as satin, the flavor hits like a warm hug from an old friend, and the aftertaste leaves you wondering why you ever settled for bland “low‑fat” versions. I dare you to taste this and not go back for seconds.
Most recipes get this completely wrong. They either skimp on flavor, over‑sweeten with sugar substitutes that leave a metallic finish, or require a pantry full of exotic ingredients you can’t find in a regular grocery aisle. My version flips the script by using just six ingredients—each one you probably already have—yet delivers a chocolate experience that rivals any high‑calorie bakery offering. The secret? A strategic blend of cottage cheese for body, cocoa for depth, and erythritol for sweetness that never overpowers. Add a dash of vanilla and a pinch of salt, and you’ve got a balanced flavor profile that sings on every palate. This is hands down the best version you’ll ever make at home.
Okay, ready for the game‑changer? I’m about to walk you through every single step — by the end, you’ll wonder how you ever made it any other way. I’ll share the exact technique that keeps the mousse from turning grainy, the temperature tricks that coax the perfect set, and a few hacks that will make you look like a professional without breaking a sweat. Stay with me here — this is worth it.
What Makes This Version Stand Out
- Taste: The combination of real cocoa and vanilla creates a deep, authentic chocolate flavor that no sugar‑free powder can mimic.
- Texture: Cottage cheese, when blended, transforms into a velvety mousse that feels indulgent yet light on the tongue.
- Simplicity: Only six ingredients, five of which you probably already have, meaning no last‑minute grocery runs.
- Uniqueness: Using dairy‑based cottage cheese as the foundation is a secret most “healthy” desserts overlook.
- Crowd Reaction: Even the most skeptical chocolate lovers admit it tastes like the real deal, often asking for the recipe.
- Ingredient Quality: The unsweetened cocoa powder provides antioxidants, while erythritol keeps the glycemic load low.
- Make‑Ahead Potential: This dessert sets beautifully in the fridge, making it perfect for meal‑prep or surprise guests.
Inside the Ingredient List
The Flavor Base
Cottage cheese is the unsung hero of this dessert. Its mild tang provides a subtle backdrop that lets the cocoa shine without becoming cloyingly sweet. If you skip it, you’ll lose the creamy body that makes each bite feel like a luxurious mousse. For a dairy‑free twist, try silken tofu, but expect a slightly different mouthfeel. When shopping, opt for the smallest curd size; the finer the texture, the easier it blends into a silk‑smooth foundation.
The Chocolate Crew
Unsweetened cocoa powder brings the deep, bittersweet chocolate flavor that defines this indulgence. Choose a Dutch‑process cocoa for a smoother, less acidic taste, or natural cocoa if you prefer a brighter chocolate punch. Skipping cocoa isn’t an option—without it, you’re left with a bland dairy pudding. A quick tip: toast the cocoa gently in a dry pan for 30 seconds to unlock hidden aromatic compounds. This step is the secret behind the “restaurant‑quality” flavor you’ll notice instantly.
The Sweetener Squad
Powdered erythritol is the sweetener that won’t spike your blood sugar and won’t leave a bitter aftertaste like some other sugar alcohols. Its fine texture dissolves effortlessly, ensuring there are no gritty pockets. If you find it too mild, add an extra half‑tablespoon, but remember the goal is a balanced sweet‑chocolate harmony. Some folks swap it for monk fruit blend; just keep the powder form for best results. Be mindful that erythritol can sometimes crystallize if over‑cooked, so keep the heat low.
The Final Flourish
A pinch of salt is the quiet hero that amplifies the chocolate’s depth, while vanilla extract adds a fragrant, lingering finish that ties everything together. Optional whipped cream on top provides an airy contrast, turning each spoonful into a layered experience. If you’re dairy‑free, a dollop of coconut whipped cream works beautifully. Skipping the vanilla? You’ll notice a flat flavor profile that feels incomplete. Remember, quality vanilla—real extract, not imitation—makes a world of difference.
Everything's prepped? Good. Let's get into the real action...

The Method — Step by Step
Gather all ingredients and measure them precisely. I dare you to double‑check every spoonful; a tiny variance in erythritol can change the sweetness curve dramatically. Place the cottage cheese in a chilled blender jar, add the cocoa powder, erythritol, vanilla, and a pinch of salt. This is the moment of truth—if the mixture looks clumpy, give it a quick pulse to break up any lumps.
Kitchen Hack: Blend on low for 30 seconds, then increase to high for another 45 seconds; this prevents the motor from overheating and keeps the texture ultra‑smooth.Turn the blender on high and watch the transformation. Within a minute, the mixture should become a glossy, deep‑brown river that coats the sides of the jar like velvet. Pause and scrape the sides with a spatula to ensure every crumb is incorporated. The aroma at this stage is intoxicating—think of a boutique chocolate shop on a rainy afternoon.
Taste the mousse and adjust sweetness if needed. If the chocolate feels a shade too bitter, sprinkle in an extra half‑tablespoon of powdered erythritol, blend briefly, and re‑taste. This step is crucial because personal sweetness thresholds vary, and you want the final product to be perfectly balanced.
Prepare your serving vessels. I like using 4‑inch ramekins because they give a nice edge for a slight crust while keeping the interior creamy. Lightly spray each ramekin with non‑stick cooking spray or line with parchment circles for easy removal. This small prep saves you from a messy cleanup later.
Pour the chocolate mousse into the ramekins, filling each about three‑quarters full. The surface should be smooth; give each ramekin a gentle tap on the counter to release any trapped air bubbles. This is where you’ll see the edges start pulling away—a visual cue that the mousse is ready to set.
Watch Out: Do not over‑fill the ramekins; the mousse expands slightly as it cools, and overflow will ruin the presentation.Transfer the ramekins to the refrigerator and let them chill for at least 30 minutes. The cool environment firms the mousse while preserving its silky mouthfeel. If you’re in a hurry, a quick 15‑minute blast in the freezer works, but be careful not to freeze the edges.
While the mousse sets, whip the optional topping. Using a chilled bowl, beat heavy cream (or coconut cream) with a splash of vanilla until soft peaks form. This airy cloud will sit like a fluffy crown on your chocolate throne, adding a contrasting texture that elevates every bite.
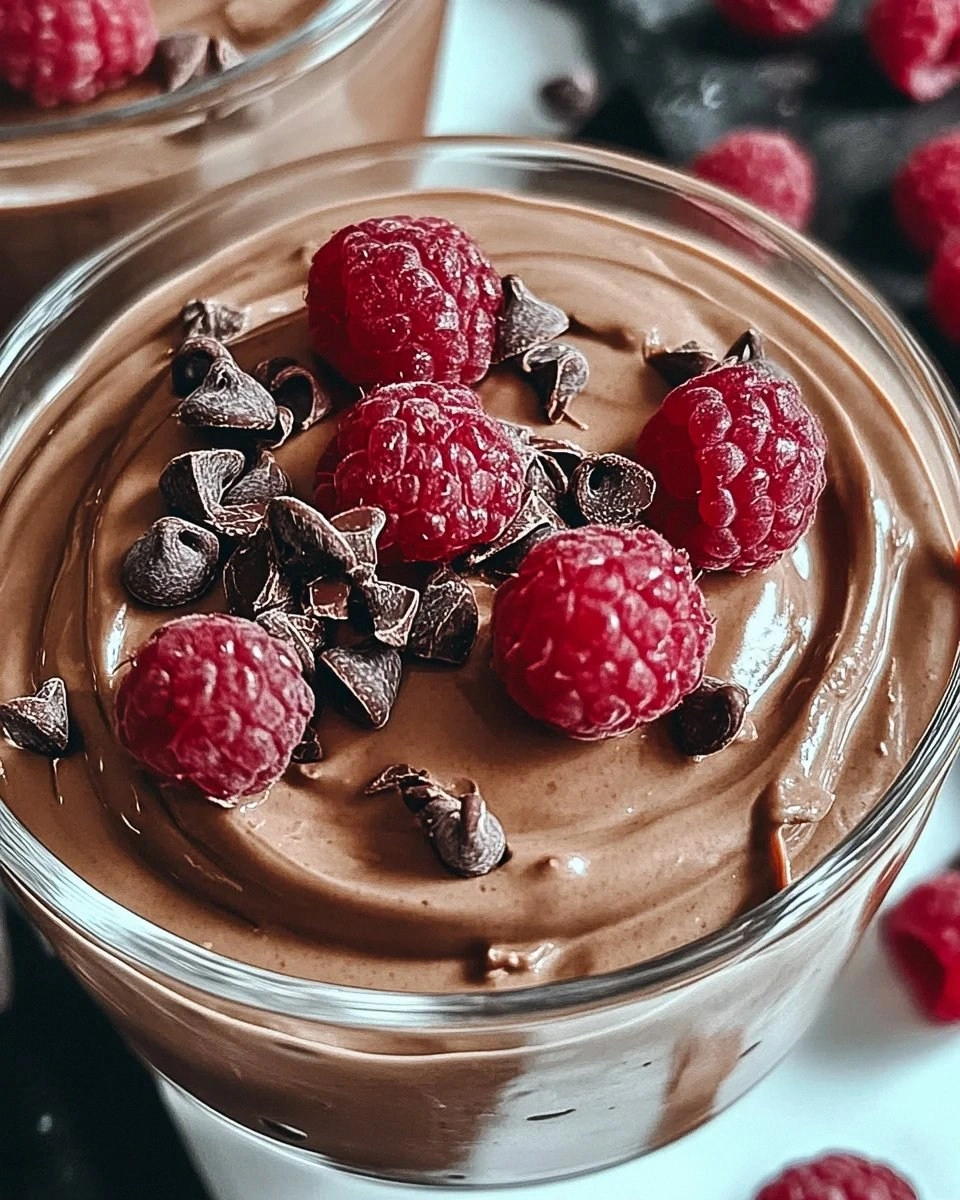
Once set, remove the ramekins from the fridge and, if desired, run a thin knife around the edge to release the mousse cleanly. Top each serving with a generous dollop of whipped cream, a dusting of cocoa, or a few fresh berries for color. The final presentation should look like a glossy, dark jewel crowned with a white cloud.
Serve immediately and watch your guests' faces light up. The first spoonful should melt on the tongue, delivering that perfect balance of rich chocolate, subtle dairy creaminess, and just‑right sweetness. And now the fun part—watch them go back for seconds, thirds, maybe even a fourth round. This is pure magic.
That's it — you did it. But hold on, I've got a few more tricks that'll take this to another level...
Insider Tricks for Flawless Results
The Temperature Rule Nobody Follows
Keep all your ingredients at the same temperature—ideally chilled. When the cottage cheese is too warm, the blender creates tiny air pockets that turn the mousse grainy. I once tried using room‑temperature cheese and ended up with a texture that reminded me of sand. The chill keeps the emulsion tight, ensuring a silk‑smooth finish every time. This hack alone can shave minutes off your prep time because you won’t need to rescue a broken texture later.
Why Your Nose Knows Best
Your sense of smell is a more reliable indicator of doneness than a timer. When the cocoa‑cottage blend starts to emit a warm, roasted chocolate scent, you know the flavors have melded perfectly. If you smell a faint “raw dairy” note, give it another 20 seconds in the blender. Trusting your nose prevents over‑processing, which can cause a watery finish. I’ve saved many a batch by listening to that aromatic cue.
The 5‑Minute Rest That Changes Everything
Before pouring the mousse into ramekins, let it sit uncovered for five minutes. This brief rest lets any tiny bubbles rise to the surface and pop, resulting in a denser, creamier final product. Skipping this step can leave you with a slightly airy mouthfeel that some might mistake for “over‑whipped.” I once rushed this step and learned the hard way that the mousse felt more like a mousse cake than a silky indulgence.
Whipped Cream Whisper
When whipping the optional topping, add a pinch of powdered erythritol and a dash of cocoa powder. This not only sweetens the cream without extra sugar but also ties the flavor back to the main mousse. Over‑whipping is a common pitfall; stop at soft peaks for a cloud that melts gracefully into the chocolate. A chilled metal bowl makes the process faster and the peaks more stable.
The Secret of the Snap
If you love a slight “snap” on the surface, sprinkle a thin layer of cocoa powder mixed with a touch of erythritol just before chilling. As the mousse sets, the cocoa layer dries just enough to create a delicate crust that cracks gently when you dig in. This contrast adds a playful textural surprise that makes the dessert feel even more indulgent. Most recipes skip this step, but it’s a game‑changer for texture enthusiasts.
Creative Twists and Variations
This recipe is a playground. Here are some of my favorite ways to switch things up:
Minty Midnight
Add ¼ teaspoon of peppermint extract to the base and garnish with a few fresh mint leaves. The cool mint cuts through the richness, making it perfect for summer evenings. Chocolate and mint are a classic duo, and this version keeps it low‑calorie while delivering that refreshing punch.
Spiced Chili Surprise
Stir in a pinch of cayenne pepper and a dash of ground cinnamon before blending. The subtle heat awakens the chocolate, while cinnamon adds warmth. This variation is a hit at holiday parties, especially when paired with a dollop of whipped cream.
Nutty Crunch
Fold in a tablespoon of finely chopped toasted almonds or hazelnuts after blending, just before pouring into ramekins. The nuts add a pleasant crunch and a buttery note that complements the silky mousse. For a nut‑free version, use toasted pumpkin seeds.
Berry Bliss
Swirl in a spoonful of raspberry puree after the mousse is blended. The tartness of the berries brightens the chocolate and creates a beautiful marbled effect. Top with fresh raspberries for an elegant presentation.
Coffee Kick
Replace half of the cocoa powder with finely ground espresso powder. This gives the dessert a deep mocha flavor that coffee lovers will adore. Serve with a side of sugar‑free coffee‑flavored whipped cream for an extra caffeine boost.
Storing and Bringing It Back to Life
Fridge Storage
Cover the ramekins tightly with plastic wrap and store them in the refrigerator for up to three days. The mousse retains its creamy texture, and the flavors continue to meld, becoming even richer. When you’re ready to serve, let them sit at room temperature for five minutes to soften slightly.
Freezer Friendly
If you need to keep it longer, freeze the mousse in airtight containers for up to one month. Thaw overnight in the fridge, then give each portion a quick stir. Adding a tiny splash of water (about a teaspoon) before reheating restores the silky consistency that can sometimes get a bit stiff after freezing.
Best Reheating Method
For a warm dessert experience, microwave a single ramekin for 15‑20 seconds on medium power. The mousse will soften without losing its structure, and the top will develop a faint sheen. Pair with a fresh drizzle of sugar‑free chocolate sauce for an extra indulgent finish.